
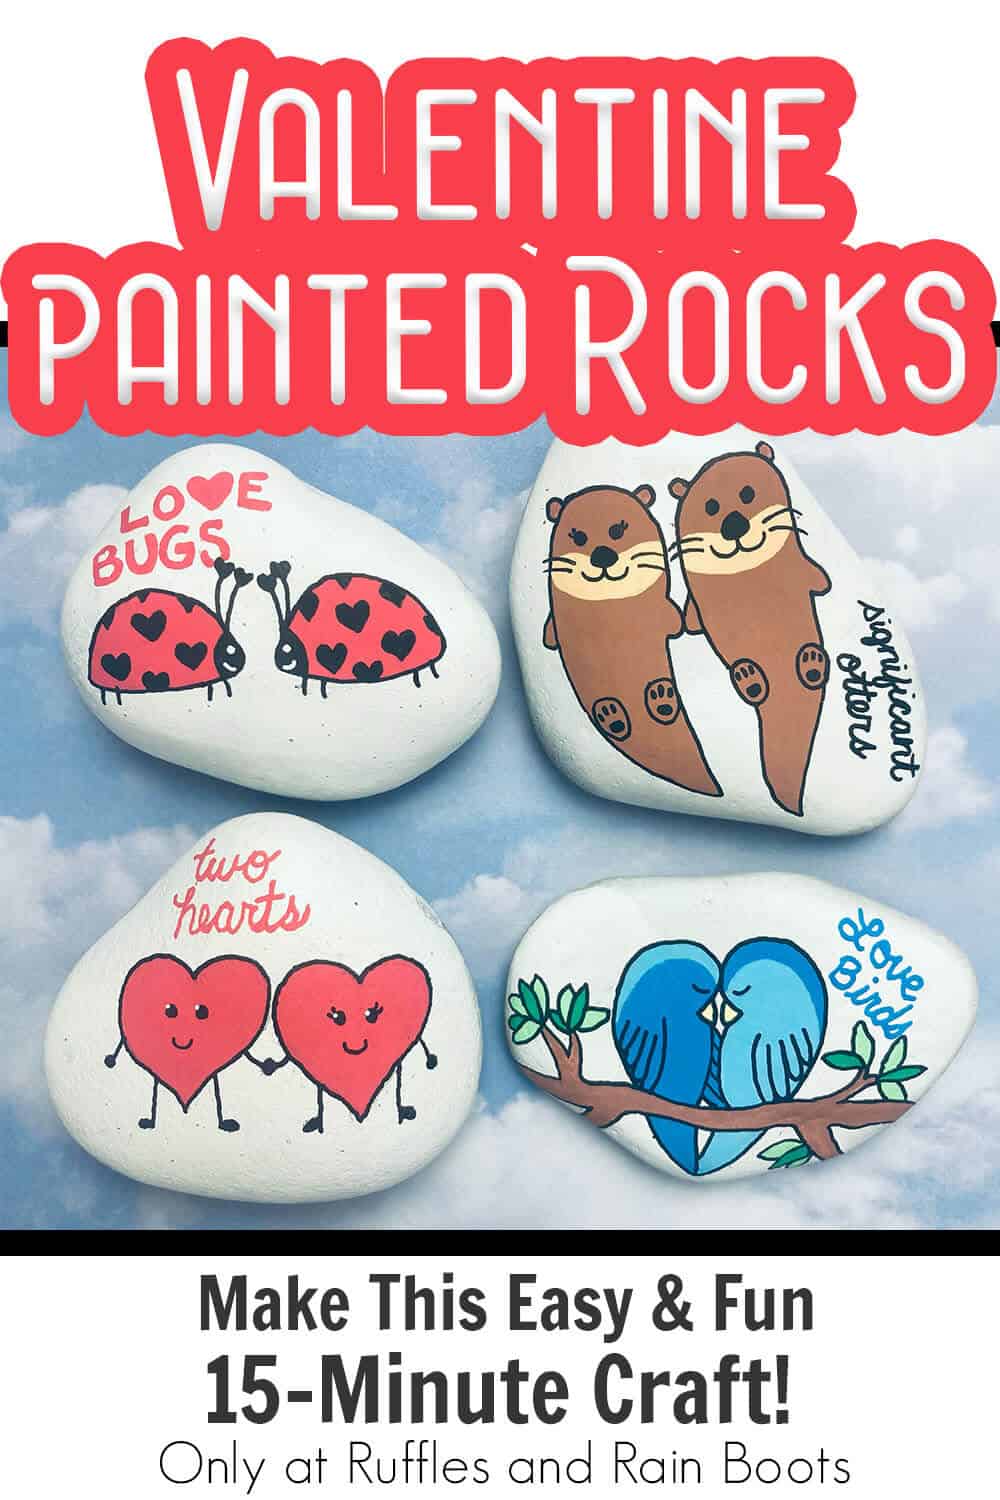
Easy Animal Valentine Rock Painting Set
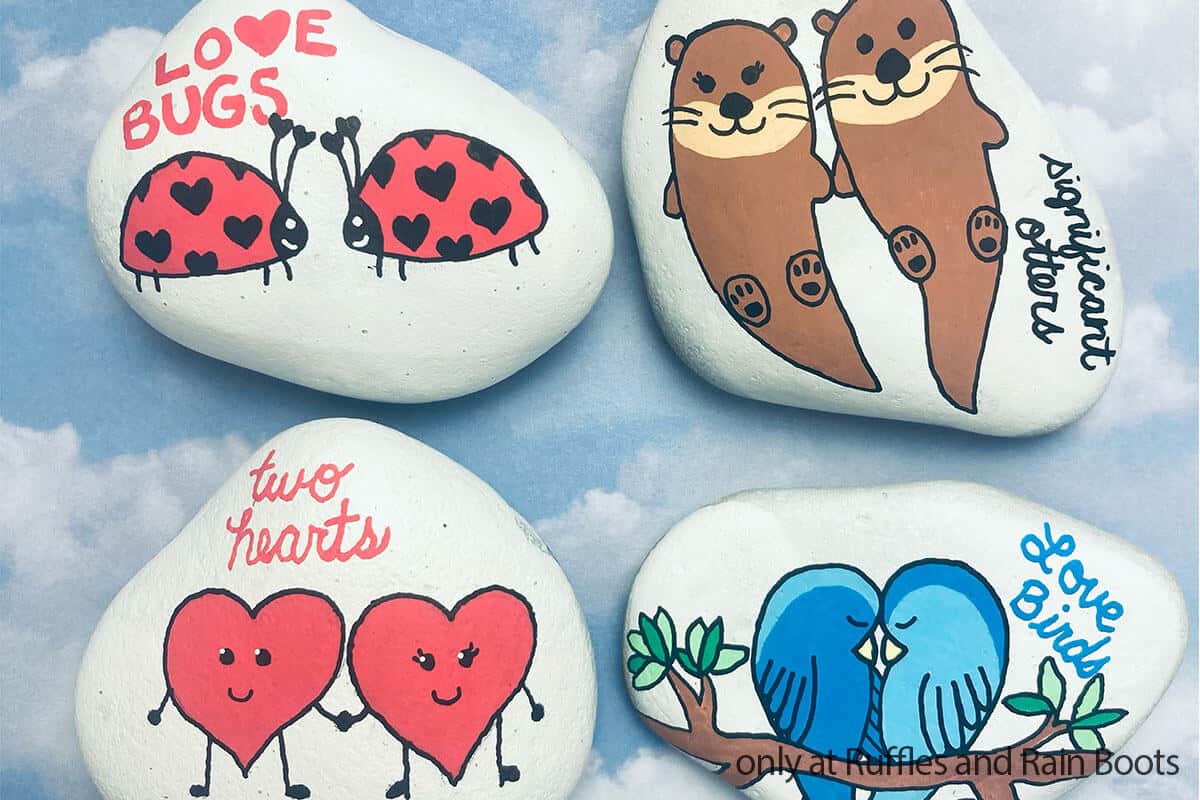
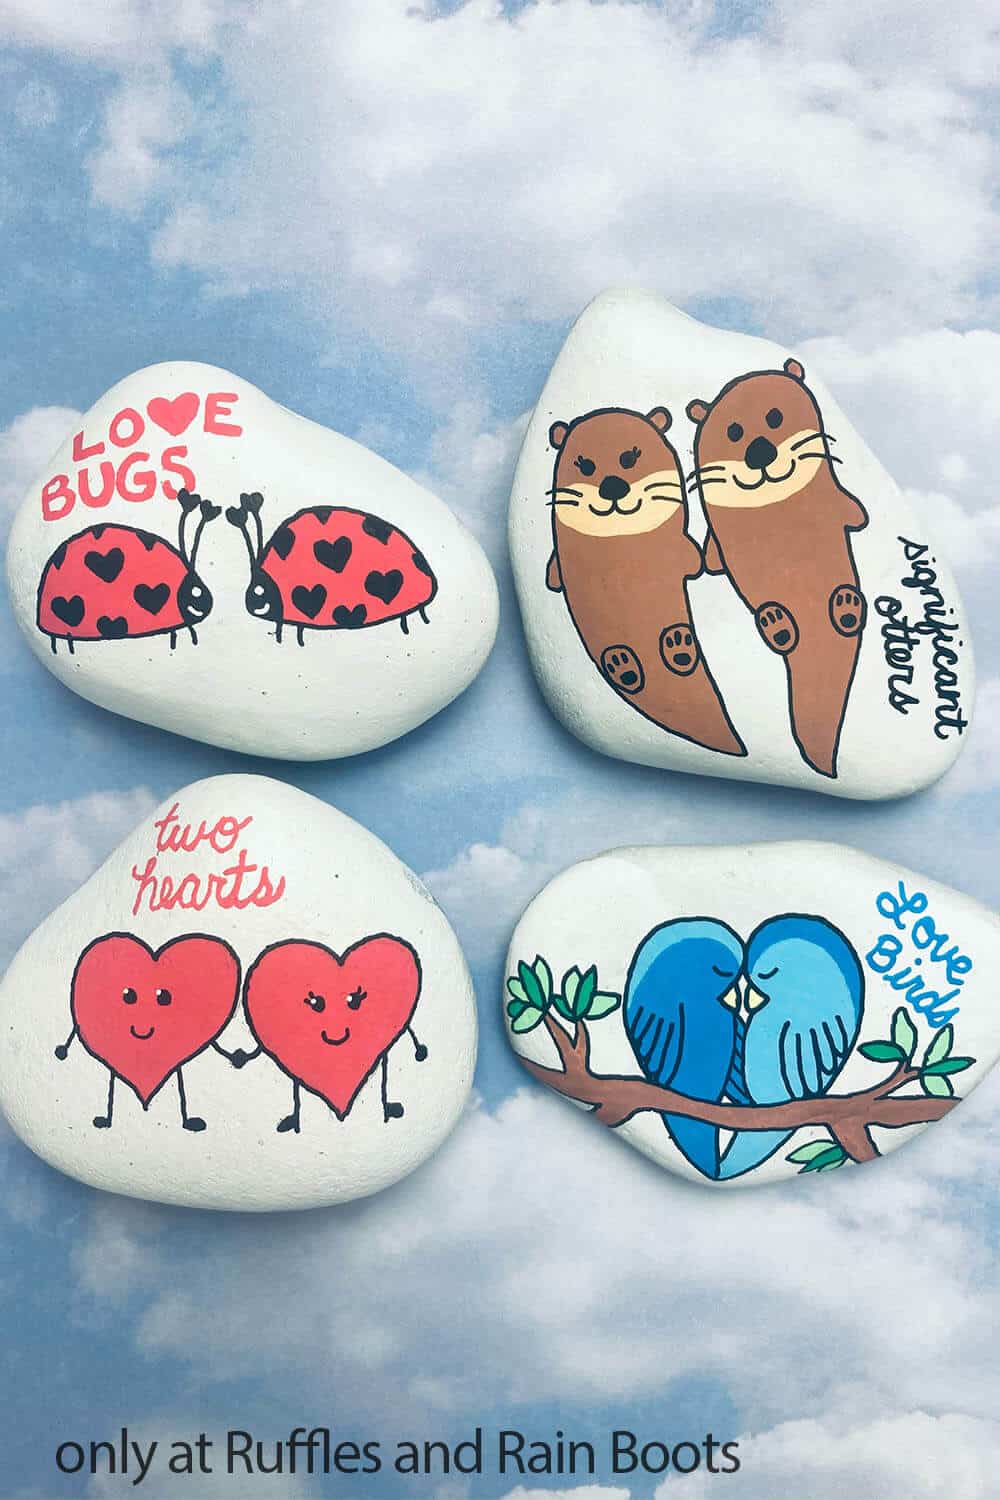
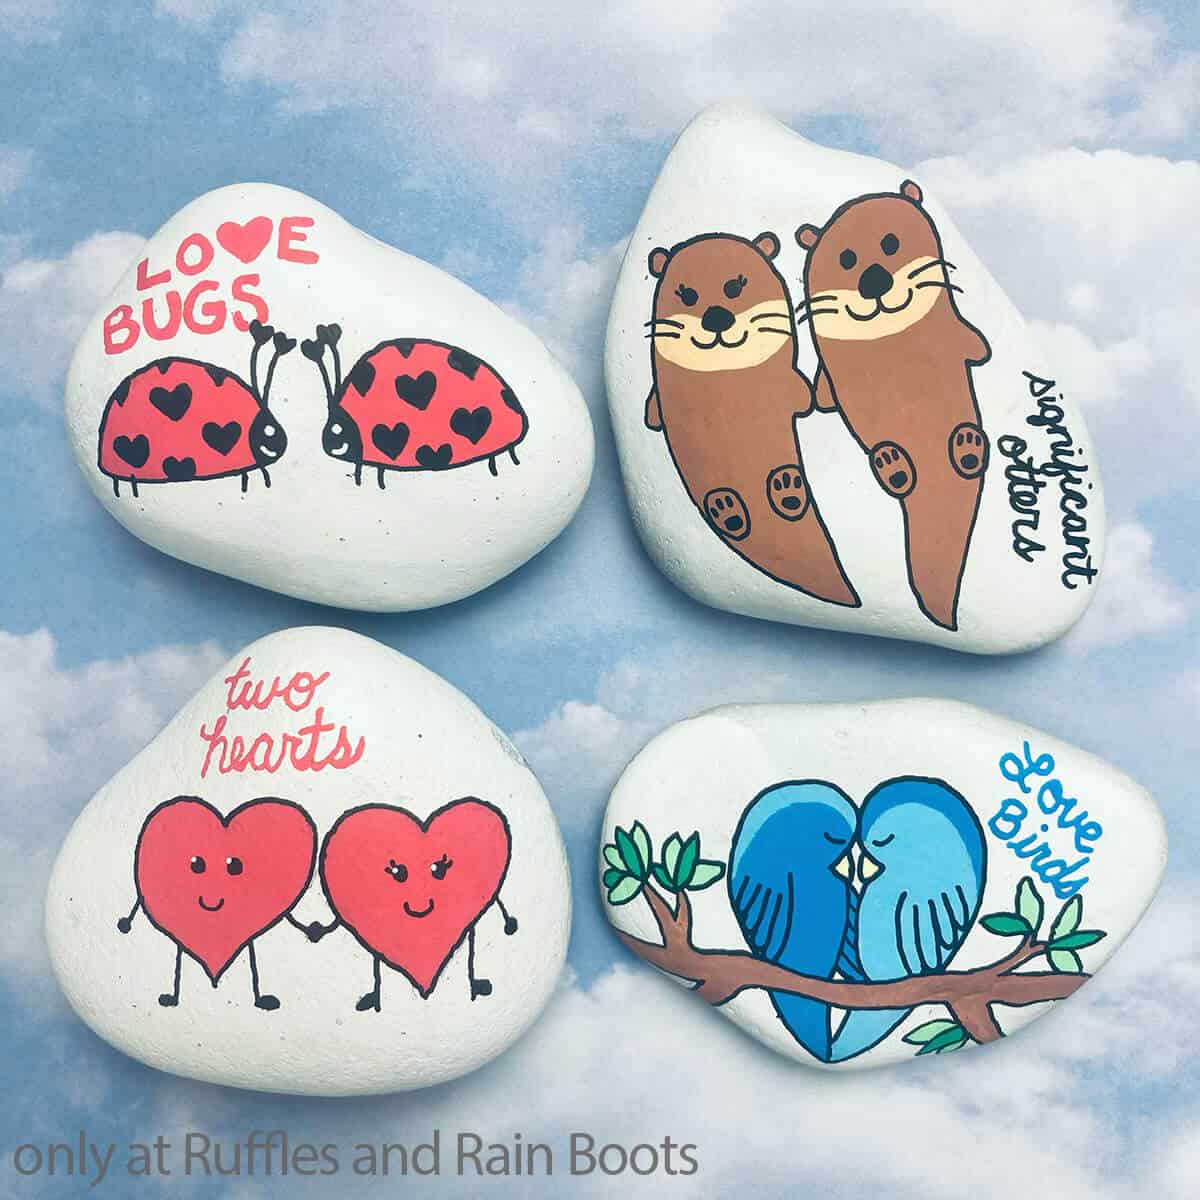
While my kiddo made super hero painted rocks, I made this fun and easy Valentine painted rock set. There are so many cute couples and they are all made from basic shapes.
You can opt to add hearts, words, or leave the cute animal rock paintings by themselves. Let’s get started.
RELATED READING: Where to Get Rocks to Paint for Rock Painting
What You'll Find On This Page
Valentine Painted Rock Set
Here at Ruffles and Rain Boots, we already had our rocks out, the day was nice, and I just needed a few minutes to make some Valentines Day painted rocks while my little one was otherwise occupied making her own DIY superhero rocks.
My efforts were well rewarded with these four absolutely adorable and wildly easy valentine painted rock ideas. If you’re ready to make some of the most fun little painted rocks you’ll make with love in mind, let’s get started.
If you’re new to rock painting, be sure to check out my tips on which rocks to buy at home improvement stores. And if you can’t start this project right now, share it or save it to your favorite rock painting ideas pin board to find easily later.
As an Amazon Associate, I can earn from qualifying purchases. There could be affiliate links within this article.
Tips to Make Painted ROcks for Valentines
- If you have trouble sourcing rocks, you can grab a package of awesome rocks ready for painting here, look at a local garden center, or even at your local landscaper’s yard.
- Before you get to painting, make sure you get your rocks clean and dry. You need your rocks to be absolutely dry before applying the paint or it may not stick.
- Acrylic paint works well, but we tend to use paint pens/markers like these here. Some different paints could require you to apply a second coat, but they will work.
- I always seal my rocks after painting them. Whether you give them a coat with a spray sealant or a generalized craft sealant like ModPodge, sealing the rocks will keep your rock art from being washed off or from fading in the sun.
More Easy Painted Rock Tutorials You Might Like
- Three Ways to Make Fox Painted Rocks – You can make three different adorable foxes super easy and fast with this fun tutorial.
- Adorable Flamingo Rocks for a Fun Summer Rock Painting Idea – I’m sharing three ways to paint the cutest flamingo rock paintings.
- DIY Galaxy Painted Rocks (Without Actually Painting) – I wanted to try making rocks without painting and it worked out SO WELL!
- Baby Yoda Rock Painting Tutorial – No matter his name, The Child is one adorable painted rock and you have no idea what he means to me, LOL!
Please Save or Share This
Your shares are how this site grows and I am sincerely grateful. Know a friend who’d like this? Please share it on Facebook or save it to your favorite Valentine crafts pin board.
How to Paint Valentine’s Day Animal Rocks
Below is my written tutorial and I hope it is clear. If you have any questions, please use the comments section below and I’ll help where I can.
Valentine Painted Rock Set

I love how easy it is to make this Valentine painted rock set. And they turned out so adorable, I'm not sure I can give them away.
Materials
- Rocks
- Acrylic Paint in Red, Blue, Brown, White and Black
- Sealant
- Primer Paint in White
Tools
- Pencil with eraser
- Paint Pens or Paint brushes
- White Paint Pen
Instructions
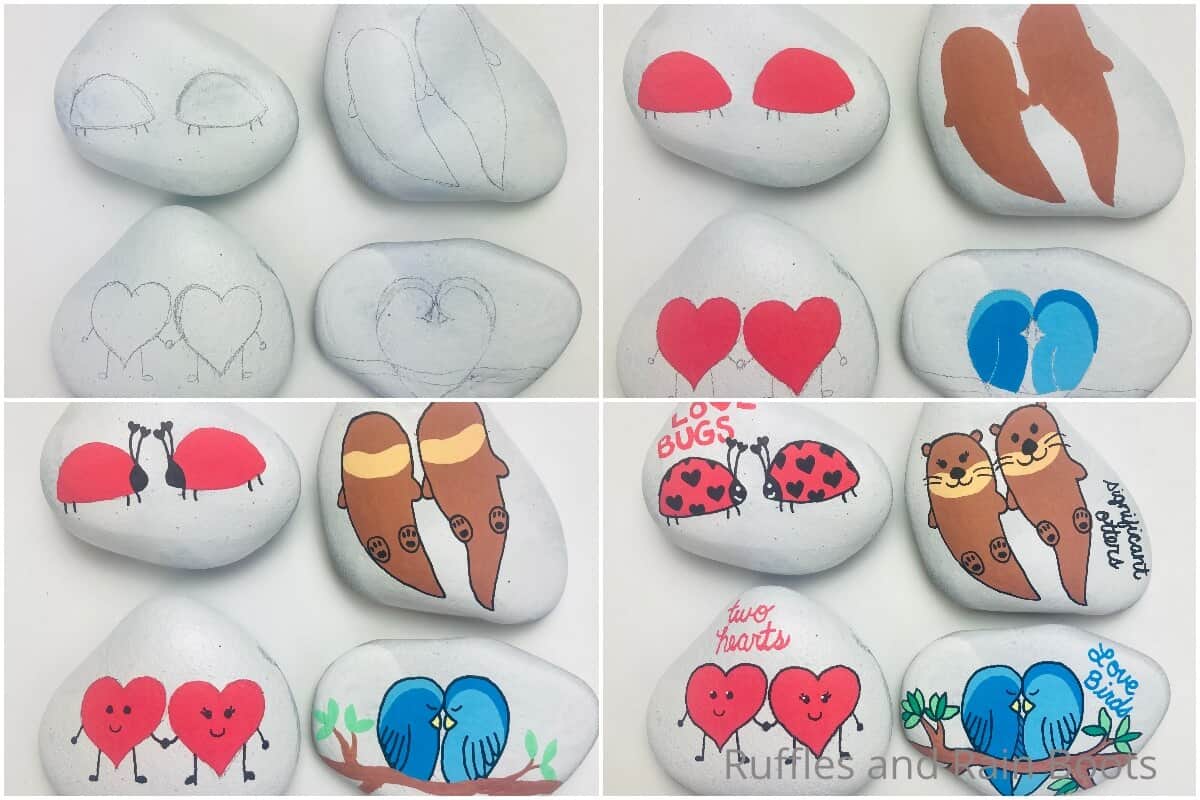
- To make the love bugs: Prime your rock with a coat of paint primer and allow it to dry completely.
- Lightly sketch the outline of the two bugs, like two crispy taco shells, which they almost were. Add two tiny sticks for front feet and matching lines for two back feet on each love bug.
- Paint both of the bodies red. Allow this paint to dry completely.
- Paint the feet black, add a small black head, and two oversized antennae on each of their heads with hearts on the tips.
- Paint little black hearts on the bodies of the love bugs for their “spots”. Allow this paint to dry completely.
- With a white paint pen, add a tiny dot on the face for each of their eyes and a tiny smile.
- Outline both of the bodies in black. Allow this coat of paint to dry completely.
- Paint “love bugs” if you have additional space to fill and allow this paint to dry completely.
- Add a coat of sealant to finish the rock.
- To make the lovey hearts, prime your rock with a coat of paint primer and allow it to dry completely.
- Lightly sketch the outline of the two hearts side by side. Add little lines for arms, legs, and feet. Be sure to connect the two arms in the middle so they are holding hands.
- Paint the hearts red. Allow this coat of paint to dry completely.
- Paint the legs, feet, arms, and hands black, then add black eyes and smiles to each of the hearts - even eyelashes if you're liking it. Allow this coat of paint to dry completely.
- Outline each of the hearts in black and paint “two hearts” to fill any remaining space.
- Add a coat of sealant to finish the rock.
- To make the love birds, prime your rock with a coat of paint primer and allow it to dry completely.
- Sketch a heart shape in the center of your rock. The two humps will be the heads of your birds cuddled together, facing each other; the pointy bottom of the heart will be the two tails pressed together. Sketch the two beaks and a line across the lower portion of the heart to be the branch the birds are sitting on.
- Paint one of the bird bodies dark blue and the other bird light blue. Allow this paint to dry completely. Go back in and paint a light blue crest on the top of the dark blue bird's head and a dark blue crest on the light blue bird's head.
- Paint each beak yellow. Allow this coat of paint to dry completely. Outline the bird in black and add short black lines for eyes and longer swooping lines to illustrate the feathers of the wings. Allow this coat of paint to dry completely.
- Paint the branch brown and add a few green leaves. Allow this coat of paint to dry completely.
- Outline the rest of the branches and leaves in black. Allow this coat of paint to dry completely.
- Paint “love birds” on the rock in any negative space. Allow this coat of paint to dry completely.
- Add a coat of sealant to finish the rock.
- To make the significant otters, prime your rock with a coat of paint primer and allow it to dry completely.
- Sketch the shapes of the two otters. I started with two elongated ovals, added a long taper at one end for the tail. Then I added two little bump-outs on each side for arms.
- Paint both of the bodies brown. Allow this coat of paint to dry completely.
- Paint a flat oval (a jelly bean shape) on the lower part of each of their faces.
- Using the black paint, outline the two lower feet on each otter, including the pads of their feet.
- Paint the outline of the two otter bodies. Allow that coat of paint to dry completely.
- Paint two little brown triangles for ears on each head, allow that coat of paint to dry and outline the ears in black.
- Paint a large black nose and a little upside down heart top for a mouth. Add whiskers and eyes, even eyelashes if you want. Allow this coat of paint to dry completely.
- Paint “significant otters” on the rock in any empty space. Allow this coat of paint to dry completely.
- Add a coat of sealant to finish the rock.

Notes
For more fun painted rock tutorials, visit Ruffles and Rain Boots!
Meet the Creator
Hi there, I’m Sarah Nenni-Daher. I’m a crafty gal and always have at least 14 projects going at once. I am a crafter, designer, DIYer, and pattern maker. I share my creations here and in the Ruffles and Rain Boots® Shop.
Here at Ruffles and Rain Boots®, you’ll find DIY gnomes, crafts, gifts, cupcakes, laser crafts, and so much more. I love sharing video tutorials over on YouTube and chatting with other crafters in my Facebook groups. We’d love to have you!