
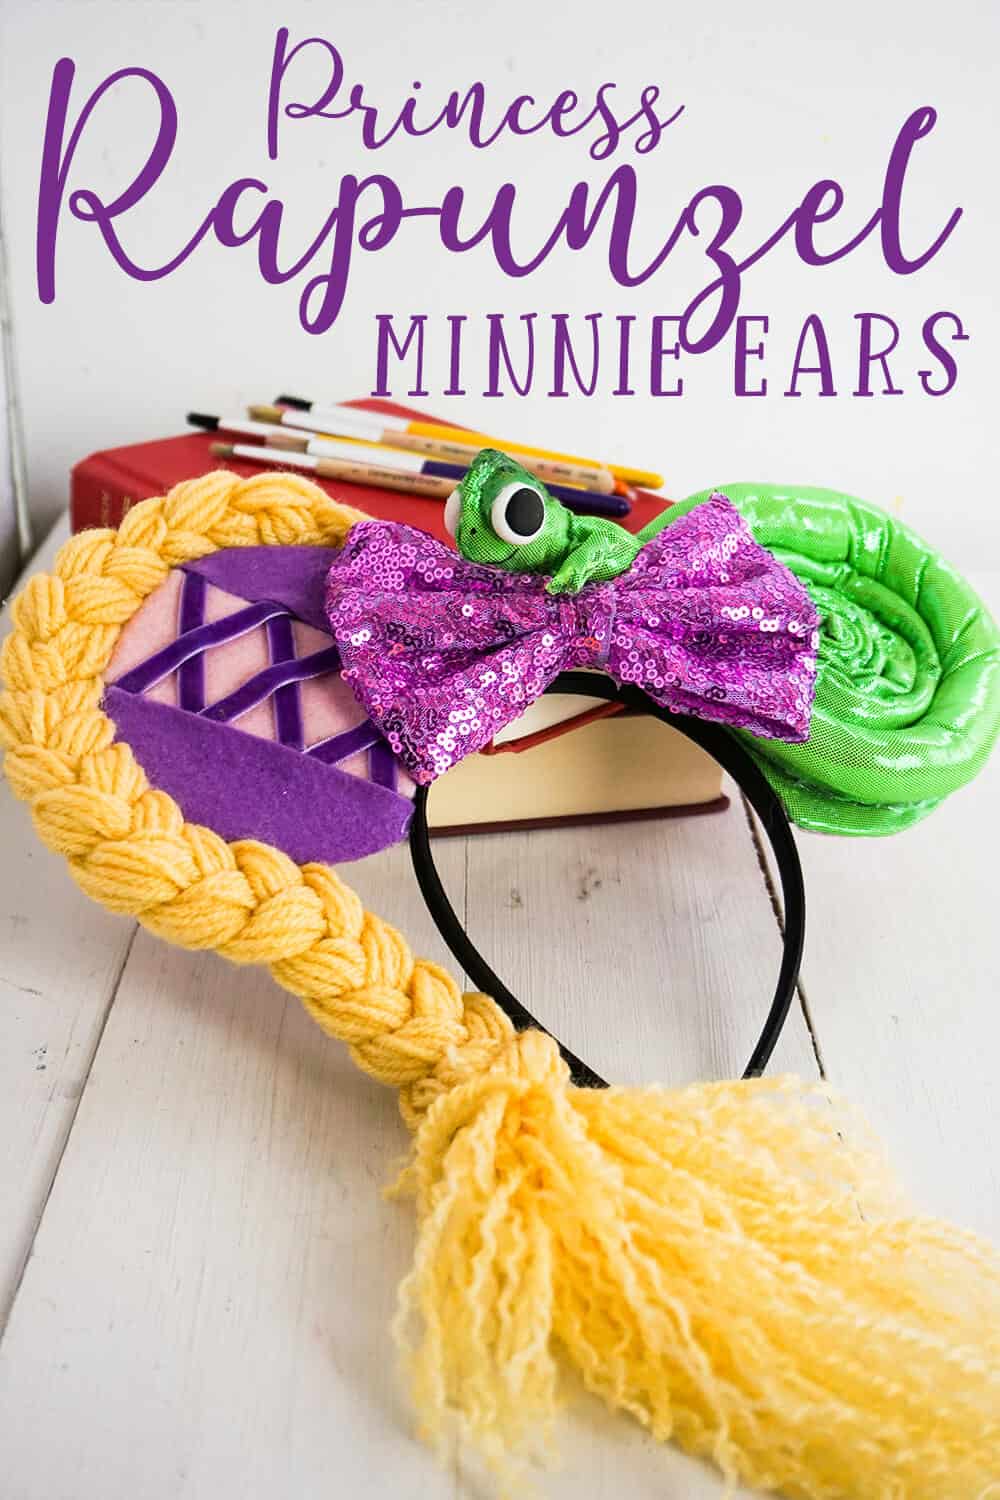
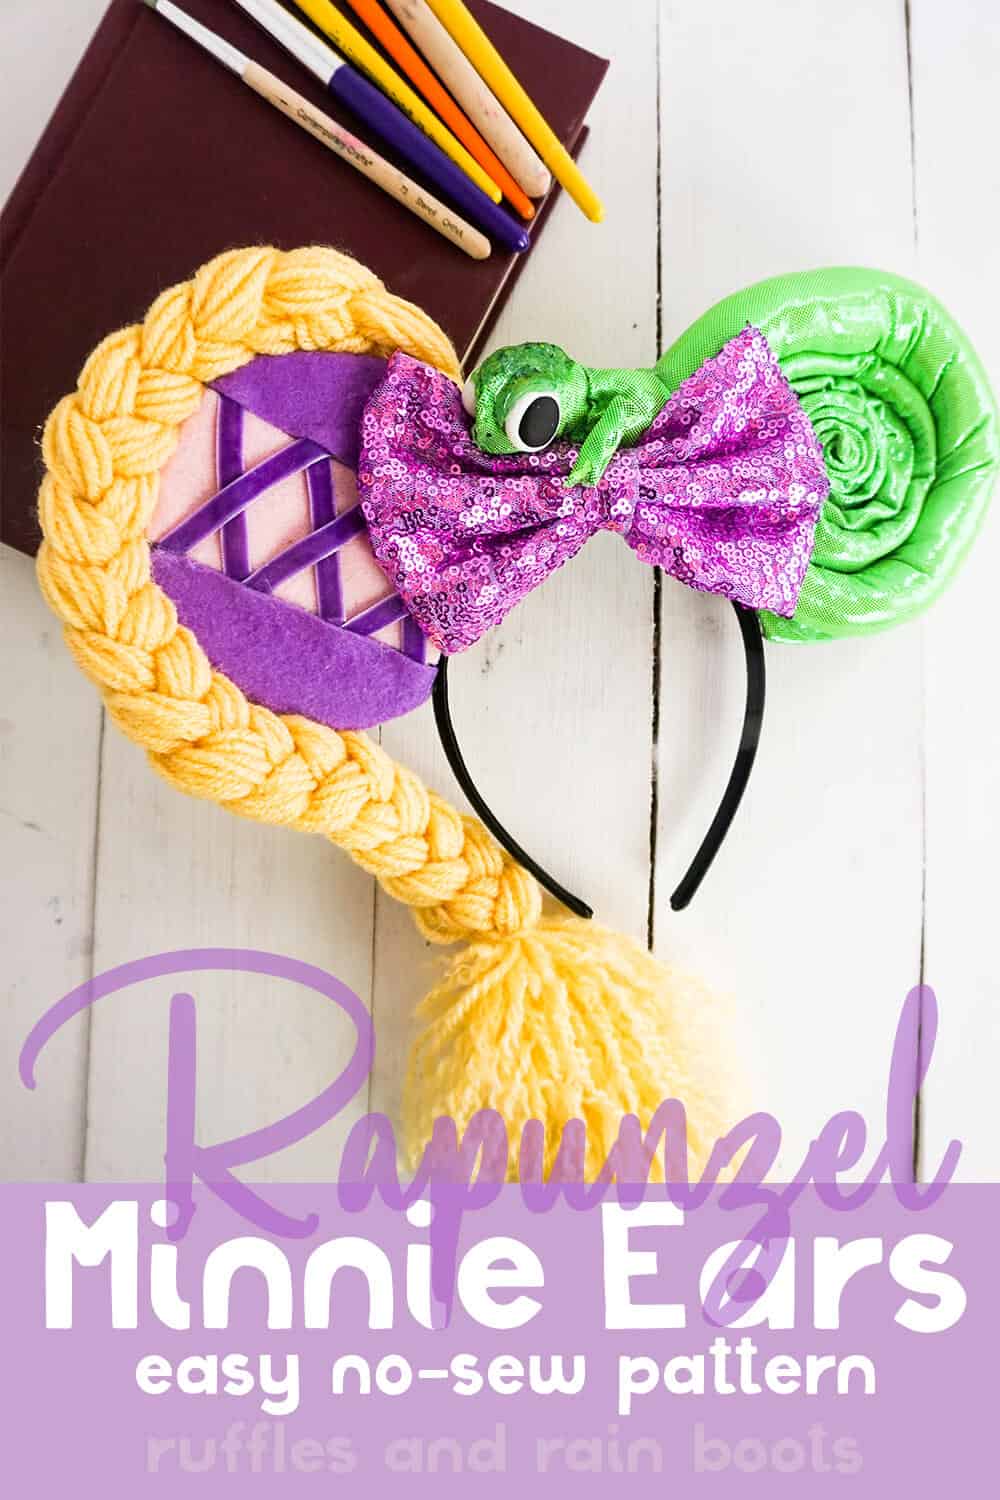
Make These No-Sew Rapunzel Minnie Ears to Wow Everyone!
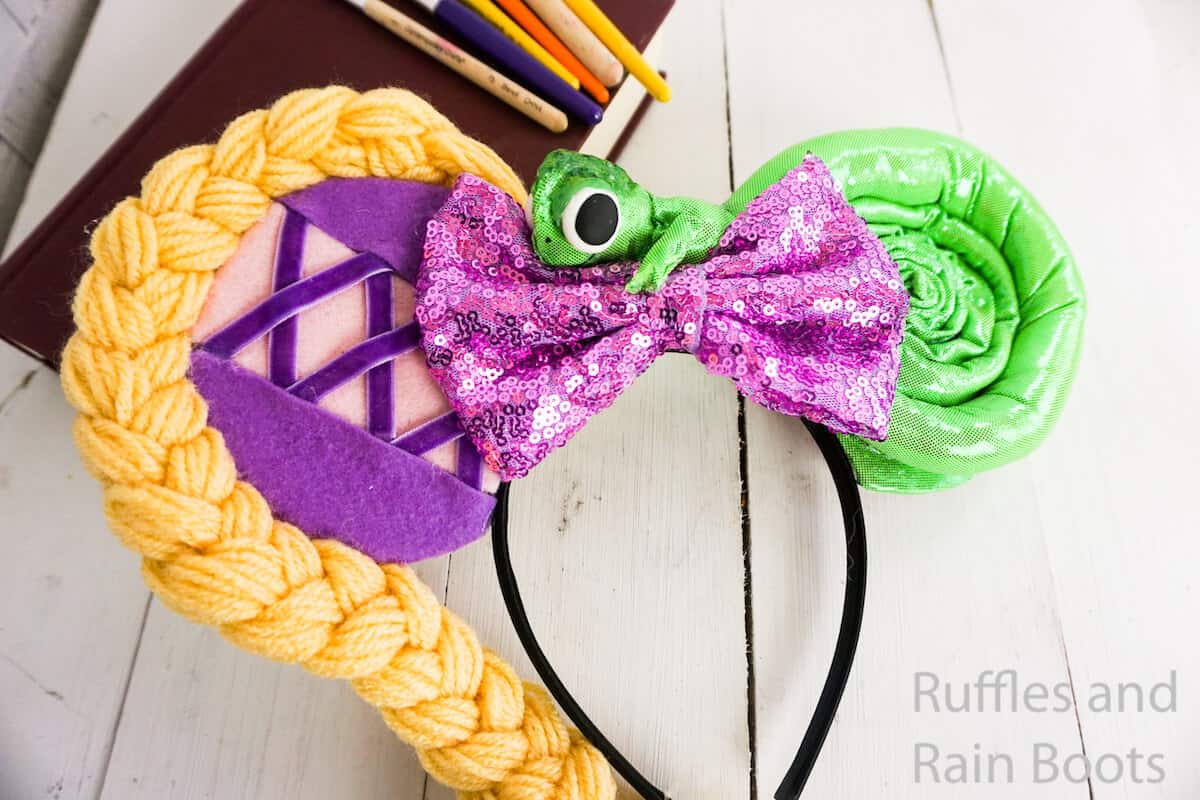
There’s a spunky sass filling Tangled’s princess that just drew me to make these Rapunzel Minnie Ears. Not only is Pascal represented, but the magic hair, too. Definitely the best Tangled Mickey ears ever.
Rapunzel Minnie Ears
Here at Ruffles and Rain Boots, we have a little secret crush on the spunky Tangled princess. She’s so full of fun and wonder that Mother Gothel could never really squash, I feel like we could be friends. You know, if she wasn’t an animated character and I wasn’t–real.
RELATED READING: ULTIMATE LIST OF DIY NO-SEW MICKEY AND MINNIE EARS FOR DISNEY
That spunk and fun is what I wanted to capture in this fun set of Rapunzel Minnie ears. They’re simple, come together quicker than you’d think, and they’re so cute I want to squee. I’d say these Tangled Mickey ears have definitely hit the spot for me. Let’s get started.
No Time to Make This Now? Pin it for Later
You’re busy, I get it. Pin this to your favorite no-sew Mickey ears board on Pinterest and it’ll be here for when you’re ready.
Tips to Make These Tangled Mickey Ears
- Pascal’s eyes are too big. Not like mine. But like actual Pascal’s. So, keep that in mind when you’re making the eyes–they need to be too big. It’s ok if they’re too big. Because they ARE too big.
- Click here to download the free printable pattern. I mean, you’re welcome to free-form Pascal, but why when there’s a convenient patter right here?!
- Think that’s a little too much yarn for all that Rapunzel hair? Nope. I’ll tell you a little trick: I turned it on its side. So, while it looks like a huge amount, it’s not. And then, to make it look even more full, I un-twisted all the strands at the bottom. I know, sneaky.
- Although my Rapunzel Minnie ears are not unbalanced at all, and I have faith you can make well-balanced Tangled Mickey ears, there’s a slight chance they might not be perfectly balanced on the first try. Don’t panic. And do not pull apart your Rapunzel Mickey ears and start over. No. Just tuck some weight behind Pascal’s tail in the center. There’s loads of room there! You could add polyfill, yarn, lead weights, whatever you need to make your Tangled Minnie ears balance. Maybe not lead weights though. That seems like overkill.
How Do I Make these DIY Minnie Ears?
I’m so glad you asked. Below is our written tutorial.
Rapunzel Minnie Ears

There's a spunky sass filling Tangled's princess that just drew me to make these Rapunzel Minnie Ears. Not only is Pascal represented, but the magic hair, too. Definitely the best Tangled Mickey ears ever.
Materials
- Free Printable Pattern
- 2 Cardboard or Foam Core Board Circles 4-inches in Diameter
- 1 Black Headband
- Small Amount of Polyfill
- Large Sequin Lavender Bow
- Light Pink Craft Felt
- Purple Craft Felt
- Purple ¼-inch Wide Ribbon
- Yellow Yarn
- Bright Green Shimmer Fabric (about an 1/8th of a yard will work)
- 2 Floral Wires
- Polymer Clay in White and Black
- Craft Paint in Green and Black
Tools
- Hot Glue Gun and Glue
- Scissors
- Exacto Knife
- Wire Cutters
- Oven
- Paintbrush
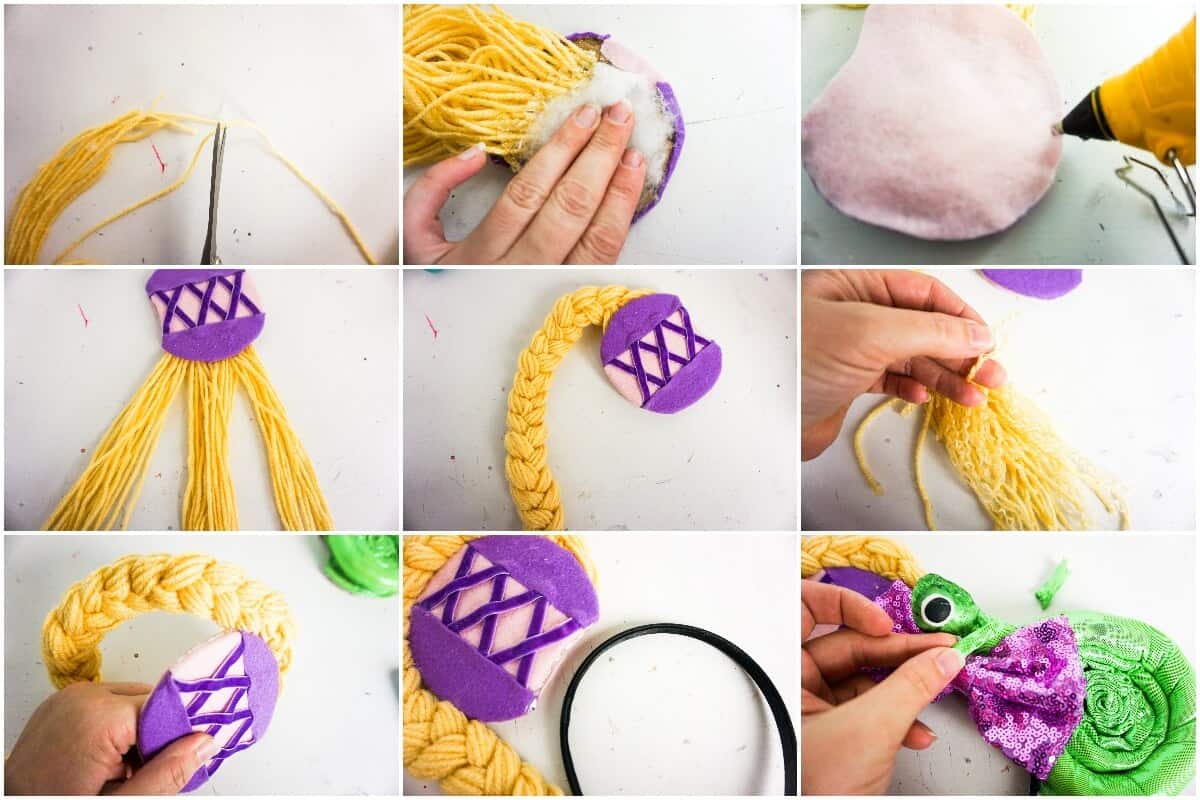
Instructions
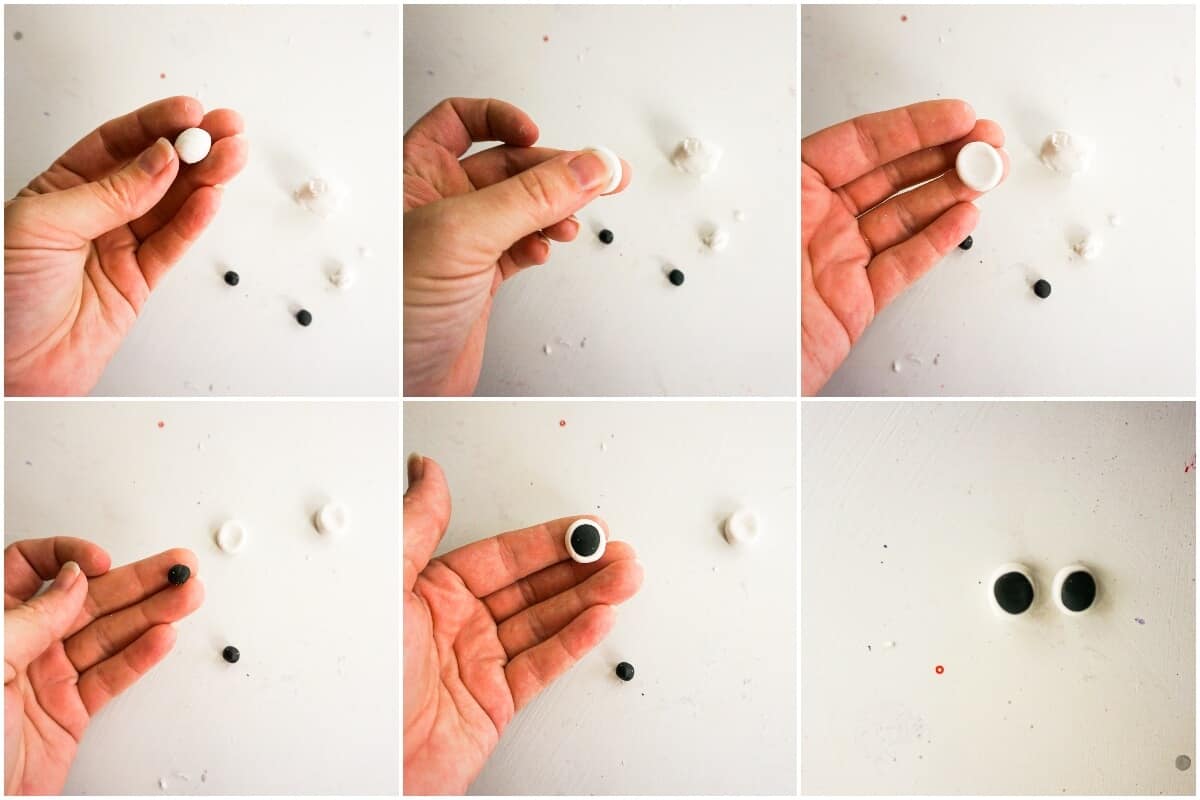
- Start by making Pascal’s eyes. Roll two half-quarter sized portions of white polymer clay into neat balls.
- With one white ball, flatten one side and press your thumb into the other side to make a large depression.
- Check the preliminary size of your eyeballs on the provided template. If your eyes seem too large, you can modify them now by removing some of the white clay. If your eyes seem to small, you can simply flatten them a little.
- Repeat with the second white ball, with the intent to make the two white portions of clay identical.
- Roll two dime-sized portions of black polymer clay into neat balls.
- Place a black polymer clay ball into a depression of the white portion of clay.
- Gently roll the eyeball in your palm until the black ball fills the depression in the white clay.
- Repeat with the other eye.
- Bake clay eyeballs per directions. Allow eyeballs to cool completely before handling.

- Lay headband over cardboard circles and sketch where you want the ears to sit on the headband.
- Cut out area of ears that is unnecessary.
- Trace the shape of each ear onto the light pink felt and cut out. Set aside one cardboard ear shape and both pink felt ear shapes.
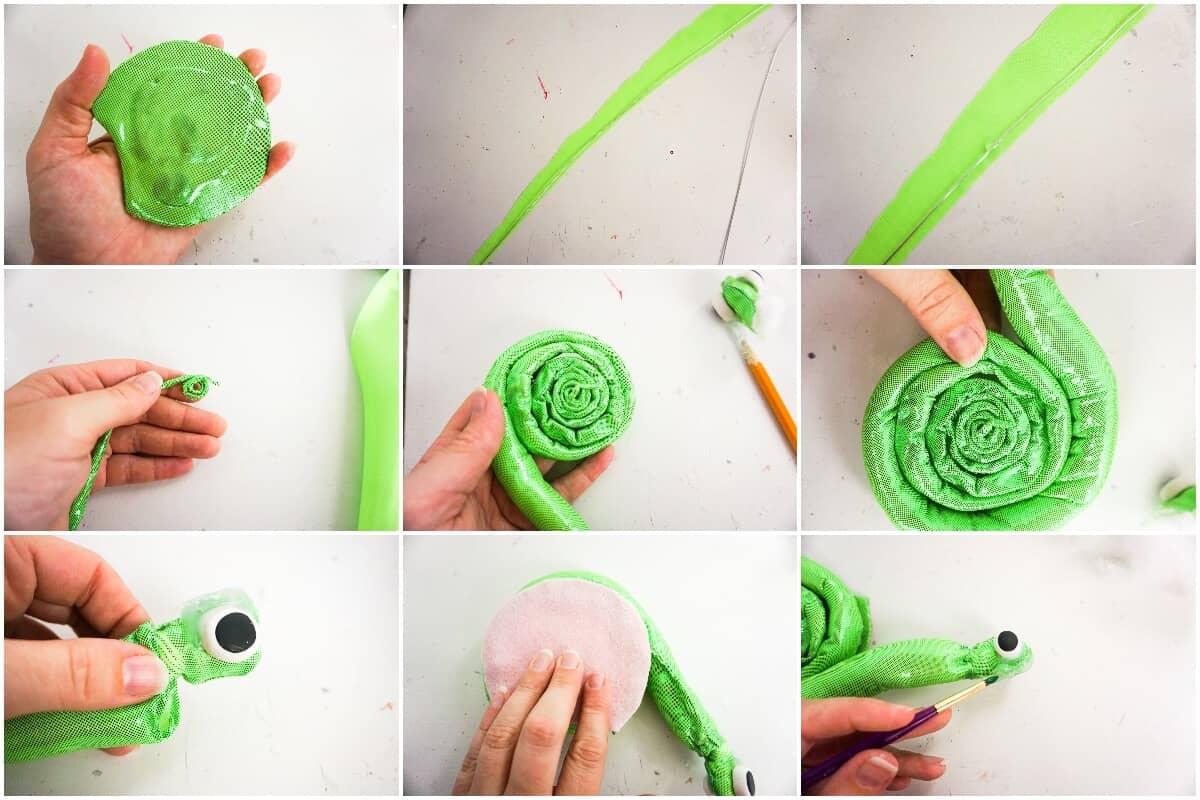
- On one of the cardboard ear shapes, trace the shape of the ear onto the back of the bright green shimmer fabric, adding about ½ inch all the way around the outside edge of the ear in extra fabric.
- Glue the cardboard ear shape face down onto the back of the green shimmer fabric.
- Affix the edges of the fabric to the cardboard by wrapping the extra around to the back and glueing the edge down, including by wrapping the bottom of the loose fabric around to the back and hot glueing it in place.
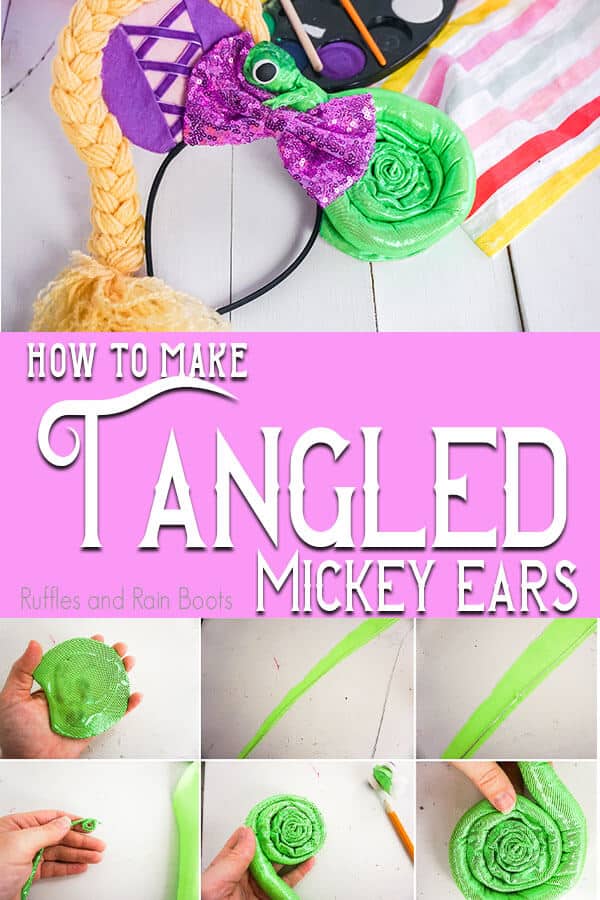
- To make Pascal’s tail, cut out a long, long cone about 4-inches wide at the start and as small as you can get in the space you have available on your bright green shimmer fabric.
- Starting at the point, fold about 6-inches of the cone in half and hot glue it in place.
- Slide a portion of your first floral wire into the sealed tail portion and hot glue in place.
- Fill portion of tail with polyfill.
- Repeat with each subsequent 6-inch portion of Pascal’s tail until the entirety of your fabric is stuffed.
- Roll the tail tightly from the point outward in a spiral, leaving 4-5 inches loose on the end. If the spiraled tail covers the majority of your green-shimmer-fabric ear, stop. If the tail does not cover the majority, add an additional section of fabric. I was able to get about 2 yards of tail length from one piece of fabric and this was adequate to cover my ear.
- Hot glue the tail in the coiled shape from the back so that no hot glue will show.
- On the opening of the body, fold the edge inward to create a hem and hot glue in place, leaving the opening open.
- Leaving the opening of the tail loose on the left side of the ear, hot glue the spiral tail in place on the ear.
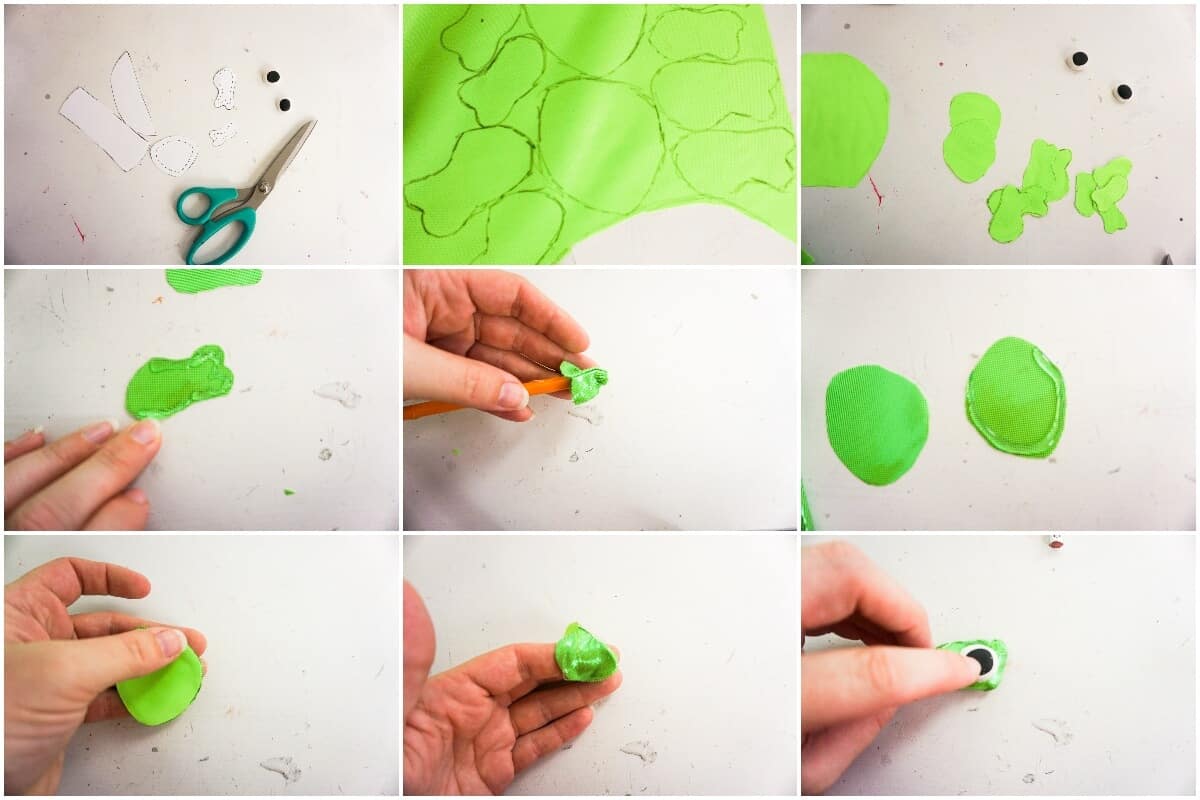
- Cut out shapes for Pascal’s body from the provided template, making sure to cut out 2 of each leg type and 2 head shapes.
- Trace the shapes for Pascal’s body on the green shimmer fabric.
- Cut out the green shimmer fabric pieces of Pascal’s body.
- Hot glue the corresponding face shapes and leg shapes face-to-face. Turn each shape right-side-out.
- Fill head with polyfill.
- Slide Pascal’s head onto the body, hot gluing the hemmed body opening to the outside of Pascal’s neck on the head.
- Hot glue Pascal’s eyes on either side of his head.
- Place a ridge of hot glue along the top of Pascal’s head and also place a ridge of hot glue above each eye.
- Add some hot glue over the top of each eye to create an eyelid.
- Allow hot glue to cool completely.
- Using the green craft paint, paint the hot glue ridge on Pascal’s head, ridges above his eyes and eyelids.
- Using the black craft paint, paint two dots below Pascal’s eyes for nostrils and a smile below that. Set Pascal aside.
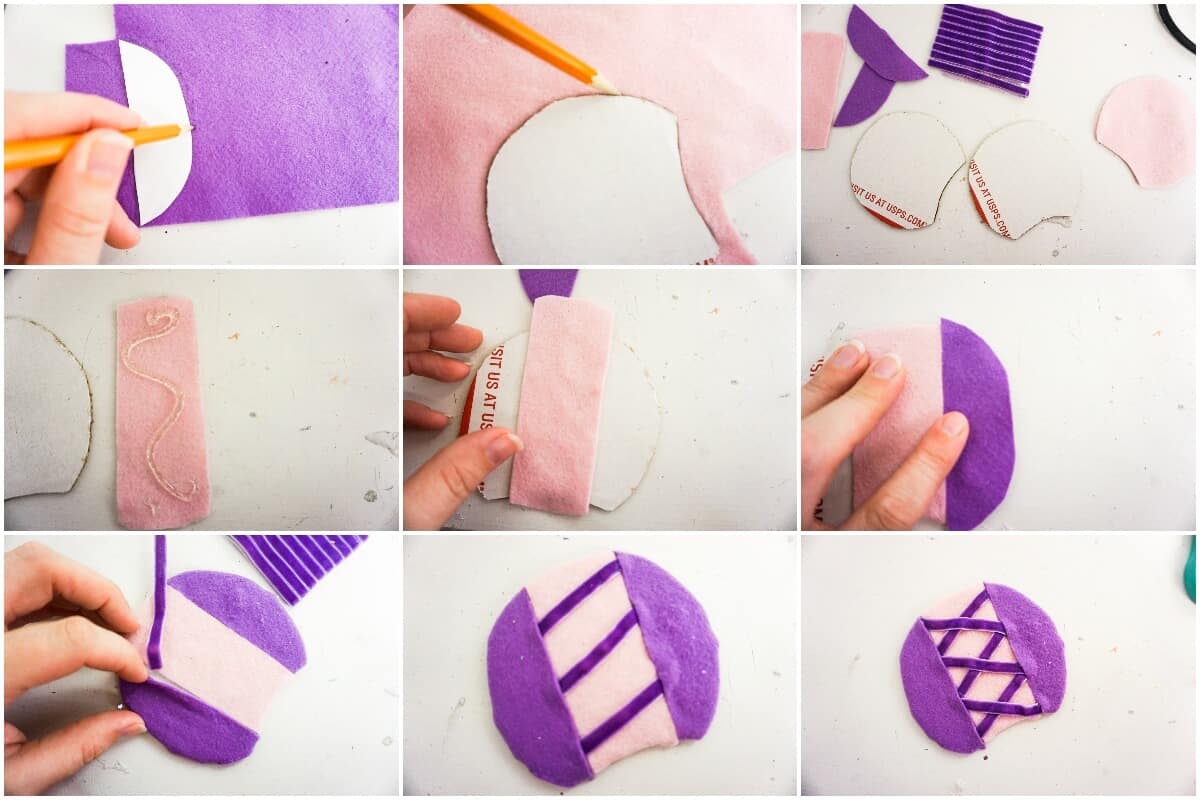
- To make Rapunzel’s dress ear, cut out the dress shapes from the provided template.
- Place the center shape on light pink craft felt and trace.
- Place the two outside shapes on purple craft felt and trace.
- Cut out shapes.
- Affix the three shapes to the cardboard ear, leaving the edges of the felt pieces unglued where the felt pieces meet.
- Cut 6 strips of purple ribbon about ¼-inch longer than the center pink felt shape.
- Tuck about ⅛-inch of purple ribbon under the purple edge of the purple felt, laying the ribbon diagonally across the pink felt and tucking the other side of the purple ribbon under the other purple felt shape edge. Hot glue in place.
- Repeat with all portions of ribbon, creating a laced-look.
- Cut 30-40 strips of yellow yarn about 2-feet long.
- Bundle the yellow yarn strips together and hot glue one end (as flat as possible) onto the dress ear on the inside top.
- Separate the yellow yarn strands into 3 equal portions and braid them together loosely.
- Tie the braid about 6-inches from the ends with a small length of yellow yarn.
- Affix the two pink felt ear cut outs onto the back of each ear, trimming the edges as desired. Take care to fully cover the area where the yarn is affixed to the back of the dress ear.
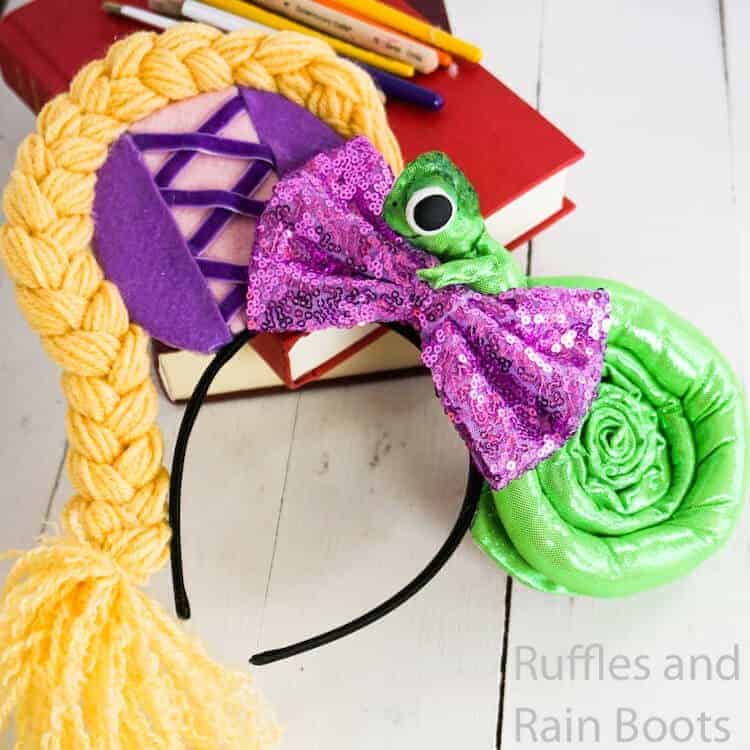
- Hot glue the braid standing on its side over the top of the dress ear to dangled down loosely on the side.
- Un-twist each yarn thread below the tie-off for the braid to make the “hair” look more fluffy.
- Hot glue the two ears in place on the headband, taking care to hold them firmly until the hot glue is completely cooled.
- Hot glue the large sequin lavender bow in place between the two ears.
- Position Pascal’s body to be coming up behind the bow so he can peek over it, hot glueing him in place, if necessary.
- Affix Pascal’s legs to his body with hot glue, with one or two legs resting over the top of the bow.
- Enjoy!
Creativity, Delivered
Would you like inspiration delivered right to you each week? Sign up for the once-weekly Ruffles and Rain Boots newsletter and you’ll get that and more! Get access to the exclusive libraries full of free SVGs, hand lettering practice, and so much more.
More No-Sew Mickey ears You Might Like
- Ultimate List of DIY No-Sew Mickey and Minnie Ears for Disney – If you need some ideas for making your own Mickey ears for Disney, look no further. Every character is has a little something–and we update this list all the time, so be sure to bookmark the page.
- Ariel Mickey Ears – Hers’s another stunning DIY Disney Princess Mickey ears tutorial that just want to be where the people are!
- The Best Snow White Mickey Ears – Reach back to the original Disney Princess and make (or buy) a stunning set of Snow White Mickey ears for your Disney Princess!
Please Save This to Pinterest
Your shares are how this site grows and I am sincerely grateful. Know a friend who’d like this? Please share it on Facebook or save it to your favorite DIY Mickey ears board on Pinterest.
Meet the Creator
Hi there, I’m Sarah Nenni-Daher. I’m a crafty gal and always have at least 14 projects going at once. I am a crafter, designer, DIYer, and pattern maker. I share my creations here and in the Ruffles and Rain Boots® Shop.
Here at Ruffles and Rain Boots®, you’ll find DIY gnomes, crafts, gifts, cupcakes, laser crafts, and so much more. I love sharing video tutorials over on YouTube and chatting with other crafters in my Facebook groups. We’d love to have you!