
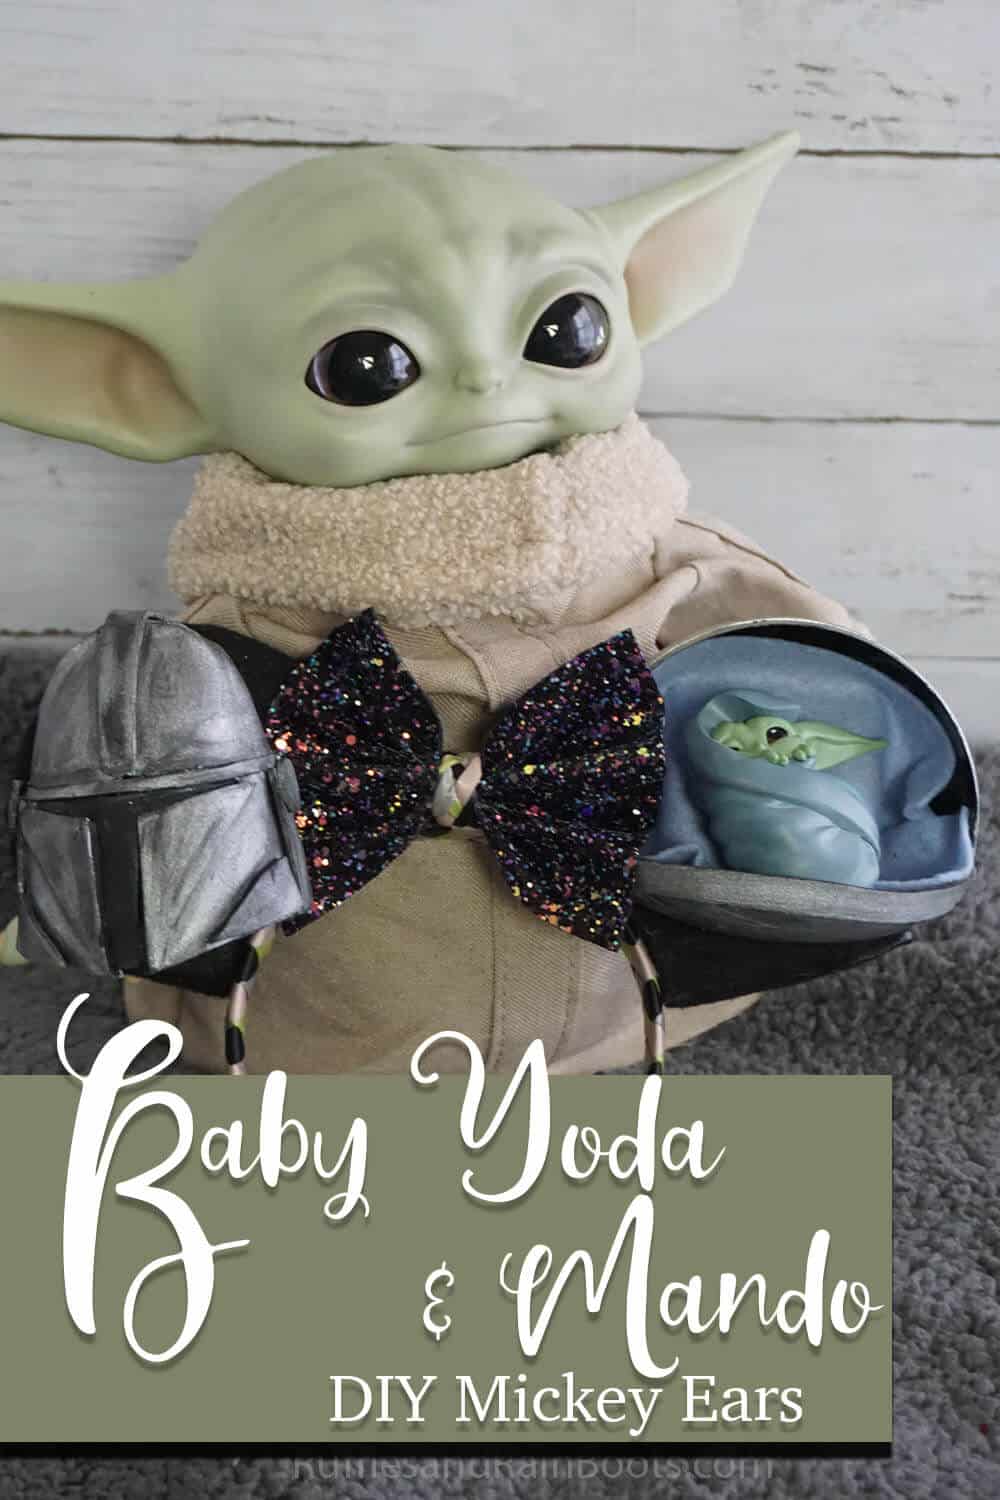
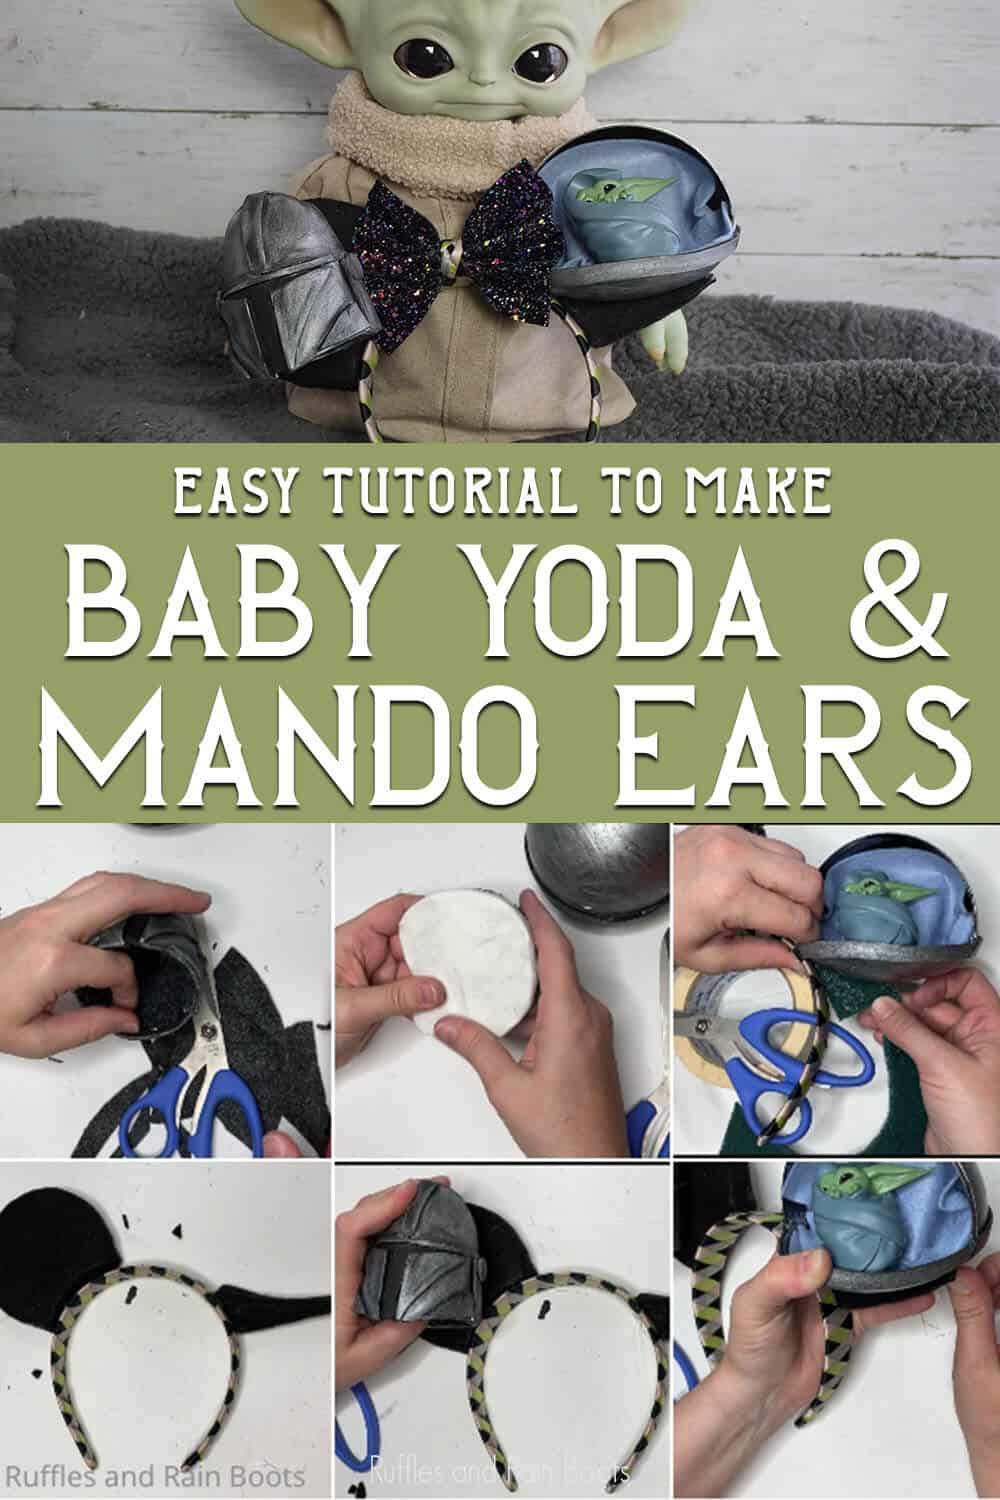
Make These Epic Mandalorian and Baby Yoda Mickey Ears for Your Disney Vacation!
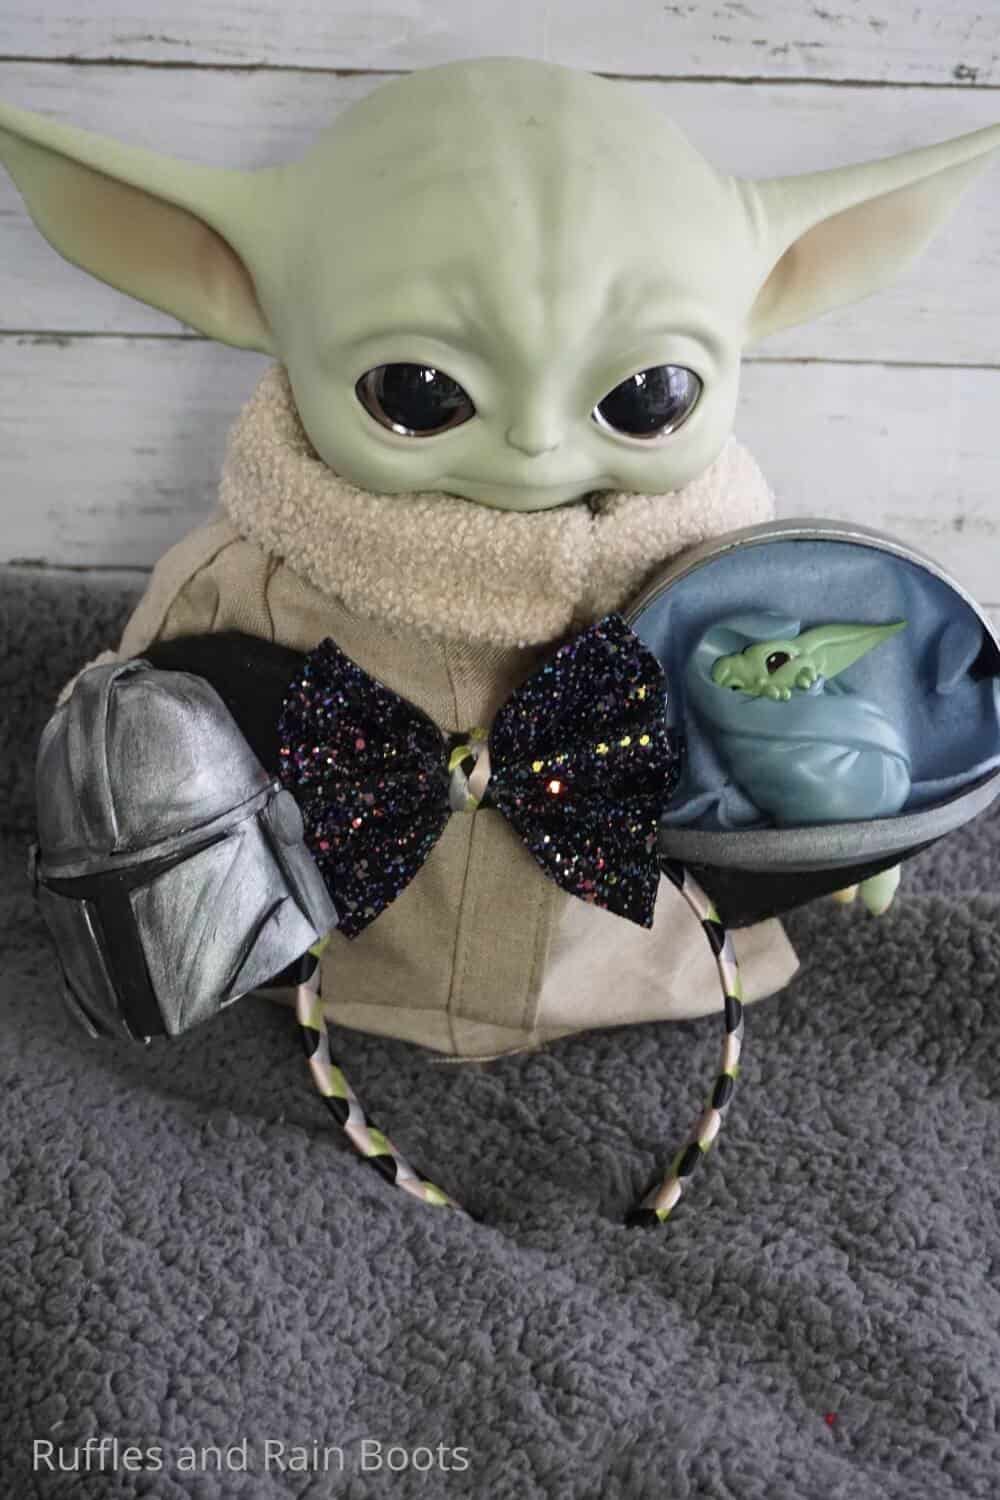
This set of Mandalorian and Baby Yoda Mickey ears are the most over-the-top Mickey ears I’ve made yet–they’re super detailed and surprisingly easy!
Mandalorian and Baby Yoda Mickey Ears
Here at Ruffles and Rain Boots, we are obsessed with The Mandalorian. And coming up with craft ideas for Baby Yoda and Mando is not hard AT ALL. But the deal is, not all of them are super realistic. Until they are. Then it’s like a fire is set under me and I have to make it–and this time it was an EPIC set of Mickey ears featuring Baby Yoda and the Mandalorian.
RELATED READING: AWESOME AHSOKA MICKEY EARS
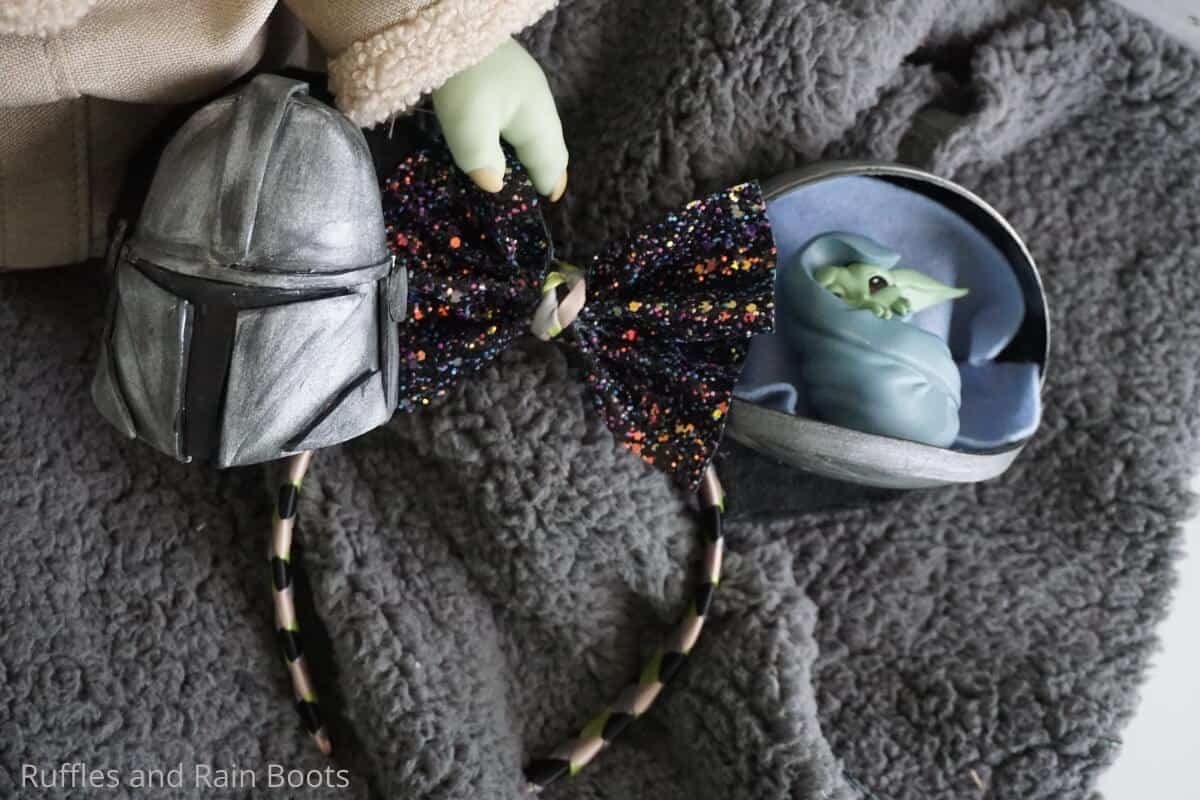
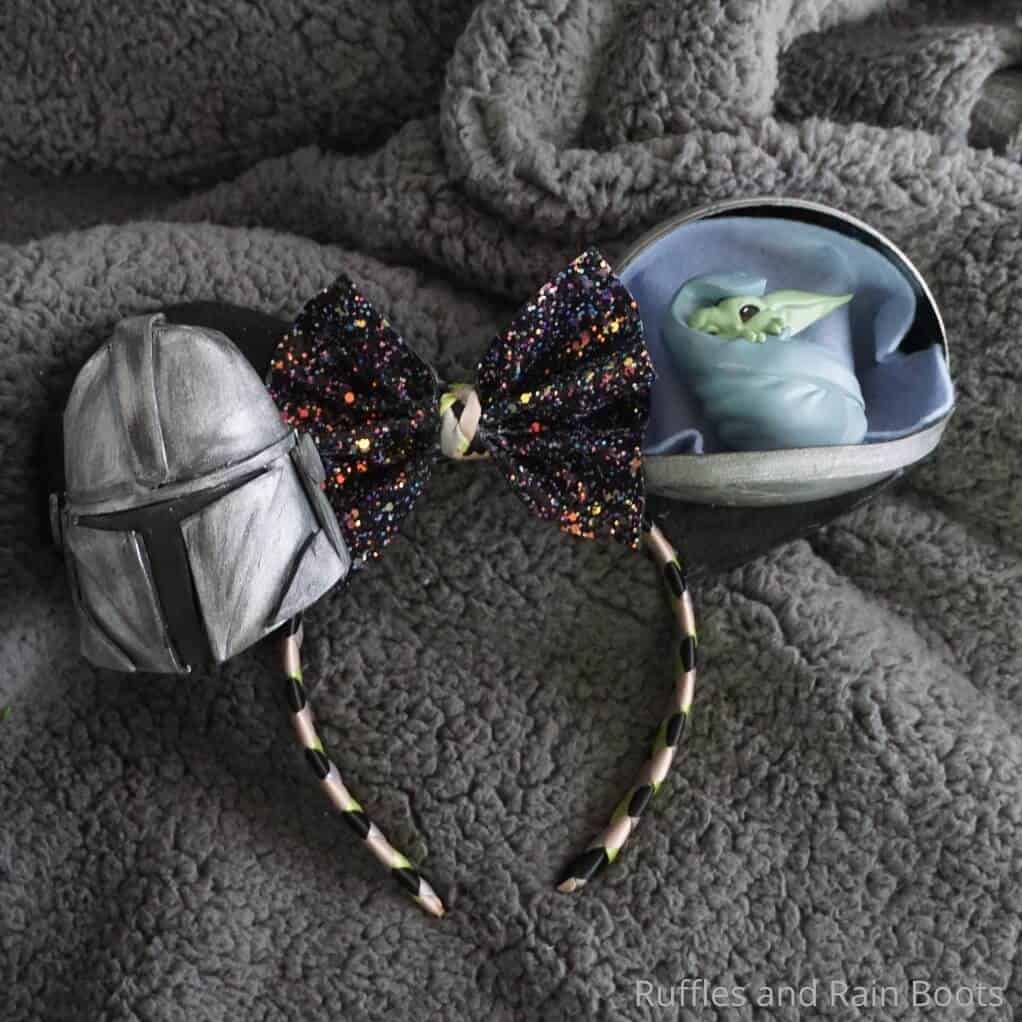
Not only was I able to get a 3D Mandalorian helmet ornament on one ear, but I was totally able to make a second ear that was equally cool with the whole baby cradle. I mean–two FREAKING AWESOME things in one. How cool is that?! If you’re ready to make an epic set of Mandalorian and Baby Yoda Mickey ears, let’s get started.
No Time to Make This Now? Pin it for Later
You’re busy, I get it. Pin this to your favorite easy Mickey ears ideas board on Pinterest and it’ll be here for when you’re ready.
As an Amazon Associate, I can earn from qualifying purchases.
Tips to Make Mandalorian Mickey Ears
- Start by grabbing the free pattern here to make the Mandalorian helmet. It’s both a quick pattern you can cut by hand–or it’s also an SVG for the Cricut or Silhouette. So it’s super convenient.
- The next priority is to grab whichever of the Baby Yoda figurines you want inside your cradle. I mean, for real…these Baby Yoda Mickey ears are perfect–but they’re customizable too! I chose to use the Baby Yoda in a blankie figurine because it was so cute. But there are several out there–just get something between 2 and 3 inches tall.
- Definitely plan on watching the video, if you can’t follow the directions. Even if you can follow…it’s probably a good idea to watch the video, just so you don’t have try to muddle through my directions. It’ll make so much more sense if you watch it.
- Keep in mind that I went kind of overboard on these Mandalorian Mickey ears. They’re super over the top, since I had some time on my hands. I even did a braided ribbon cover over the headband–but that’s not required at all. Having fun making Mickey ears is the ONLY way to go. Have fun–even if that means making these a little less crazy-cakes for yourself!
How Do I Make Mandalorian and Baby Yoda Mickey Ears?
I’m so glad you asked. Below is our written tutorial.
Mandalorian and Baby Yoda Mickey Ears

I can't tell you how awesome these Mandalorian and Baby Yoda Mickey ears are in person--the photos can't do them justice. I can't wait to wear them to Disney!
Materials
- Mandalorian Helmet Ornament Pattern
- Baby Yoda Figurine
- 1/2 of a Plastic Disc Fillable Ornament
- Silver Acrylic Paint
- Black Acrylic Paint
- Black Craft Foam or EVA
- 2 Thick Green Scrubbies (I got mine at the Dollar Store)
- 1 1-inch Headband
- Green Ribbon
- Black Ribbon
- Silver Ribbon
- Light Beige Ribbon
- Black Craft Felt
- 1 Disposable Plastic Wine Glass (I got mine at the Dollar Store)
- Polymer Clay (color doesn't matter)
- 6-inch Black/Galaxy Canvas Glitter Ribbon (the kind on the spool at the craft store)
- Blue Craft Felt Scraps
- 1/2 of a Plastic Fillable Globe Ornament
Tools
- Scissors
- Hot Glue Gun & Glue
- E6000 Glue
- Paintbrushes
- Cricut Cutting Machine (Maker or Explore Air 2), optional
- Oven
- Hand Saw or Scroll Saw (or similar)
- Sandpaper
Instructions
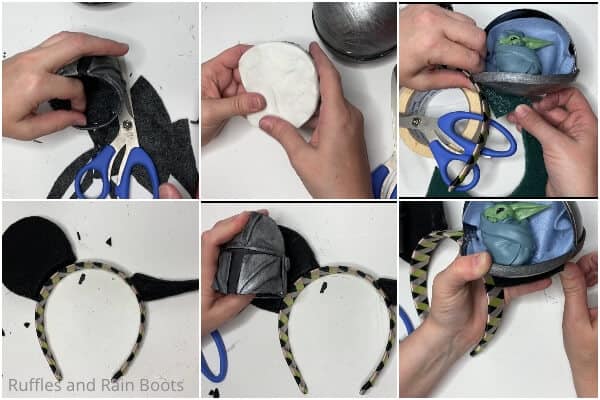
- Start by cutting off the bottom 1/3 to 1/2 of the globe ornament to form the dome on the cradle. I did this cut with my hand saw, but a friend swears by her scroll saw. Lightly sand the exterior of both the cut off dome and the disc ornament. Using the E6000, glue this dome onto the back half of the disc ornament half.
- Once the glue has dried, hot glue a 1/4-inch wide piece of craft foam around the middle of the cradle to hide the join of the two ornaments and add visual texture.
- Paint the entire cradle black, then allow this coat of paint to dry. Once dry, dry brush the cradle with silver paint.
- Using 3-4 small triangles about 1-inch tall glued together, made from the scrubbie, build a stand for the Baby Yoda figurine to tuck into the cradle. Hot glue this in place then cover loosely with the blue craft felt.
- Hot glue the Baby Yoda Figurine in place inside the cradle and set the cradle aside.
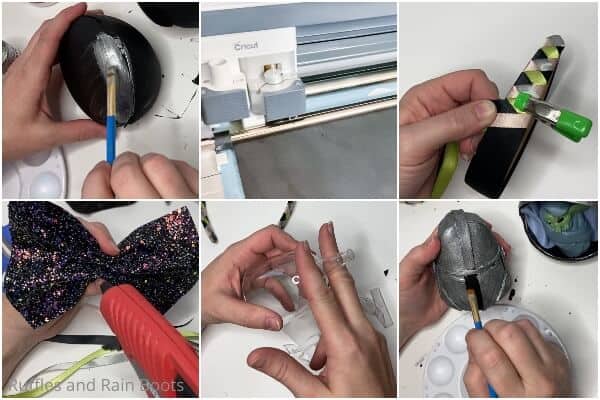
- To make the Mandalorian helmet, cut off the stem of the plastic wine glass. Don't worry about cracking the glass or anything--it will be completely hidden from view. You just need the form.
- Cut out the pieces of the Mandalorian helmet pattern, as indicated on the PDF. Using hot glue, affix the pieces of the helmet as indicated on the pattern. It may be helpful to use a heat gun to soften the foam a little to make the curves more gentle. Generally, place each helmet piece as follows: With the wine glass upside down (so the top is now the bottom and the bottom is now the top), wrap the two cap pieces over the top of the glass, pinching it together at the v's in the pattern; wrap the front rectangle piece with the long edge wrapping around the front of the wine glass, hanging over the edge if desired (but not required); follow this by wrapping the back long rectangle around the back in the same manner as the front piece, allowing the sides to evenly hang over the front piece, then trim neatly.Add the thin long rectangle of foam around the joint of the cap pieces and the front and back pieces; place the cap centerline piece in place, then each of the cheek pieces, followed by the side pieces and the ear covers.
- Once the helmet is assembled, paint the entire helmet with silver paint and allow it to dry. You can kind of dry brush it, but really the helmet should look silver. After the silver dries, paint the inside of the helmet black and dry brush the exterior of the helmet with black paint.

- Slip a piece of black felt inside the helmet to cover the wine glass, just on the off chance someone sees in there, and hot glue it in place.
- To make the ear for the helmet, cut a scrubbie in a 4-inch round, then trim the bottom to match the radius of the headband. Make a 1/4 inch thick slab of polymer clay into the same shape as the scrubbie, making it as flat as possible. Bake the polymer clay per the clay package directions.
- While the clay is baking, wrap the headband in the 4 shades of the ribbon. To do this, please watch the video. But the idea is to do a 4 way braid, starting at one side and wrapping each of the ribbons around in turn. Hot glue the end of the ribbon in place on the other side of the headband and trim the ribbon.
- Wrap the ear-shaped scrubbie in black felt and hot glue it in place, then wrap the polymer clay slab in the black felt and hot glue it in place. Hot glue the scrubbie to the back of the polymer clay ear, lining them up neatly.
- Cut two-3 pieces of scrubbie in a sharp triangle, forming a support to attach the cradle to the headband. Wrap this triangle in place, providing it with some additional support. Hot glue this piece in place just below where you want the bottom of the cradle to sit.
- Hot glue the cradle in place on the support, taking care to affix it to the headband where possible.
- Hot glue the black ear to the headband about 2 to 2 1/2 inches from the cradle.
- Carefully place the Mandalorian helmet on the center of the ear and glue it in place.
- To make the bow, cut a 6-inch length of the glitter ribbon, then pinch it in the center, hot gluing the pleats you create. With a length of each of your ribbon colors, braid a length of about 3 inches of ribbon. Wrap this braided ribbon around the center of the bow and hot glue it in place. Hot glue the bow into the center of the headband between the cradle and the black ear. Then enjoy!
Notes
For more easy Mickey ear tutorials, visit Ruffles and Rain Boots!
More Mandalorian and BabY Yoda Crafts You Might Like
- Funny Parenting Mandalorian SVG – I adore everything about The Mandalorian. And telling the kiddo “This is the way” has become my new parenting mantra! LOL!
- Baby Yoda Sleep Mask – Need a few winkie-winks? Is it hard to sleep during nappy time? This adorable sleepy time mask will help, I promise.
- Baby Yoda String Art Craft – So cute, I just want to take a bite out of him, this string art is both somehow too cute for words and also so, well, arty!
Please Save This to Pinterest
Your shares are how this site grows and I am sincerely grateful. Know a friend who’d like this? Please share it on Facebook or save it to your favorite Star Wars craft ideas board on Pinterest.
Meet the Creator
Hi there, I’m Sarah Nenni-Daher. I’m a crafty gal and always have at least 14 projects going at once. I am a crafter, designer, DIYer, and pattern maker. I share my creations here and in the Ruffles and Rain Boots® Shop.
Here at Ruffles and Rain Boots®, you’ll find DIY gnomes, crafts, gifts, cupcakes, laser crafts, and so much more. I love sharing video tutorials over on YouTube and chatting with other crafters in my Facebook groups. We’d love to have you!