
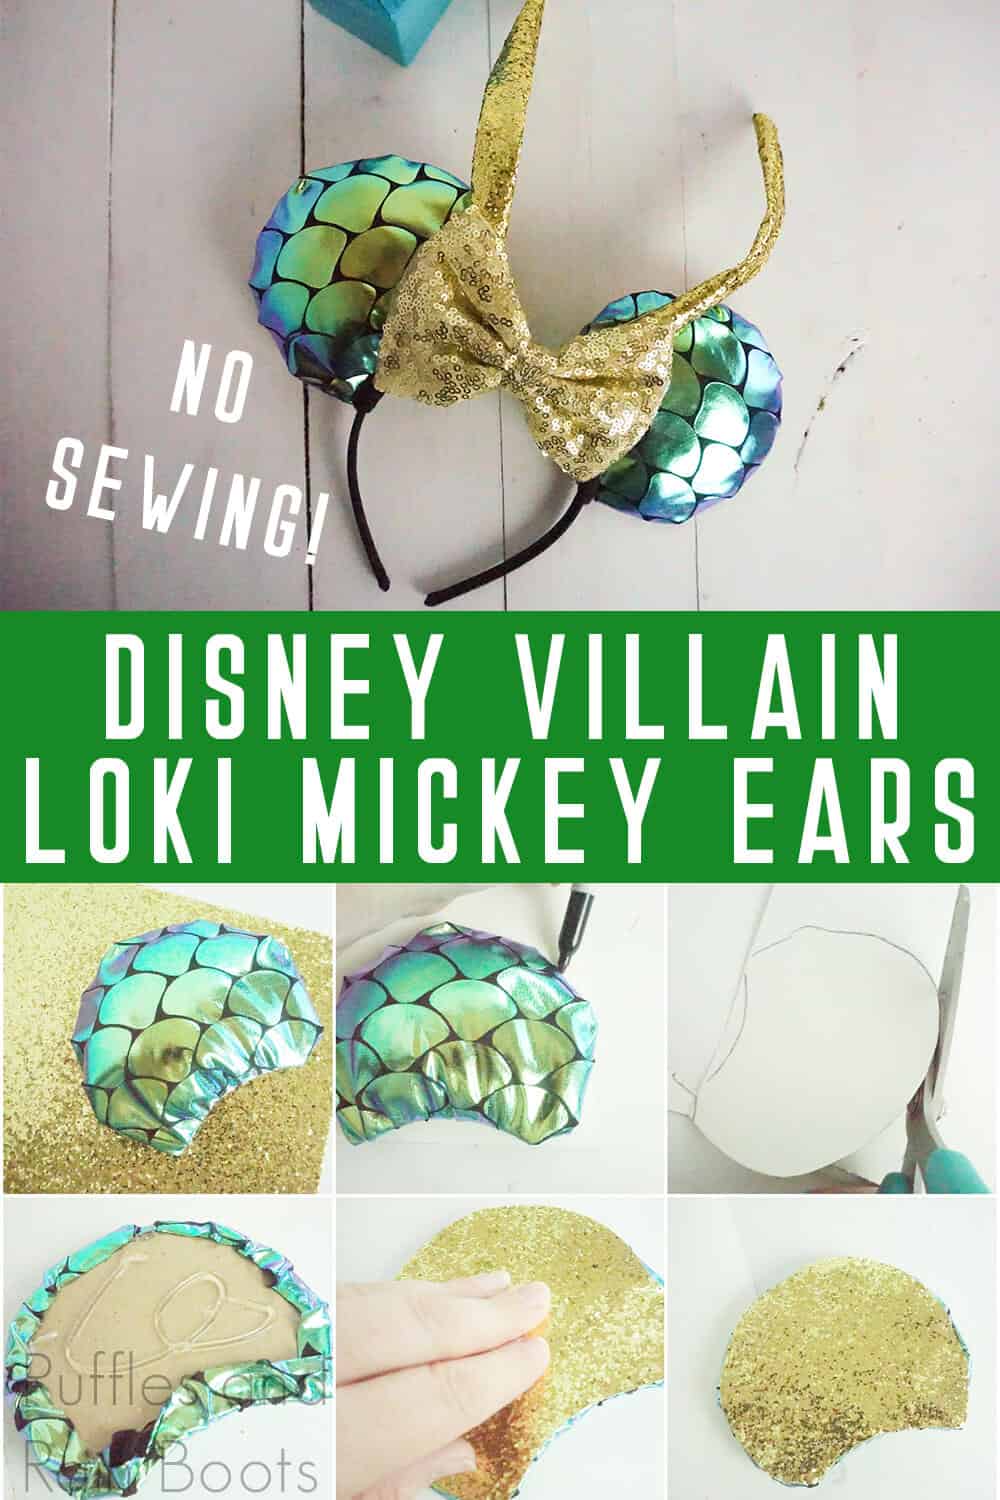
Make These Wickedly Awesome Loki Mickey Ears for Disney
For every hero, there’s a beloved villain that makes the hero shine. These wickedly awesome Loki Mickey ears for Disney are my way of saying I love the baddies and their Disney villain Mickey ears.

Loki Mickey Ears
Here at Ruffles and Rain Boots, we are harboring a secret crush on a certain handsome ice giant with a penchant for getting himself in trouble. Yeah, from the moment we met Loki on the big screen, well, let’s just say that while Thor is nice, Loki is the fun one.
So, along with all the fabulous no-sew Mickey ears I’ve been working on, I whipped-up these awesome–ADJUSTABLE–Loki Mickey ears.
Yeah, you heard that right–they’re adjustable. You can make those horns do whatever. It’s awesome. Just like the fabric is changeable, and Loki is totally a chameleon, these awesome ears are all about being what you want to see when you want to see it. Let’s get started.
No Time to Make This Now? Pin it for Later
You’re busy, I get it. Pin this to your favorite Avengers Mickey ears board on Pinterest and it’ll be here for when you’re ready.

Tips to Make these Disney Villain Mickey Ears
- So, lately, I’ve used a mix of foam core board (not the puffy kind of foam sheets, but the board like you’d buy for the kids’ science project) and cardboard for my various Mickey ears. To be honest, I’m more worried about durability and weatherproofing than is probably necessary. But, I have been rained on before–surprise–and I want my Loki Mickey ears to last. But, because this holographic fabric is pretty slick, I’m not feeling the need for foam core board. It’s up to you, but the foam core board does provide that extra layer of rain-resistance.
- There’s no particular pattern for these Loki Minnie ears, so there’s not a download. Just follow the directions and you’ll be able to make an awesome pair–they’re that easy.
- If you don’t have floral wire, that’s ok. You can use a wire hanger, even. Just know that the floral wire is so much more flexible, so if you can manage floral wire, do it.

How Do I Make these Loki Mickey Ears?
I’m so glad you asked. Below is our written tutorial. If you’re making a DIY Disney villains ears playlist on YouTube, here is our Loki Mickey ears video tutorial.
Loki Mickey Ears

For every hero, there's a beloved villain that makes the hero shine. These wickedly awesome Loki Mickey ears for Disney are my way of saying I love the baddies and their Disney villain Mickey ears.
Materials
- 2 Cardboard or Foam Core Board Circles 4-inches in Diameter
- 1 Black Headband
- Black Craft Felt
- Dark Green & Purple Shimmer Fabric
- Gold Glitter Canvas Sheet
- 2 Floral Wires
- 1 5-Inch Gold Sequin Bow
- Small Amount of Polyfill
Tools
- Hot Glue Gun & Glue
- Scissors
- Wire Cutters
Instructions
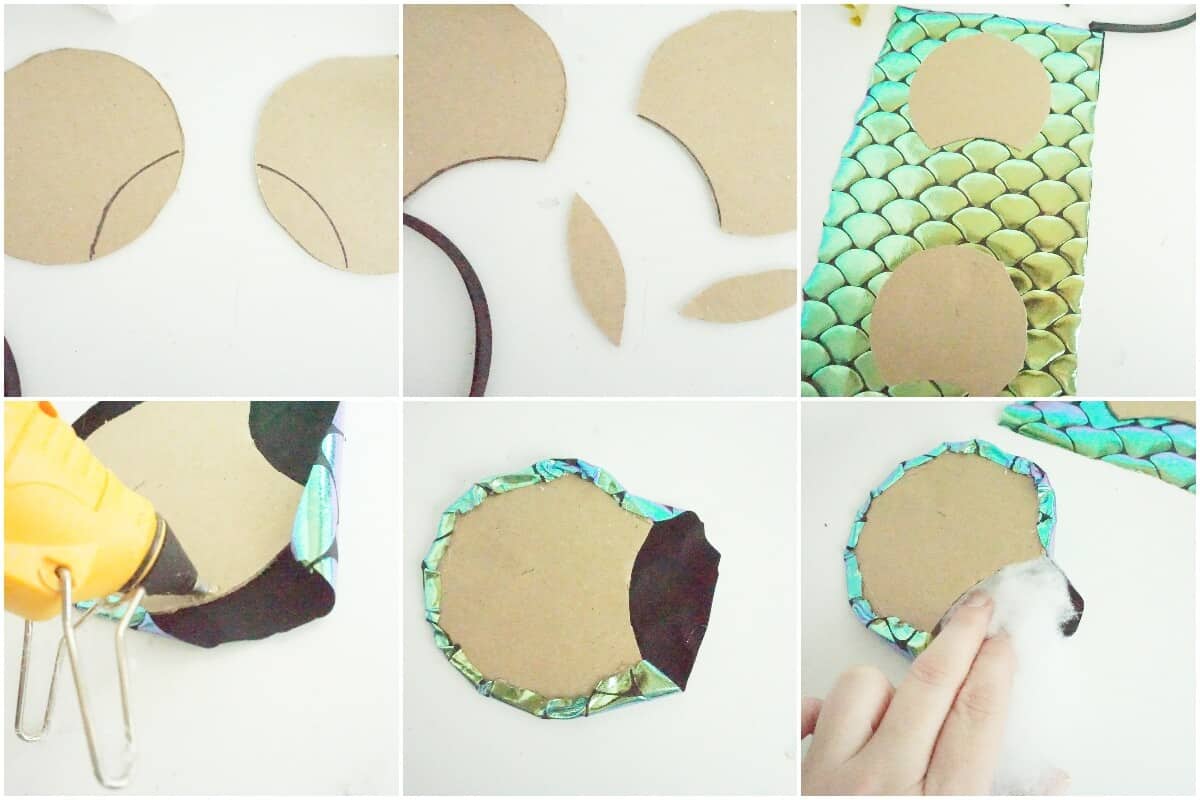
- Lay headband over cardboard circles and sketch where you want the ears to sit on the headband.
- Cut out area of ears that is unnecessary.
- Trace the new shape of the ear onto the back of the dark green & purple shimmer fabric, adding about ½ inch all the way around the outside edge of the ear in extra fabric.
- Repeat with the other ear and cut out both shapes.
- Lay the cardboard ear shapes face down onto the back of the shimmer fabric.
- Affix the fabric to the cardboard by wrapping the extra around to the back and glueing the edge down on the upper part of the ear only, leaving the bottom of the ear open and leaving excess fabric on the front of the ear--do not pull the fabric tight.
- Repeat with the second ear.
- Work a small amount of polyfill into the space between the extra fabric and the cardboard, smoothing it out. Loki doesn’t like lumps in his Mickey Ears.
- Finish affixing the fabric to the cardboard cutouts by wrapping the bottom of the loose fabric around to the back and hot glueing it in place. While doing this, you may now pull the fabric tight--though not super tight. You just want the fabric to be taut, not smashing the polyfill flat.
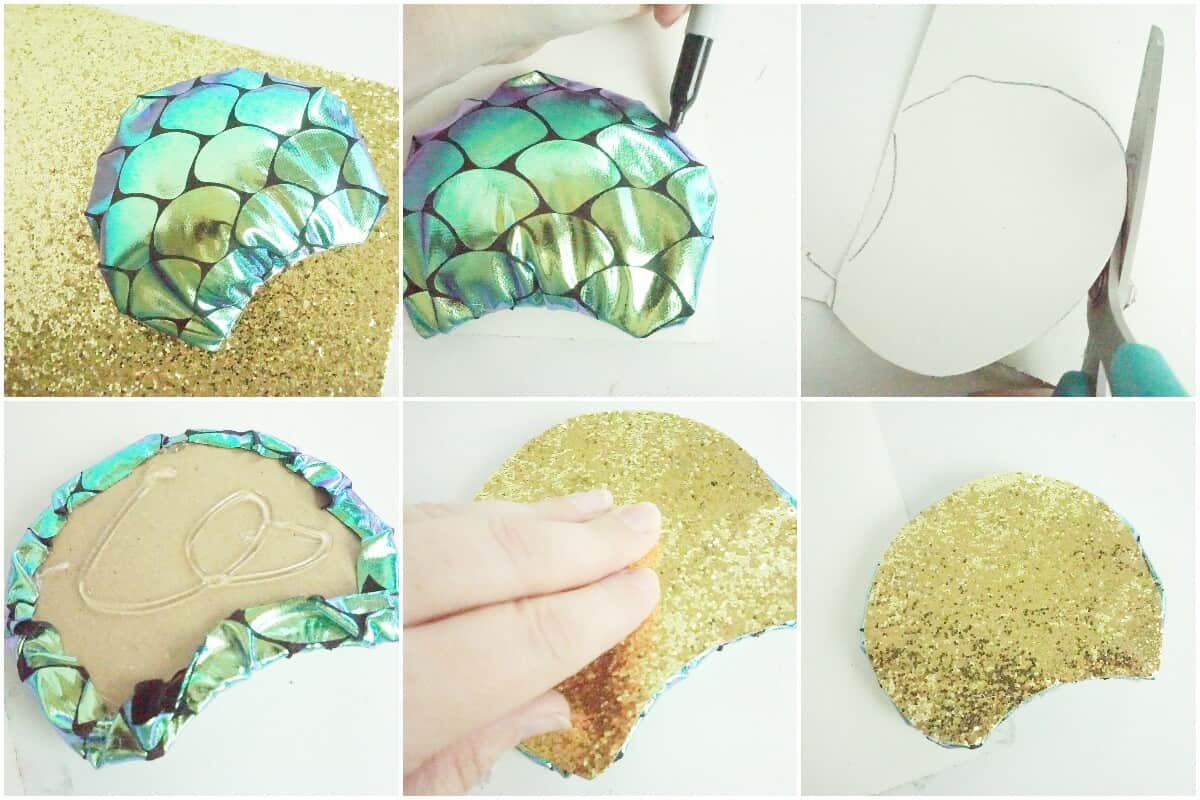
- Place the ears face-up on the back of the glitter canvas sheet and trace the shape out, along the long side of the canvas sheet (it is important to leave the whole sheet intact along one long side so that you have plenty of length for the horns, but we’ll get there).
- Trace the shape of the ears onto the back of the canvas sheet.
- Cut out the shape of the ears from the canvas sheet. I recommend cutting just slightly inside of your traced line so that your cut out follows just inside the edge of the ear.
- Hot glue each canvas sheet cut-out onto the back of the corresponding ear. Be sure to glue around the edges to make them look clean. You can also trim with an exacto knife at this time, to make sure they look nice and tight along the edges.
- Hot glue the two ears in place on the headband, taking care to hold them firmly until the hot glue is completely cooled.
- Cut out a thin, maybe ¼-inch wide strip of black felt, long enough to wrap from one end of the ears to the other.
- Hot glue this in place, in front of the place where the ears and headband meet, to hide the hot glue. Loki does not like his hot glue to show.
- Cut out two 2-inch wide, full-length strips from the glitter canvas sheet along the long edge.
- Trim one end to a fine triangle, starting about 3-inches from the end to create the triangle.
- Place a bead of hot glue along the edge of one side of one of the strips of glitter canvas and roll the other edge over it to create a cylinder with a small cone on one end.
- Repeat with the second strip of glitter canvas.
- Allow hot glue to cool completely.
- Slide a length of floral wire into each horn.
- Hot glue the floral wire in place at the bottom of the horn by basically filling the opening with hot glue.
- Allow hot glue to cool completely.
- Trim floral wire to about 2-inches longer than the horn.
- Place horn on front of Mickey Ears, wrapping the floral wire around the headband to secure it in place.
- Hot glue the horn to the corresponding ear.
- Hot glue the bow in place in front of the horns.
- Bend each horn backward in a soft curve.
- Enjoy!

Notes
For more fun Disney villain Mickey ears, visit RufflesandRainBoots.com
More Disney Villain Mickey Ears You Might Like
- Ultimate Gathering of Wickedly Evil Disney Villain Mickey Ears – Yeah, it’s like the Justice League, but with all the best Disney villains represented in Mickey ear format.
- The Best Evil Queen Mickey Ears Ever – Ok, so yeah, that little brat Snow White is first with all sorts of fun Minnie ears, but the Evil Queen gets hers if you scroll down. (Also, I don’t think she’s a brat, but you know, gotta stay with my villains.)
- Death Star Mickey Ears – You will bow to the power of the Dark Side when you see just how easy it is to make these awesome ears.
Please Save This to Pinterest
Your shares are how this site grows and I am sincerely grateful. Know a friend who’d like this? Please share it on Facebook or save it to your favorite Disney villain Mickey ears board on Pinterest.
Meet the Creator
Hi there, I’m Sarah Nenni-Daher. I’m a crafty gal and always have at least 14 projects going at once. I am a crafter, designer, DIYer, and pattern maker. I share my creations here and in the Ruffles and Rain Boots® Shop.
Here at Ruffles and Rain Boots®, you’ll find DIY gnomes, crafts, gifts, cupcakes, laser crafts, and so much more. I love sharing video tutorials over on YouTube and chatting with other crafters in my Facebook groups. We’d love to have you!