
Make a Dollar Tree Geode Skull Halloween Craft
I loved making this Dollar Tree geode skull for Halloween because it’s an epic DIY crystal skull that only takes a few minutes.
The best part is that you can customize it to match your Halloween decor and even set this up as a Halloween party craft idea.

RELATED READING: DIY Dollar Tree Crystal Ball Craft for Halloween
Geode Skull
Here at Ruffles and Rain Boots, I have a hidden “spooky” side. I mean, I love unicorns and rainbows, but love all things dark and slightly creepy, too. When I get an idea to crash those two things together like making this geode skull, I can’t help but follow through.
This DIY crystal skull is fun and easy spooky decoration piece. It’s bright, shiny, dark and spooky – perfect in every way. Grab a paintbrush and let’s get started.
RELATED READING: NO-SEW WITCH GNOME FOR HALLOWEEN
No Time to Make This Now? Save or Share for Later
If you need to gather supplies, save this to your favorite halloween DIY ideas pin board or share it to Facebook. It will make it easier to find when you’re ready to begin.

As an Amazon Associate, I can earn from qualifying purchases. There could be affiliate links within this article.
Tips to Make a Crystal Skull
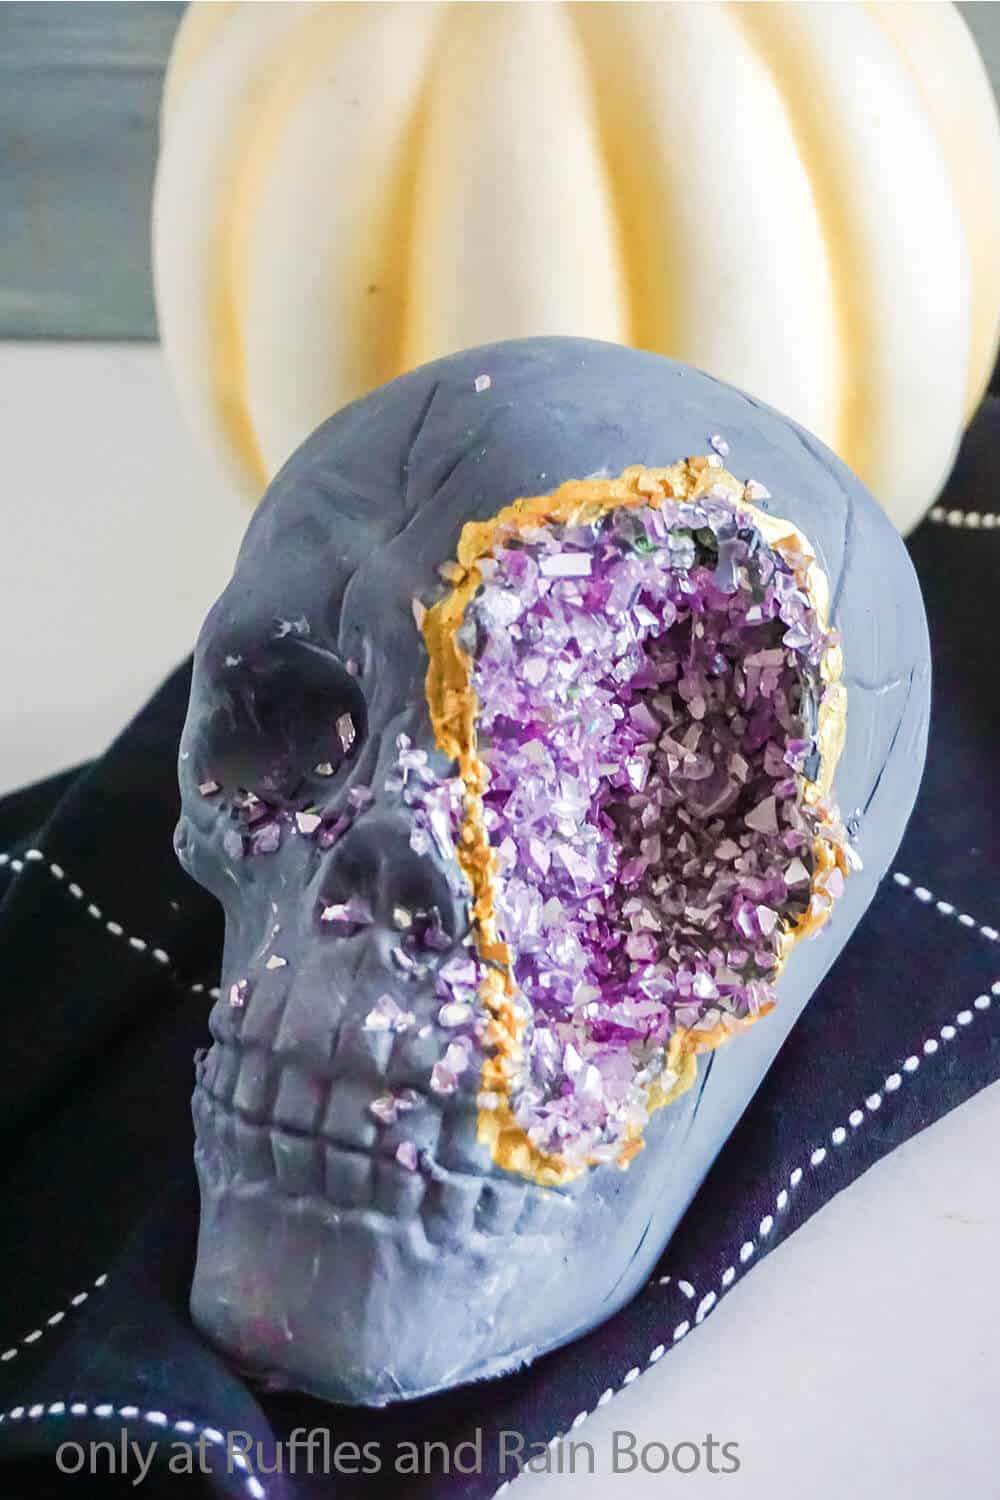
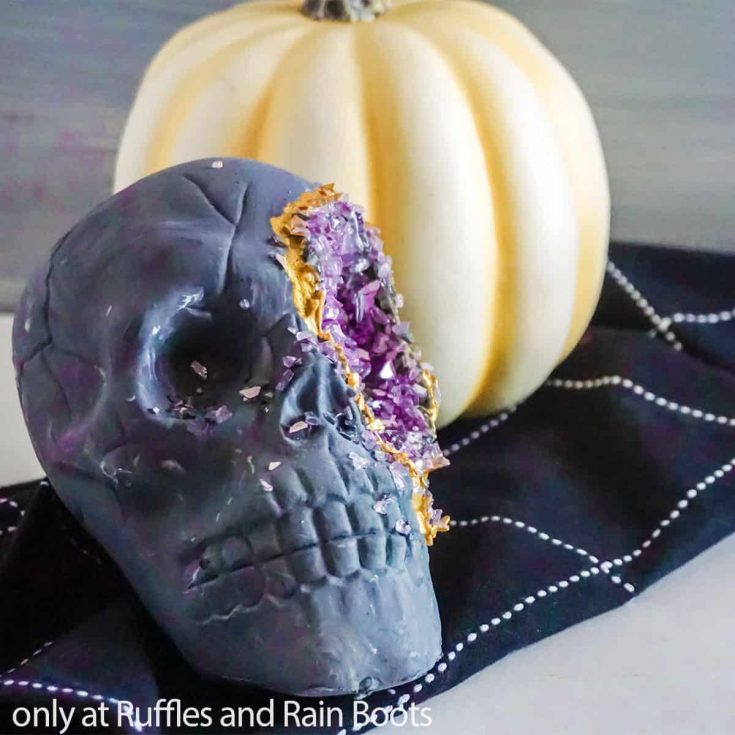
- I had a hollow plastic skull from the Dollar Tree just sitting around. You don’t need anything more sturdy than that.
- For the geode portion of this craft, I used some purple crushed glass vase filler. It’s cheap, goes really far, and has great color to make the crystallized part of your skull shine!
- Personally, I used some leftover floral foam I had laying around in the closet to fill in the gap on my skull, but you do not have to use that. Regular foam would work, cardboard, or anything stiff. Fill in the gap to close it up and create a concave surface for the crystals – no one will be able to see what’s underneath them.

RELATED READING: Black Flame Candle DIY with Free Printable
More Halloween Crafts You Might Like
- Candy Corn Gnome Pattern – So fun and definitely unique, this DIY gnome craft is adorable and sweet!
- Spider Mason Jar Craft – If you love halloween crafts, this simple mason jar DIY is right up your dark and creepy alley!
- Boo Spooky Tree Cut File Set – Wanna take a boring tumbler to epic and impactful? Add a spooky SVG!
Please Save or Share This Dollar Tree Halloween Skull DIY
Your shares are how this site grows and I am sincerely grateful. Know a friend who’d like this? Please share it on Facebook or save it to your favorite halloween crafts pin board.

How to Make a Geode Skull
Below is the written and printable tutorial. Let me know if you have any questions on this cool Halloween craft using the comments section below.
Geode Skull Halloween Craft
Such a fun and unique halloween craft, this geode skull is fast and when you have your own crystal skull, the decoration options are endless!
Materials
- 1 Hollow Plastic Skull
- 1 cup Crushed Glass Vase Filler
- White, Black and Gold Acrylic Paint
- Floral Foam
Tools
- Paint Brushes
- Craft Knife or Box Cutter
- Hot Glue Gun & Glue
Instructions
- Using the craft knife, cut out a roughly round portion of the skull, centered around one eye and discard the cut out bits.
- Fit some floral foam inside the skull, securing it with hot glue so that it will not move and generally filling the hole. You will want to leave a concave dip inside, but need to fill in the area to create a solid surface to work with.
- Working in small areas of about 3 by 3-inches, place a layer of hot glue on the floral foam, immediately pouring the glass vase filler over the hot glue. Allow the hot glue to cool completely (about 2-3 minutes), then remove the loose vase filler by shaking it gently upside down. Repeat this process until the entire foam area is covered in glass vase filler.
- Cover the exposed plastic skull with 1-3 coats of dark charcoal mixture of black and white acrylic paint, then allow it to dry completely.

- Add an extra line of hot glue around the rim of the skull where the crystal area starts then cover with additional glass vase filler, bringing the geode effect around onto the exterior of the skull a little.
- Place some hot glue in random locations over the face of the skull and top with the glass vase filler for additional spots of crystallization.
- Place a thick line of gold acrylic paint around the main area edge of the crystals and allow the paint to dry completely. Then it's time to display your geode skull!

Notes
For more fun halloween crafts, visit Ruffles and Rain Boots!
Recommended Products
As an Amazon Associate and member of other affiliate programs, I earn from qualifying purchases.


Quick question: Do you recommend wearing masks and gloves working with the glass vase filler or is it not sharp enough that you can just work with your bare hands? Thanks.
Mine wasn’t sharp but you can definitely wear gloves. :)