
DIY Teapot Gnomes Using Fabric and Fur Scraps
Turn a boring afternoon into a crafter-noon with these easy DIY teapot gnomes. Use fabric and faux fur scraps to create adorable tiered tray, holiday, or seasonal decor.
Keep your eye out for fun miniature finds like the ceramic teapots. Read the tutorial to learn how to reuse these same teapots by making non-destructive changes for frugal decor and crafts.

RELATED READING: See This 3-Minute Tutorial for Easy Sock Gnomes!
What You'll Find On This Page
Gnomes in Teapots – An Easy Afternoon Craft
Here at Ruffles and Rain Boots, am often challenged by readers and viewers to create quick, no-sew gnome crafts they can put together using scraps. These are items which are perfect for craft shows, package ties, or even to tuck into shop orders.
Some of my favorite gnome DIY projects to use up fur and fabric scraps are:
- mini gnome ornaments using gloves
- wood slice gnome ornaments and package tags
- tiny tiered tray gnomes
This week, I was at the craft store and came across the tiniest little teapots and could not resist. Finding ANYTHING miniature is a good idea to make over into a niche item because someone will fall in love with it, guaranteed. Let’s make this easy gnome DIY together.
Want to Save or Share This Craft?
If you need to go on the hunt for some tiny teapots or want to save this as inspiration, I would be so thankful. Please save this to a DIY gnome pin board or share with a crafty group on Facebook. It will be easy to find later.

Tips for Making Tiny Gnomes
As this is most definitely not the first miniature gnome project I’ve made over the years, I’m going to share some tips with you on how you can make this easier and more cost-effective.
- Scraps, scraps, scraps – these types of projects are perfect for using those tiny little cut offs of fun fleece, patterned cottons, and embellishments left over from other projects.
- I made the boy and girl gnomes different heights after I had already formed the bodies. If you want to do this, too, cut slits in the bottom of the gnome body (even after the fabric is on), lift them, and use scissors to cut off the flaps.
- Watch the video tutorial to see how I pieced together the hair and beard for the boy gnome. This is a PERFECT craft idea to use fur scraps.
- Friction fitting these gnome bodies into the teapots is a great way to be able to use the teapots for other crafts.
- Wine corks are not going to work well for this project (save them for these easy Scandinavian gnome ornaments). The corks are going to be too short on their own.
- If you sell, consider coming up with a few ideas like these tiny teapot gnomes to tuck into your craft show displays, but use less-expensive options like ornaments to give away with orders.

DIY Teapot Gnomes Project
Below are the written and printable instructions for this quick craft. If you are a visual learner or are new to piecing together scraps of fur, watch the full gnomes in teapots video tutorial here on the YouTube channel.
Psst: while you’re there, subscribe. I have hundreds of videos with crafty tips for making gnomes and other crafts.
Teapot Gnomes
These adorable mini gnomes are made with teapots and are too cute on tiered trays or tucked into displays throughout the house. The best part is that both of these can be done in about 30 minutes!
Materials
- 2 Miniature Teapots
- 1 x 2-inch Styrofoam ball (cut in half)
- Card Stock
- Fabric (I used a fleece and a crushed velvet)
- Air Dry Clay (or Model Magic)
- Wood Bead
- Faux Fur Scraps
- Mini Elastics (or String)
- Optional, Mini Floral Decorations
Tools
- Hot Glue Gun and Glue Sticks
- Scissors
- X-Acto Knife
Instructions
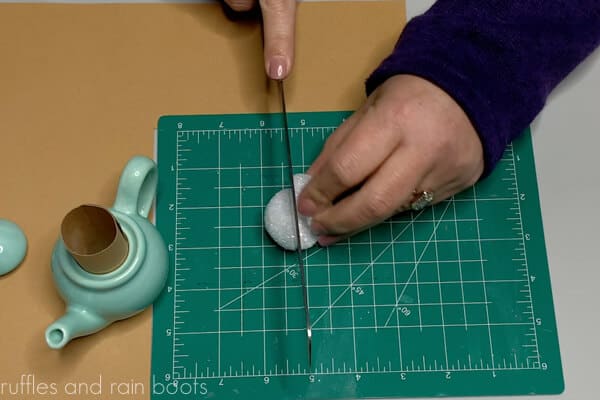
- Cut Styrofoam ball in half. Set aside.

- Roll a piece of card stock at 3.5 inches wide by 3 inches tall and glue in place, ensuring the fabric can wrap around and friction fit inside the teapot opening.
- Cover the card stock roll in fabric, trimming off any excess.
- Glue faux fur scraps to the top of the half balls. For the girl, part in the middle and use elastics or string to create two ponytails.
- Place the roll into the teapot and glue the fur covered ball on top.
- Repeat all of the steps with the boy gnome, taking care to add fur to hang down in front for the beard.
- Glue on noses and fashion any clay mittens, if desired.
- Affix the top of the teapot at an angle on each gnome’s head. Tuck pip beads into the teapot spot or add miniature flowers around the back of the gnome.


Notes
I used a wood bead for the guy gnome but you can roll another air dry clay gnome nose to match the girl.
The mini teapots I used were from the craft store, Hobby Lobby, however you can use any size or style.
More Small Gnome Crafts You Might Like
- Mini Tiered Tray Gnomes – These 3 to 6 inch gnomes gnomes use scraps of fabric and fur and can be customized easily for any decor, holiday, or season.
- Tiered Tray Farmhouse Gnome – Use your hot glue gun to assemble this fun 6 inch gnome pattern that comes with A LOT of inspiration and extras.
- 3 Ways to Make Mini Gnomes – A sachet, an ornament, and a shelf sitter – make all of these easy gnomes for the holidays or all year round.

Please Save or Share This
Your shares are how this site grows and I am sincerely grateful. Please save this to a DIY decor and crafts pin board or share it to a Facebook group whose members would love it!

Meet the Creator
Hi there, I’m Sarah Nenni-Daher. I’m a crafty gal and always have at least 14 projects going at once. I am a crafter, designer, DIYer, and pattern maker. I share my creations here and in the Ruffles and Rain Boots® Shop.
Here at Ruffles and Rain Boots®, you’ll find DIY gnomes, crafts, gifts, cupcakes, laser crafts, and so much more. I love sharing video tutorials over on YouTube and chatting with other crafters in my Facebook groups. We’d love to have you!