
DIY Flower Fairy Dolls – Wire Fairy
We had the best time making these flower fairy dolls and I know you will, too! They are an easy fairy craft that look great hanging from a garland for a party, tucked into gift bags, or even just handed to little ones for imaginative play.
The supplies are simple and easy to find and the variations in skin and hair color, hair style, and wings make for easily customized fairy dolls. I just know you’re going to love making these so let’s get started.
RELATED READING: Popsicle Stick Fairy Craft for Kids
What You'll Find On This Page
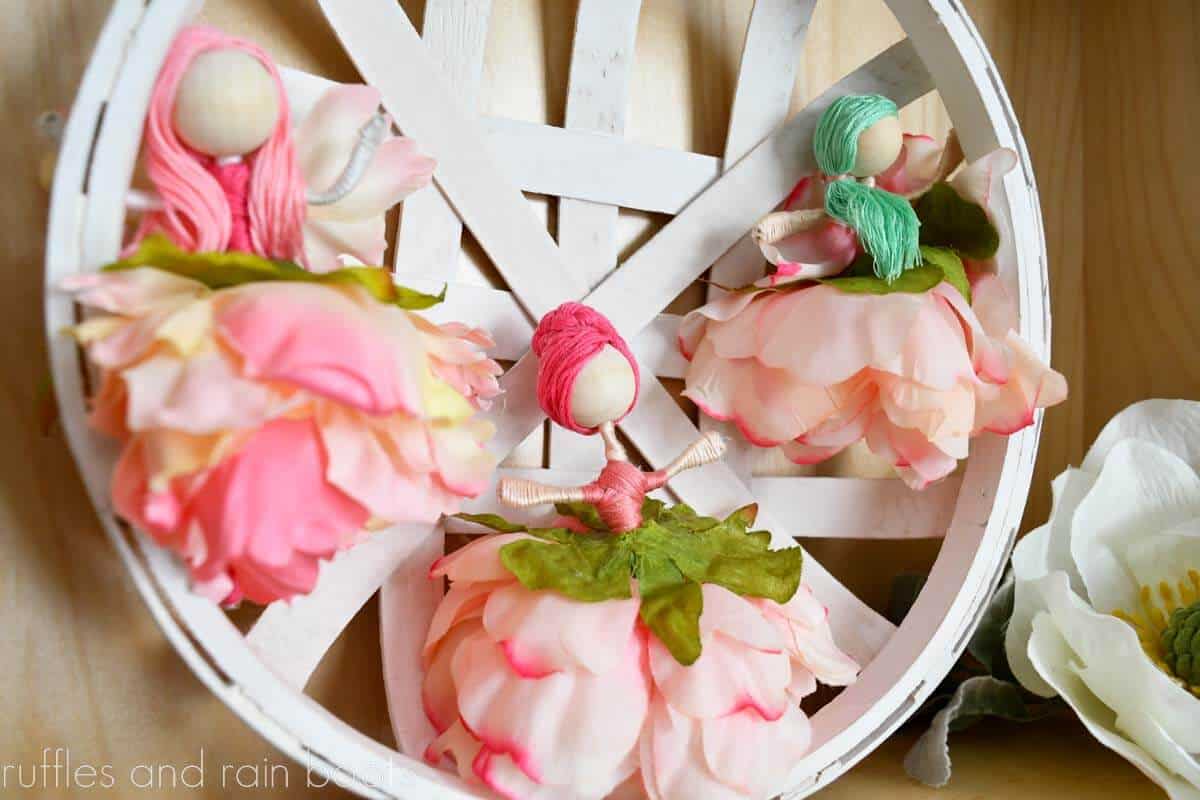
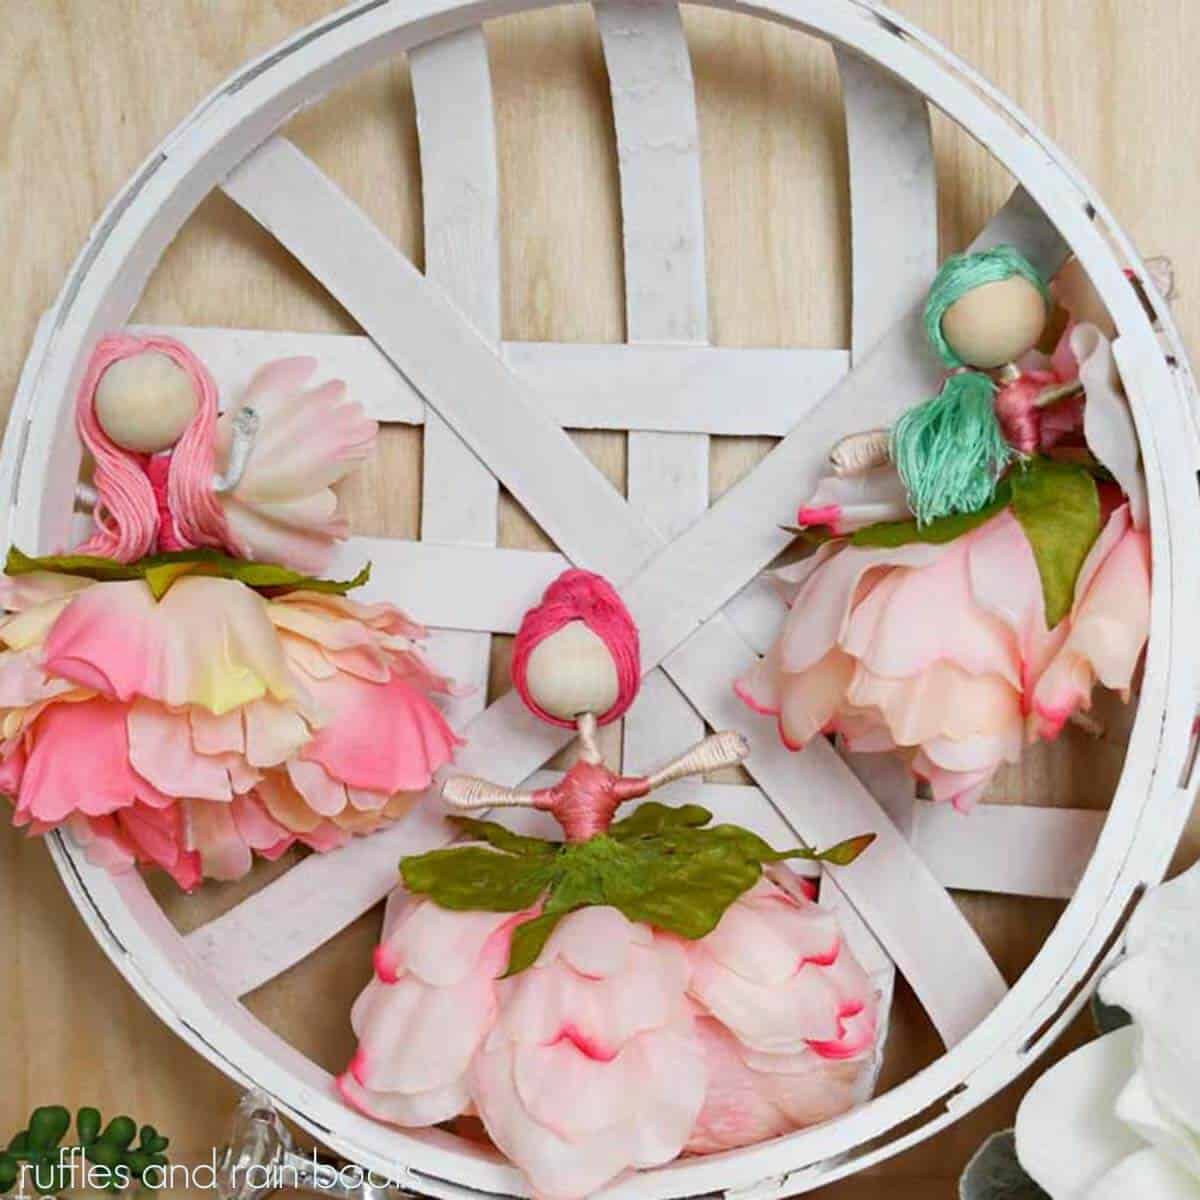
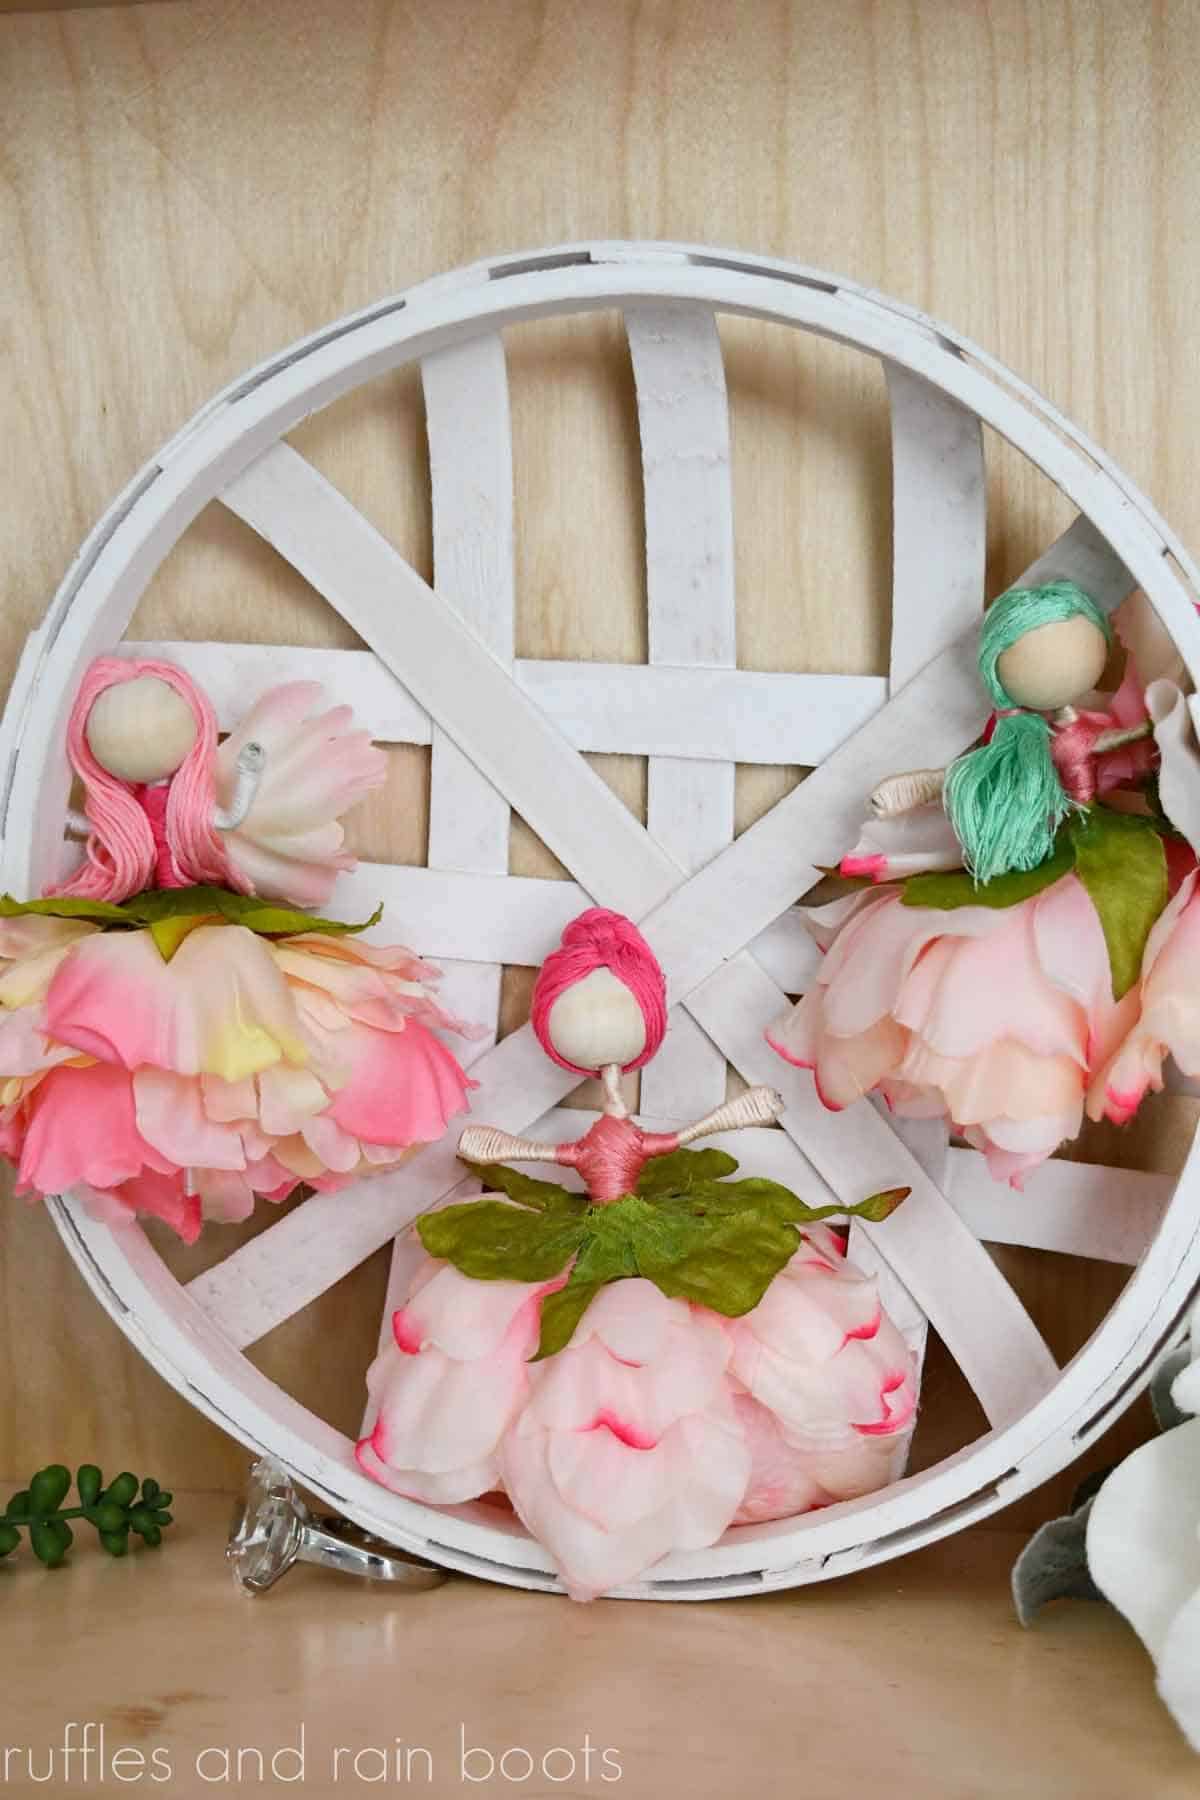
Flower Fairy Dolls
Here at Ruffles and Rain Boots, I create a lot of whimsical creatures and cryptid crafts for all ages: gnomes, mermaids, unicorns, and fairy crafts are often shared here. While crafting for an early summer party, my daughter and I found ourselves searching for fairy inspiration and came across Cicely Mary Barker’s series. We fell in LOVE and, of course, had to get crafting.
I had everything on hand for this craft, so before you head to the craft store check your supplies. We’ve used a variety of different flowers and sizes of wire for these little fairy dolls, so you have some wiggle room.
No Time to Make These Now? Save or Share for Later
If you want to gather up a group of friends for this fun fairy craft idea, save this to a DIY pin board or share it on Facebook. Tag those friends and build some excitement for your crafting session!

As an Amazon Associate, I could earn from qualifying purchases. There could be affiliate links within this article.
Supplies Needed for Fairy Dolls
- Wire Stem
- Faux Flower
- Wood Bead
- Embroidery Floss (3 colors for each doll)
Tips for Making Wire Fairy Dolls with Faux Flowers
As of this writing, I’ve made more than 15 of these adorable little dolls. Here are my biggest tips for making flower fairies:
- Use the full length of the floral wire and the recommended measurements when making the first couple. It gets difficult when making them smaller.
- The larger, fuller flowers (5-6 inch diameter) make the fullest fairy skirts and are perfect for beginners.
- Different colors of embroidery floss allow for many skin tones so that you can create a fairy doll who looks exactly like someone in your life!
- Save the small plastic spacers and use them to fluff out the skirt. Place them in between the petals in the same order you removed them.
- Of all steps, the fairy hair is the most difficult only until you figure it out. Go slow and finger comb the embroidery floss. Here is a fairy hairstyle tutorial for beginners. Psst: she also sells flower fairy kits in her Etsy shop here (they’re gorgeous).
- There will be quite a bit of embroidery floss left over from the bodice color which can be used to create a necklace, gloves, or slippers for the fairies. I’ve also used it as the hair tie color and you could even braid it into the fairy’s hair.
- I strongly suggest a detail tip glue gun for this project. The precision tip and thin flow of hot glue works well with the smaller, daintier aspects of this craft.
How to Make Flower Fairy Dolls with Wire
Below is the written and printable tutorial for fairy dolls. If you’re a visual learner and want to see some fun alternate hair styles and wings, watch the flower fairy doll tutorial here.
DIY Flower Fairy Doll

A few supplies and a bit of wrapping are all you need to create these gorgeous, elegant flower fairy dolls. Follow along with a written and video fairy doll tutorial.
Materials
Tools
- Ruler
- Detail Tip Glue Gun and Glue Sticks
- Wire Cutters
- Scissors and/or X-acto Knife
Instructions
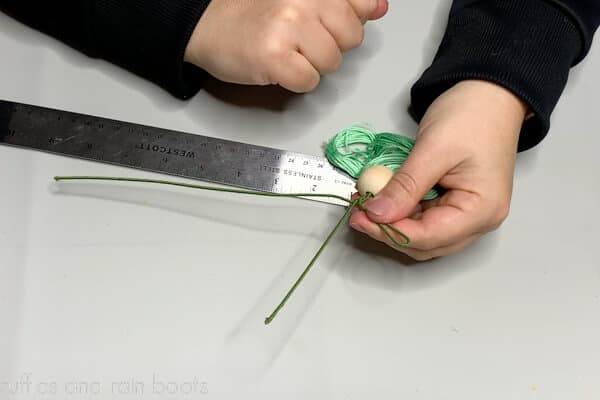
Prepare the Head and Fairy Hair
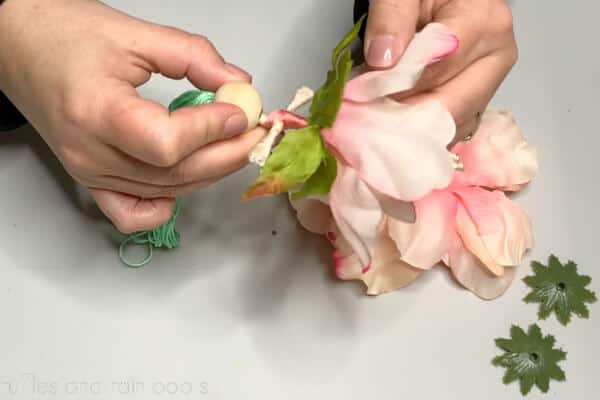
- Bend a single floral wire in half. Remove the paper ties (but do not loosen or unroll) an embroidery floss for the hair and loop the center of the floss into the opening of the folded wire.

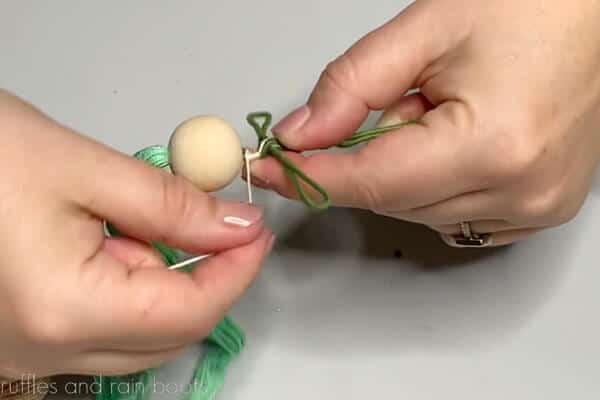
- Put the ends of the wire together and press them through the center hole of the one inch bead. Align the top of the wire with the top of the wood bead (this forms the head and hair of the fairy doll). Glue the bead in place on the wire.


Create the Fairy Doll Body
- Twist the wire twice around itself just under the bottom bead opening (opposite of the hair) to form a neck.
- Lay the ruler down flat and use it to measure out 2 inches for an arm. Fold under the same amount and press the wire together. The end (the hand) should be a teardrop shape. To secure, twist the wire of long end of the wire you just used to form an arm once around the other piece of wire. Repeat with the other arm.
- Twist the two ends of wire around each other three times to form a body.
- To form the legs and feet, press the two ends of the wire and cut with the wire cutters to make them even.


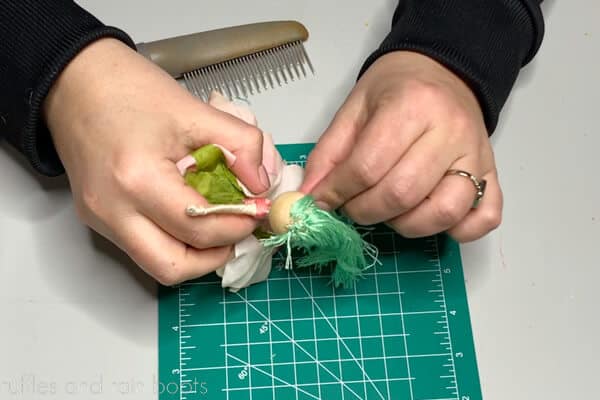
Wrap the Body
- Add a small dab of glue to the body area and press in the end of the flesh tone embroidery floss. Wrap the wire up the body to the neck, add glue, and wrap completely to cover the wire back down to where you started the neck. Do not cut the floss.
- Wrap each arm using the same color floss. Use a tight wrap, securing the floss to the wire every so often in case it unravels. I cover the ends of the hands with a small amount of glue, vertically wrap them, and then cover back to the body.
- Repeat wrapping (each appendage gets two layers). You should only have a small amount left after covering each appendage in two layers (one up, one back). See this video for detailed instruction.
- Using the same dab of glue method to start, use the bodice embroidery floss to wrap over each shoulder and the full center body, stopping where the legs split. You may also use this color for shoes by wrapping just the bottom half inch of each leg wire.


Create the Flower Fairy Doll Skirt
- Remove any leaves or extras from the floral stem. Remove each petal from the stem, keeping them in order.
- Use scissors or an X-acto knife to cut one-quarter inch slits around the center hole so you can slip the floral pieces over the legs to form a skirt.
- First, slip the bottom of the flower and follow with the largest petals (at the waist), securing each with glue. Repeat with petals and plastic spacers from the faux flower until the dress is as full as you like.


Style the Fairy Dolls' Hair
- Brush the embroidery floss out with fingers. Glue down the front forehead section by adding a half moon of glue and pulling the hair forward. Repeat with the back of the head, pulling the bottom loops of the floss to secure in the glue. This is best shown in the video.
- Cut the thread loops at the BOTTOM of the hair ends, taking care to split them and not cut any length off.
- Use your fingers or a comb to brush out the hair. If you want to split it into individual strands for fuller a fairy hairstyle, do so here. Trim any scraggly ends along the bottom.
- Gently finger comb the floss down creating hair on each side, securing with a very light layer of glue. Tip: use the point of the glue gun to press the glue flat.
- Pull the hair around to the back or to the side, gluing the base of the hair down in the back. Secure the hair with a mini elastic or another piece of embroidery floss into a side ponytail. Read through the options in the article above and watch the video for extras like hairstyles and fairy wings using the flower petals.


Notes
Please see the full video tutorial for variations on hair styles, how to make flower petal fairy wings, and more.
Recommended Products
As an Amazon Associate and member of other affiliate programs, I earn from qualifying purchases.


More DIY Fairy Crafts You Might Like
- Fairy Wishing Bottles – This is a fun nature craft and the kids absolutely loved it! You know, the parents found it really fun, too.
- Popsicle Stick Fairy Craft for Kids – Head over to the Dollar Tree and pick up what you need for this crowd-pleasing fairy craft.
- Teacup Fairy Garden – The thrift store is the perfect place to start on this fun and easy craft that uses up little bits and bobs from the garden and your supply stash.
Please Save or Share This Fairy Craft Idea
Your shares are how this site grows and I am sincerely grateful. Please save this to a DIY pin board or share it with a crafty group on Facebook.


I ordered the flowers you linked to and they are only 5 centimers not 5 inches:(
Oh my goodness, they changed what they offered! I bought that listing (it says “previously purchased”) for a display in my guest room and they are most certainly NOT 5 cm.
I’ll find another link and get that updated today with these (I also bought these but it was in 2022).