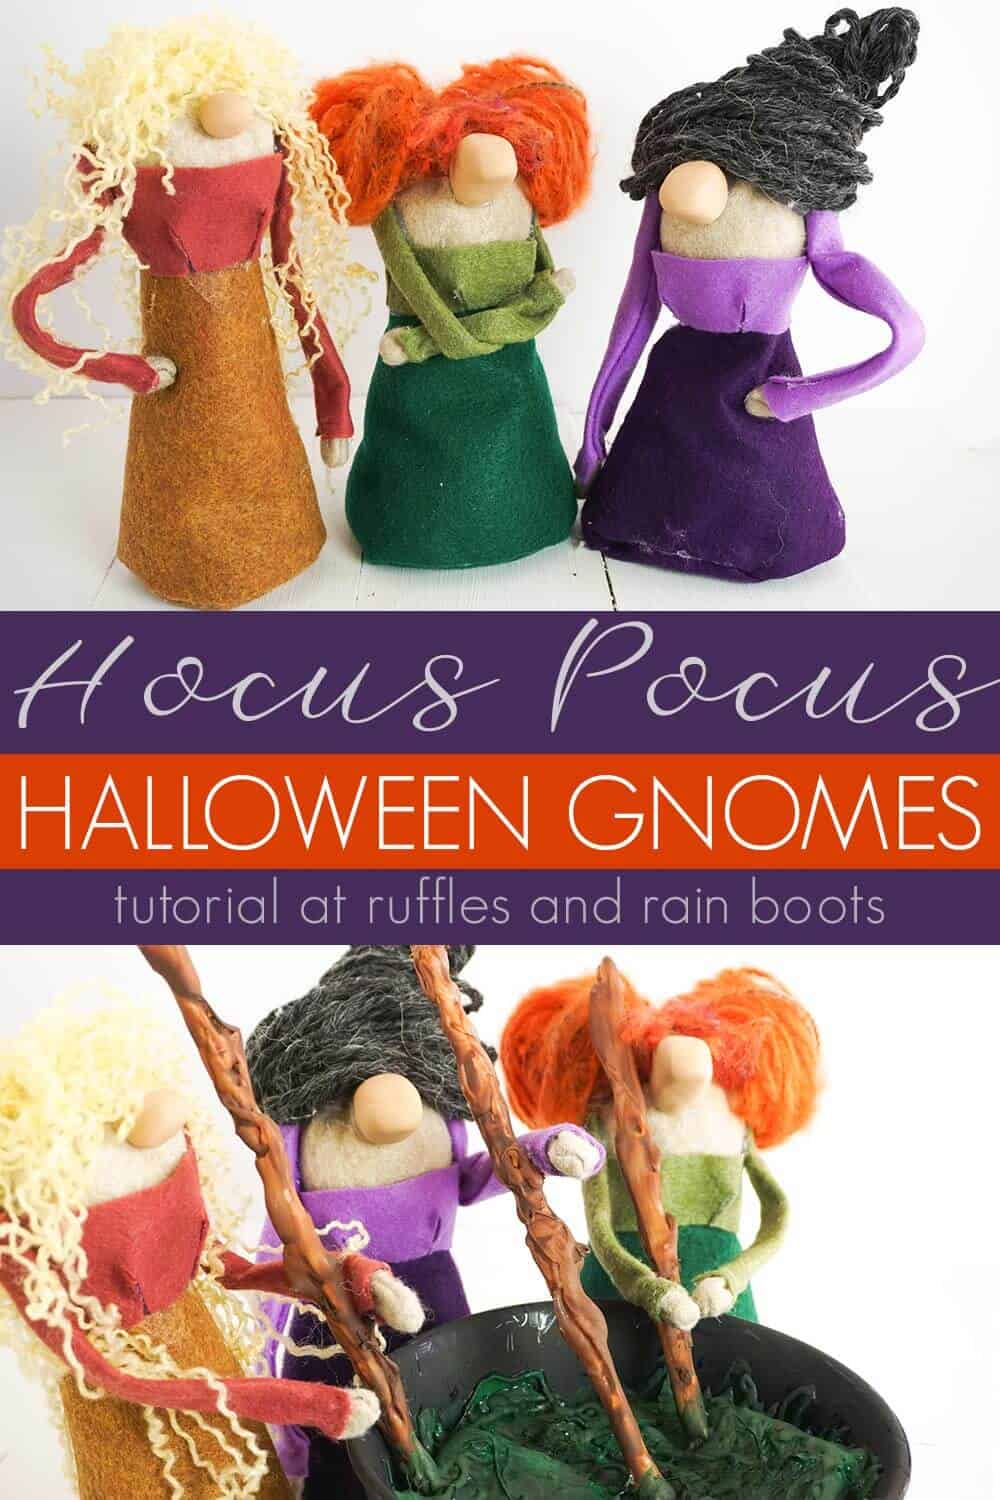
These Hocus Pocus Gnomes are the Best Halloween Gnome Ever!
If you’re a fan of Hocus Pocus at all, this tutorial for Hocus Pocus gnomes are the best Halloween gnome ideas you’ll ever see. And if not? I’m cackling like a witch, because you’re still going to love these witch gnomes.
Hocus Pocus Gnomes
Here at Ruffles and Rain Boots, we are a little bit obsessed with our favorite Halloween movie, Hocus Pocus. I seriously love Bette Midler and this movie is a cherry on top of her already stellar career. So, it was obvious when I wanted to make a Halloween gnome, of course I’d try my hand at making Hocus Pocus Gnomes. But, I will admit, this is my second round of making gnomes in honor of this movie. You can check out the first try here, which is fun and great, but these no-sew halloween sock gnomes are quite superior.
RELATED READING: ALL THE BEST GNOME TUTORIALS YOU’LL EVER NEED
Simple, but really fun, these witch gnomes are are a quick craft with really stunning results. If you’re ready to make a wicked Halloween gnome (or three) you’re going to love, let’s get started.
Get Secret Gnomes, Tips, & Freebies Delivered!
What is the best pattern to use when you don’t want to sew? Do you know the secrets to a properly-proportioned gnome? Do you know where to get the best-priced fur?
Get all of this (and exclusive content just for you) delivered right to your inbox with the gnome-making series, free of charge. Sign up to get the once-weekly newsletter (and a jaw-dropping special offer)!

No Time to Make This Now? Pin it for Later
You’re busy, I get it. Pin this to your favorite Halloween crafts board on Pinterest and it’ll be here for when you’re ready.
Tips to Make these No-Sew Witch Gnomes
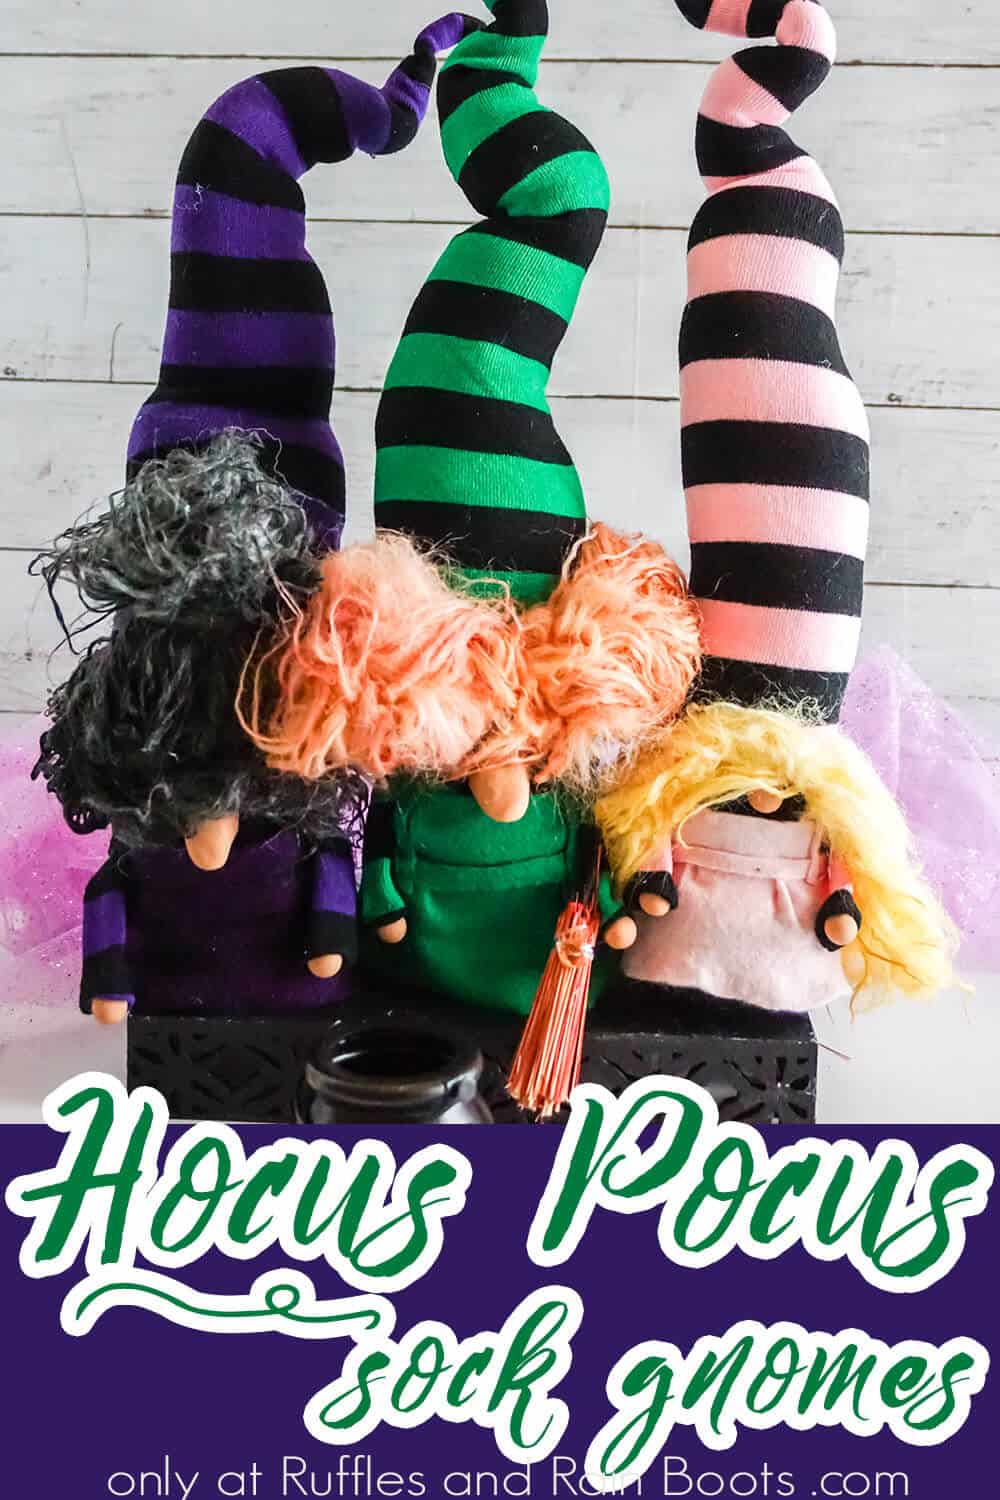
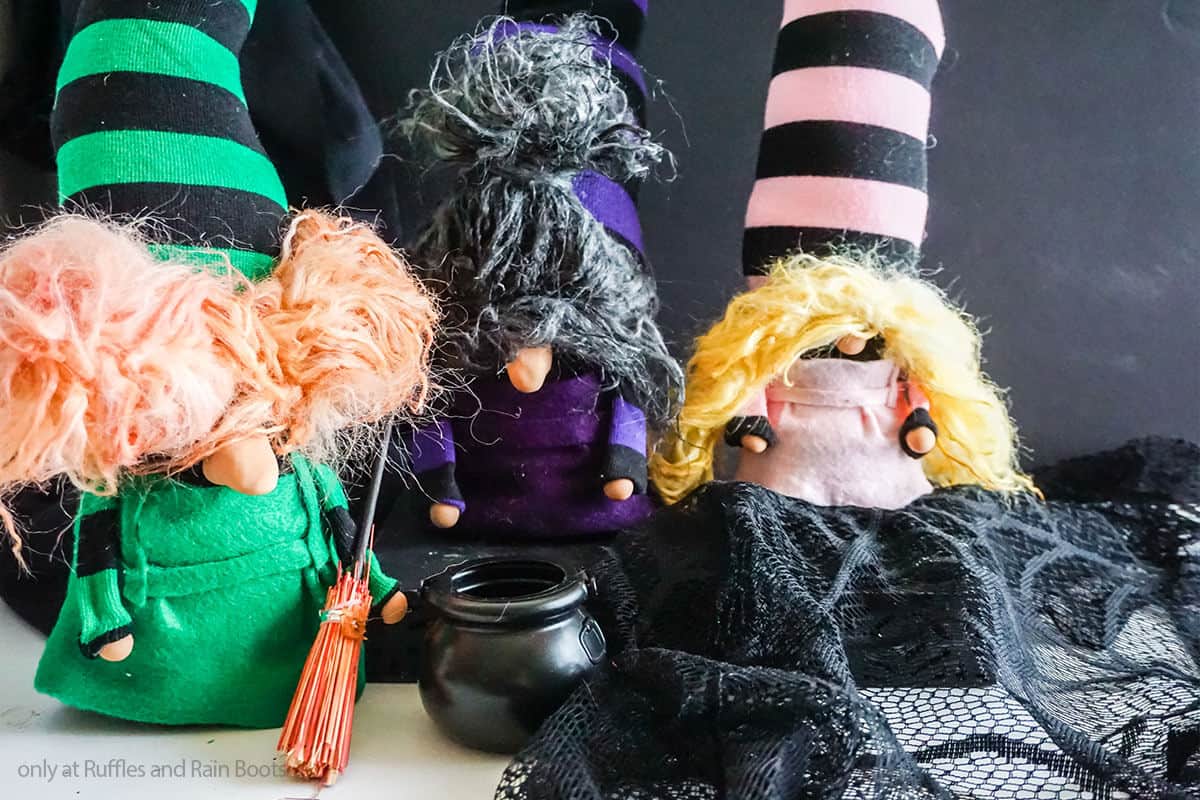
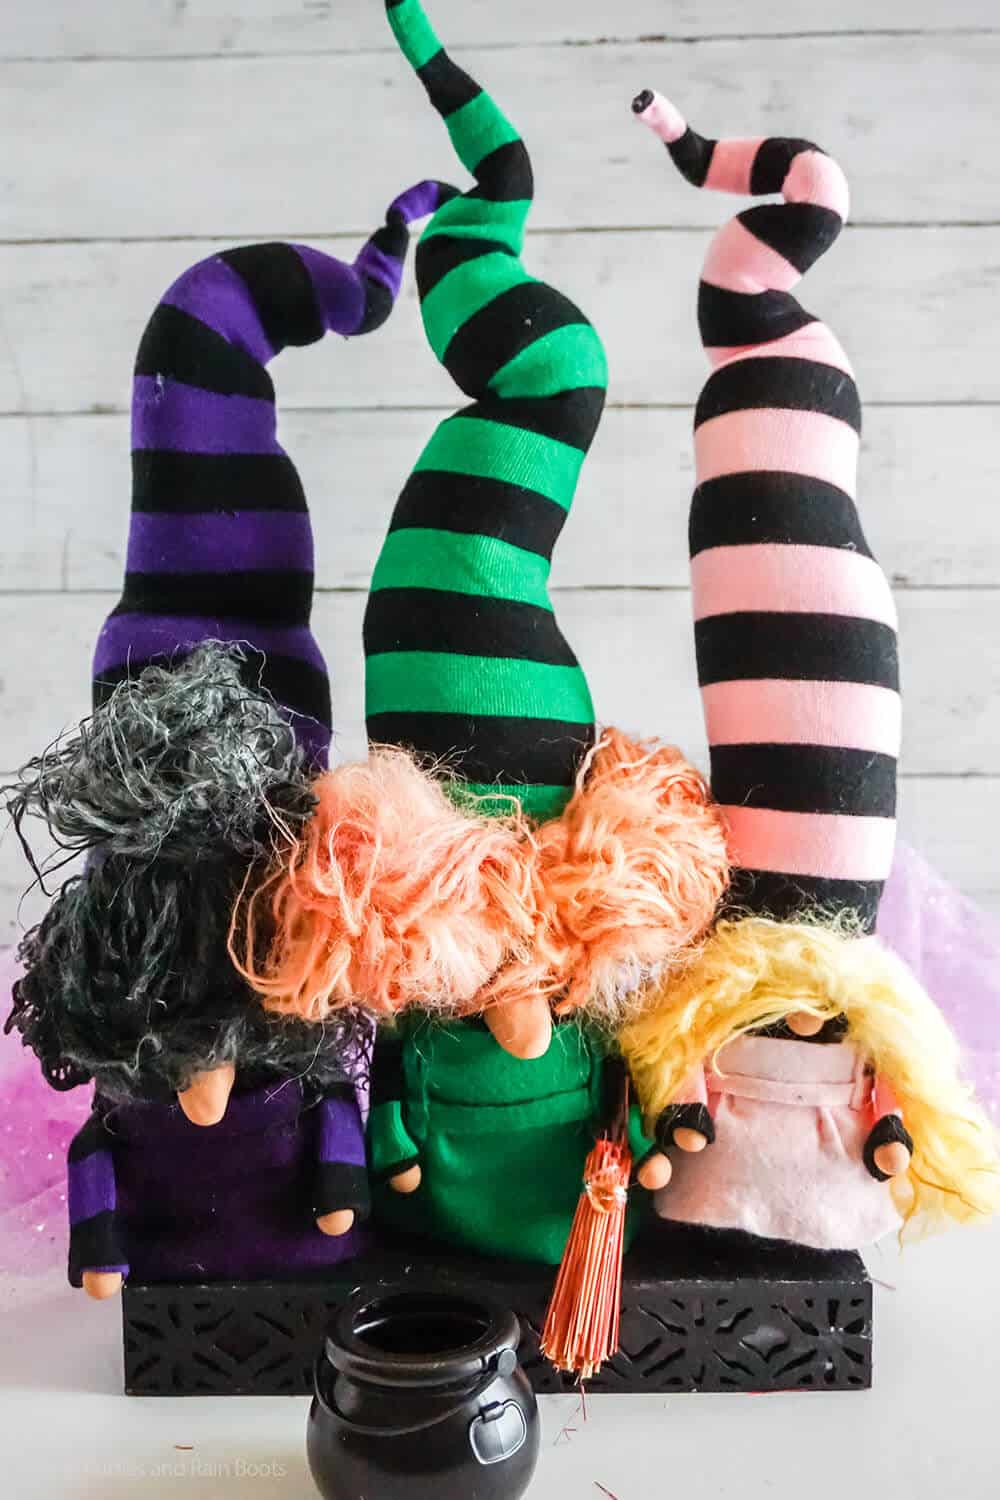
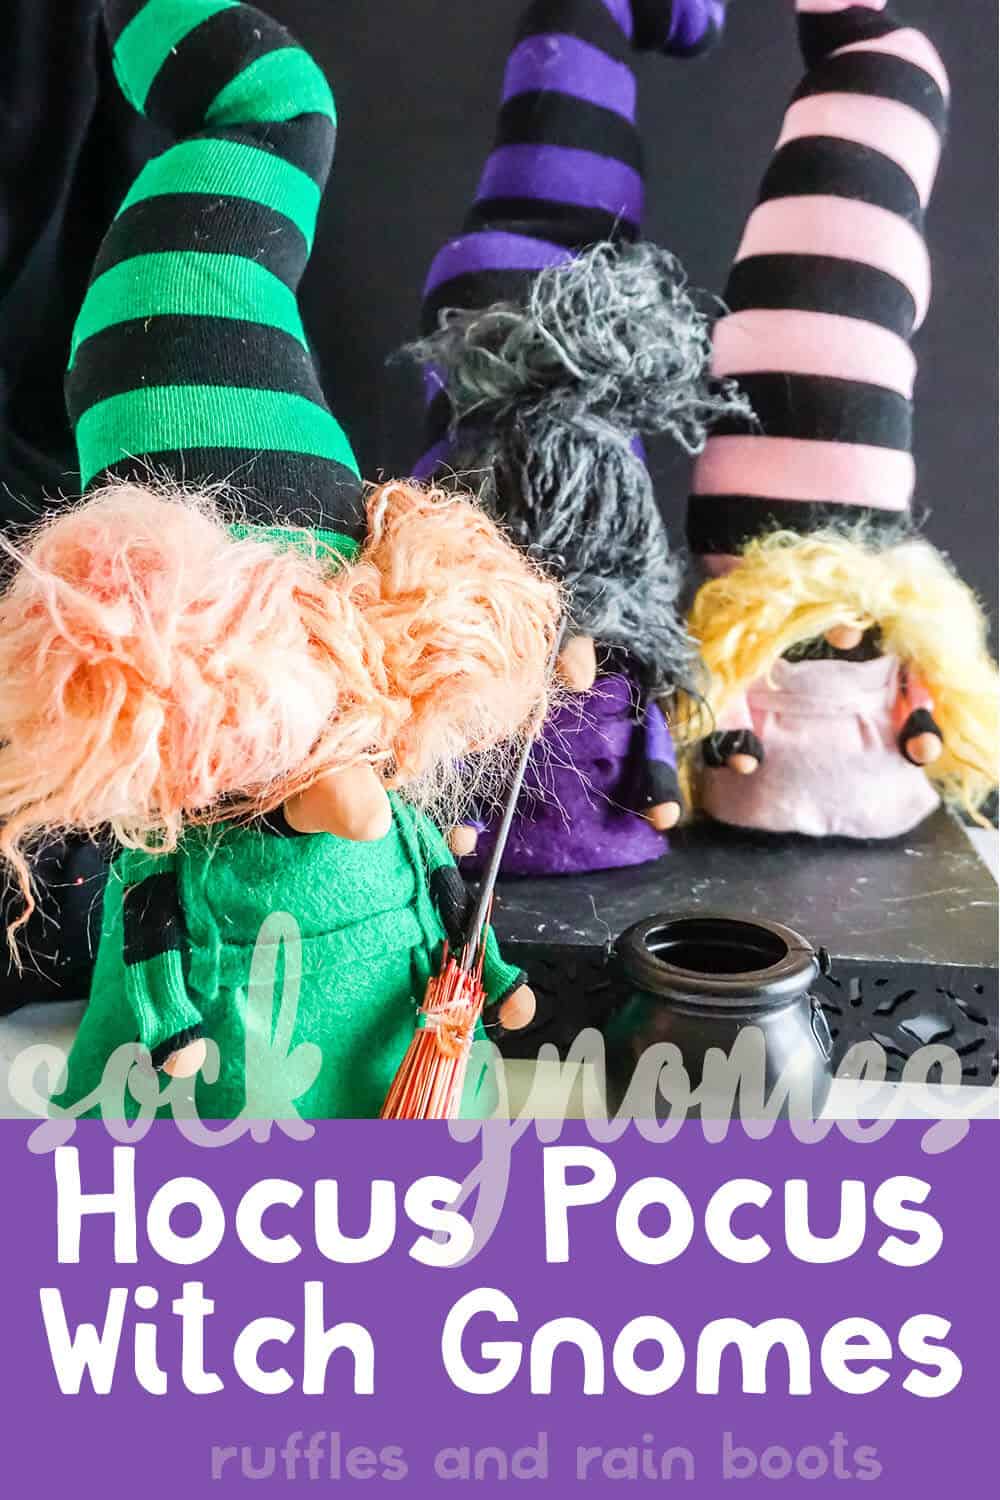
- First, start by grabbing the trio of socks here that you need to make these adorable Sanderson Sisters gnomes here. The sock is everything about this no-sew gnome craft, because you need long, tall and stripey to pull this off. You’ll need one green and black, one pink and black, and one purple and black.
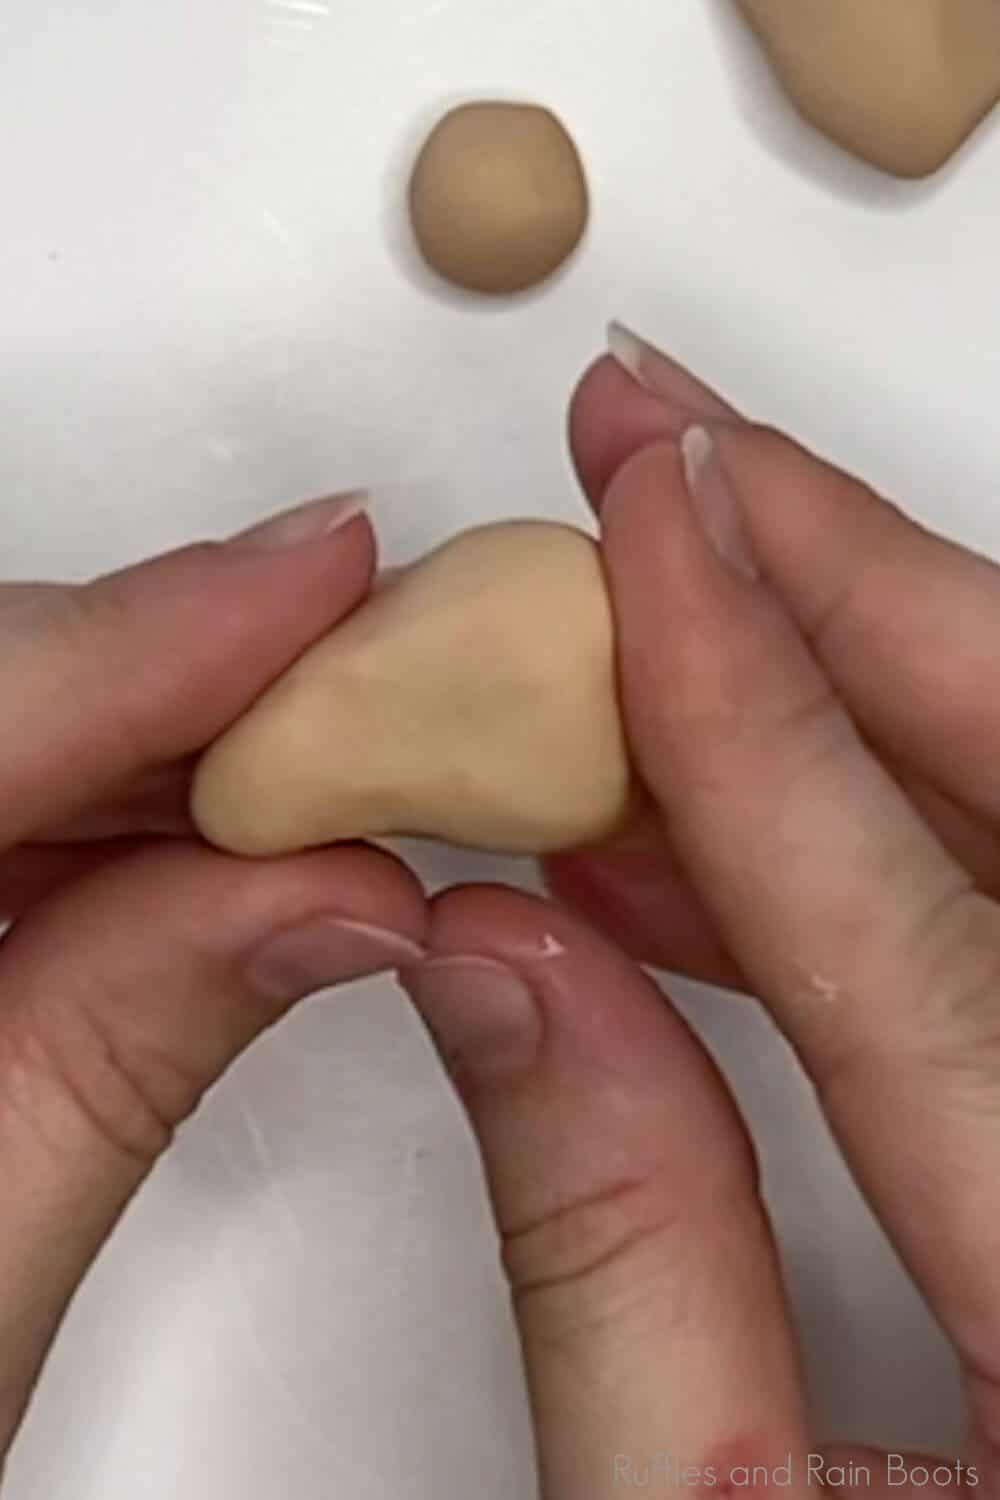
- If you’ve seen any of my other gnomes, you’ll notice that the noses on these witch gnomes are markedly different than my norm. They’re polymer clay formed into some long, witchy noses, like the noses on Winifred, Mary and Sarah (ok her nose is mostly normal, if a little larger LOL!). If you’ve never used polymer clay, it’s super easy. All you need to do is take it out of the package, mold it to whatever shape you want, smooth it a little, then bake in the oven per the package directions. I have tons of clay tutorials on my YouTube channel here.
- I made all three of these gnomes no-sew gnomes by using hot glue to make all the necessary hems (even though there are very few). It’s my honest recommendation that you use a fabric hot glue stick like these or my favorite brand of non-fabric glue here.
- Last little tip: I made those crazy signature hair-dos for the Sanderson Sisters gnomes by watercolor-painting some crinkle faux fur like this here. Seriously, that’s it. Once the fur was painted, it was just styling. No real fuss or anything!

How Do I Make these Hocus Pocus Gnomes?
I’m so glad you asked. Below is our written tutorial. If you’re making a sock gnome playlist on YouTube, here is our Hocus Pocus gnomes video tutorial.
Hocus Pocus Gnomes
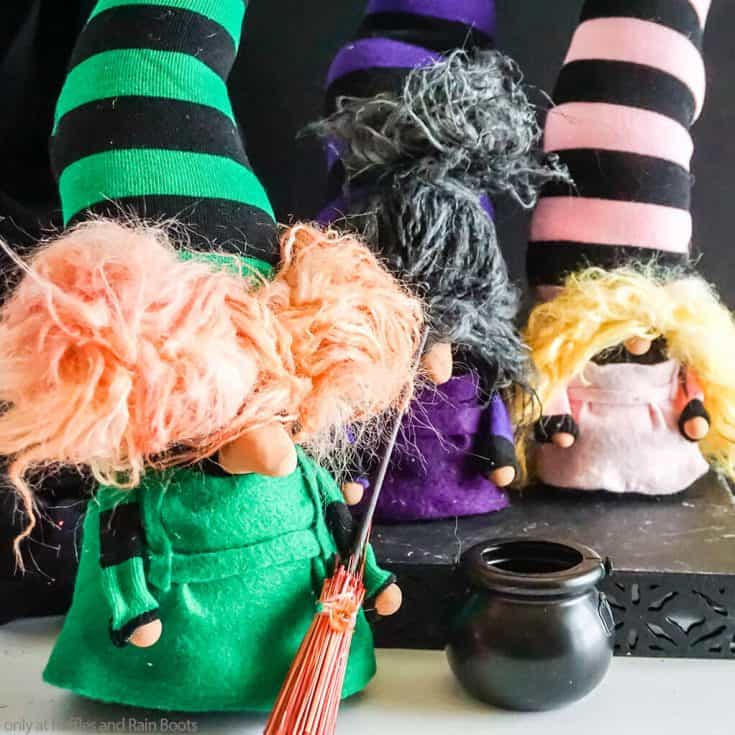
I am seriously in love with how fun these wicked Hocus Pocus gnomes turned out to be. They're some of the best halloween gnomes you can make, plus they're no-sew gnomes you can make in minutes!
Materials
- 3 Thigh-High Socks - 1 Green/Black Stripes, 1 Pink/Black Stripes and 1 Purple/Black Stripes
- 1/4 yd White Crinkle Faux Fur
- Craft Felt in Green, Purple and Pink
- 3 Floral Wires
- 3 cups Polyfill Beads
- 6 cups Polyfill
- Light Brown Polymer Clay
- Watercolor Paint in Yellow, Red, Brown and Black
- Ribbon Scraps
Tools
- Scissors
- Exacto Knife or Razor Blade
- Hot Glue Gun & Glue
- Wire Cutters
- Needle Nose Pliers
- Oven
Instructions
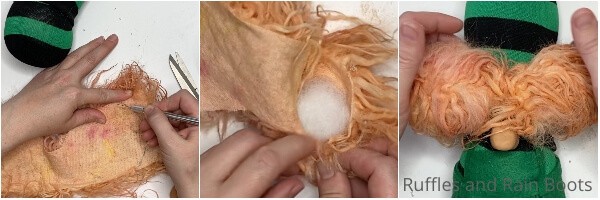
- Make your individual witch hair by painting the white crinkle fur with your yellow, black and a mixture of red and brown watercolor. Allow the faux fur to dry completely.
- Roll a quarter-sized portion of clay into a neat ball then form it into a big honking hooked honker, AKA nose (make sure the back where it will affix to the face is flat) for Sister Winifred. Repeat to make a slightly smaller hooked nose just like the first for Sister Mary, then finally make a smaller ball of clay for Sister Sarah's nose. Set aside.

- Roll six nickel-sized portions of the clay into 6 neat balls. These are the hands.
- Bake the nose and hands per the clay package's directions. Allow them to cool fully.
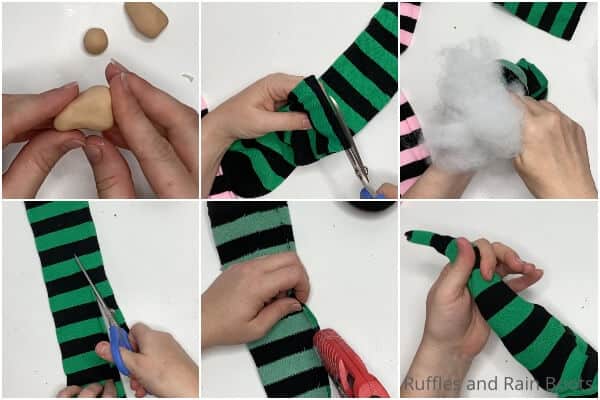
- Start making your gnome bodies by cutting off the bottom of each sock about 3 inches higher than the sock's ankle. Fill the toe portion of one of the socks with 1 cup of polyfill beads. Fill the sock with an additional 1-2 cups (or so) of polyfill, about halfway up the sock, rolling and smushing to make it look nice and smooth. Tie the sock closed with the scrap ribbon and hot glue the knot to make sure it stays closed.
- With the remaining portion of the sock, cut a big long angle, starting at the cut, moving all the way up into the toe, making a large, thin angled cut. Turn the sock inside out. Hot glue the two cut edges together, forming a seam. Turn the sock right side out.
- Using the needle nose pliers, bend the ends of the floral wire over into a circle. Feed the floral wire up into the hat, followed by polyfill, forming the hat. Stuff the sock full of polyfill, as desired.

- Tuck the hat down over the body and make sure you like the fit.
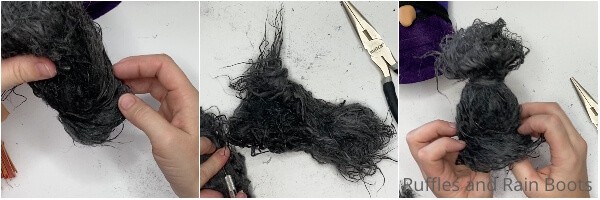
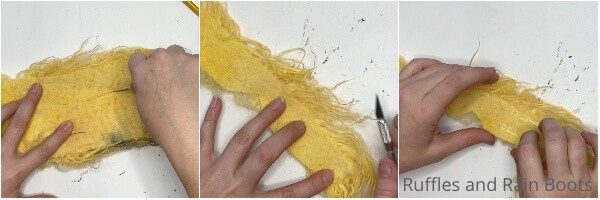
- Depending on which gnome you're working on, make the hair-do as follows:
- Winifred: Using a jar or funnel as a template, draw two circle on either end the fabric side of the red/brown faux fur, about 2 inches apart. Cut out both circles AND the space between the two circles, leaving the two circles connected. Add a small amount of polyfill into the center of each circle of faux fur on the fabric side, then pinch the edges of the circles together, forming a pom pom and closing the circle over onto itself. Once both of the pom poms are made, style the fur a little to make sure you like it and set aside.

- Mary: Fold a 4-inch wide section of black faux fur into a trapezoid shape (wide on one end and narrower on the other). About 1/4 of the way from the top, pinch the fur together and, using a strip of faux fur or a ribbon or rubber band, make this pinch stay in place. Fluff the fur up on the top part of the fur, past the pinch area. In the lower 1/8 of the faux fur, create bangs by pulling the fur to one side or the other. Set aside.
- Sarah: Cut your yellow faux fur into a 2-inch wide strip about 15-16 inches long. Trim the faux fur to be narrower on the two ends and flat or even narrowed in the center. Fold the edges of the fabric side in on itself along both edges and hot glue the edges in place. Style as desired. Set aside.
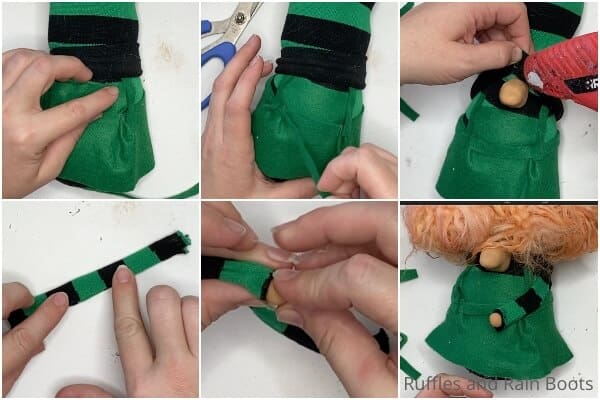
- Hot glue the noses on just above where you want the apron to start onto the appropriate colored sock.
- With the appropriate colored sock, hot glue the hair on to the front of the sock gnome.
- Cut a 3-inch square piece of coordinating color felt and hot glue it in place onto the front of your gnome, about 1/2 inch below the nose. Cut a rectangle of the coordinating color felt long enough to wrap around the sock gnome and about 4 inches tall, wrapping this around the gnome and pleating it, as desired, to make a skirt. Cut a 1/4 inch wide strip of the coordinating color felt about 7 to 8-inches long. Hot glue this length of felt to the gnome, where the square of bodice and the skirt meet, making a belt. Cut two 1/4-inch wide strips of felt, about 3 inches long and hot glue them on either side of the bodice piece of felt, over the belt and lace skirt.
- Cut out two arm shapes from the remainder sock, about 3 inches by 6 inches. Place a line of hot glue down one long side of the arms and then fold the fabric over onto itself twice to make a thin arm. Slip the arm up into the hat on the side and hot glue it in place. Trim arm as desired Hot glue the hands in place on the ends of the arms.
- Hot glue the hat in place above the nose and in the back, pulled down snugly to open-up the face. Then just enjoy!
Notes
For more fun halloween gnome tutorials, visit Ruffles and Rain Boots!
If you are here looking for the first version of these Hocus Pocus gnomes (pictured below), you can click here to find that tutorial.
Recommended Products
As an Amazon Associate and member of other affiliate programs, I earn from qualifying purchases.


More DIY Halloween Gnomes You Might Like
- Gnome Costume for Kids – If you’re looking for the world’s easiest (and cutest) way to no-sew a costume for your little gnome, this is it!
- Boo! and Eek! Halloween Sock Gnome – Oh, this is the perfect sock gnome tutorial for Halloween gnomes ever. You have to grab the free SVGs and get this made now.
- Pumpkin Gnome – It’s so cute, I want to take a bite out of his sweet little pumpkin-ey butt!
Please Save This to Pinterest
Your shares are how this site grows and I am sincerely grateful. Know a friend who’d like this? Please share it on Facebook or save it to your favorite farmhouse crafts board on Pinterest.