
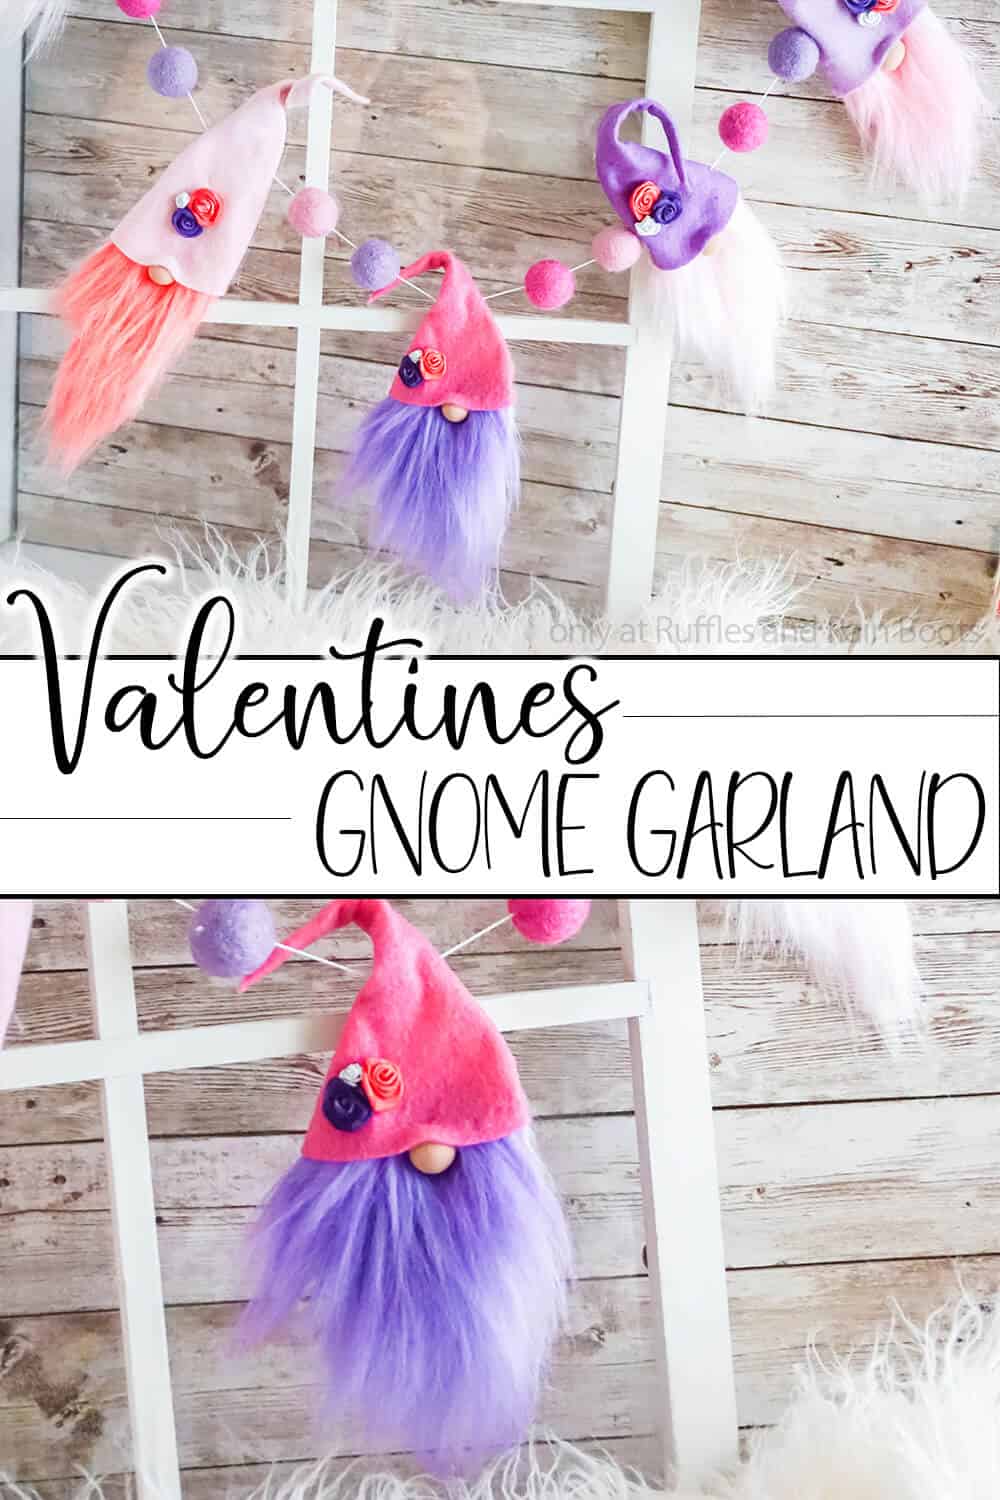
This Valentine Gnome Garland is the Cutest Valentine Garland EVER!
If you are ready to set out some Valentine’s Day decor, this Valentine gnome garland is the most adorable DIY piece you’ll add to your collection this year.

Valentine Gnome Garland
Here at Ruffles and Rain Boots, I am more than just a little excited about Valentine’s Day. The pinks and reds replace the holiday colors and I just love the bright remix around the house. And because I’m a bit obsessed enamored with gnomes, these two things have come together.
This is a simple, fun project that took almost no time once I decided on my color scheme. The little extra step of making custom colors for my gnome beards makes this craft wow-worthy.
RELATED READING: ALL VALENTINE’S DAY GNOMES ON RUFFLES AND RAIN BOOTS
Below I’ll show you exactly how to color faux fur so it doesn’t transfer but if you want, you can keep the beards their natural color. If you’re ready to make a cute Valentines gnome garland, let’s get started.
No Time to Make This Now? Pin it for Later
If you aren’t quite yet ready to start or you need to gather supplies, pin this to your favorite easy craft ideas board on Pinterest and it’ll be here when you’re ready.

As an Amazon Associate, I can earn from qualifying purchases. There could be affiliate links in this article.
Tips to Make A Valentine Garland with Gnomes
- I made a conscious decision to make each of my gnomes on this Valentine garland distinctive and different. While I made each gnome be unique in some way, there’s no reason that you can’t make them all the same.
- Click here to get the pattern for the gnomes to cut by hand or click here to get the pattern for the gnomes with the cut files. You will notice that it’s a pattern for a reindeer gnome garland, so just ignore all the reindeer-specific things (antlers). You get two crafts in one!
- If you have never learned to cut faux fur correctly, don’t worry, I show you how to cut faux fur in the video. Hint: use an Exacto knife, flip it over, and cut only the fabric backing.
- Take your time. The entire project took about 45 minutes from start to finish (including painting the faux fur and making the roses from clay).
- Let’s take a second to talk about felt balls. Making those little guys is not as easy as YouTubers would have you think!! They do not come out as pretty and it takes SO MUCH TIME. So, skip making your own felt balls and grab some here like I’ve learned to do.

How Do I Make this Valentine Gnome Garland?
I’m so glad you asked. Below is our written tutorial. If you’re a visual learner and would like to watch me make this fun garland, here is the Valentine gnome garland video tutorial on YouTube.
Valentine's Day Gnome Garland

This is just the cutest gnome garland for Valentine's Day! You will learn how to make the gnomes, color fur, and make each gnome unique.
Materials
- Craft Felt in Shades of Pink and Purple
- White Craft Fur (click here)
- Polymer Clay in White, Light Brown, Red and Purple
- Felted Wool Balls in Pinks, Purples and Reds (I bought these)
- White Embroidery Thread
- 3-4 Pipe Cleaners or Floral Wire
- Watercolor Paints (if coloring fur)
- Craft Paint (optional)
Tools
- Paint Brush
- Exacto Knife
- Scissors
- Hot Glue Gun and Glue
- Oven (if creating clay flowers)
- Embroidery Thread Needle
- Comb or Brush
Instructions
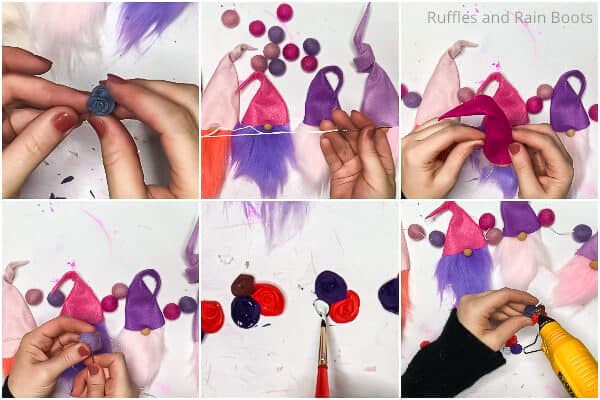
- Start by making your custom beard colors by painting the fur with watercolors in sections about 3-4 inches wide by 6-8 inches long. I went with reds, pinks and (eventually) purple. Allow the paint to dry overnight.
- Comb or brush the painted fur out until it's soft.
- Make the noses for the gnomes by combining light brown and white polymer clay and working them until the color is consistent.
- Pinch off and roll little balls of about the size of a dime--make as many as you want to make of the little gnomes.
- Bake the gnome noses in the oven per the directions on the package.
- Cut out the beards in rough "v" shapes, taking care to make each individual.
- Match-up the colors of beards with the scraps of craft felt you have to make sure each gnome coordinates well.
- Repaint any beard you need to replace the beard colors you don't want. I added purple to my beads.

- Cut each of the felt scraps into a rough triangle, wider than the coordinating beard, with a slightly rounded bottom edge.
- Place the beards face-down on the felt triangles.
- Working one gnome at a time, fold the edges of the felt over the beard edges and hot glue the two sides of the felt together, forming the hat.
- Slide a pipe cleaner up into the back of the hat and cut it to be no longer than the hat.
- Hot glue the pipe cleaner in place.
- Flip the gnomes right-side up.
- Tuck a gnome nose up under the edge of the hat brim and hot glue it in place both to the hat and to the beard.
- Make the little roses by forming your red, purple and white clay into little flat snakes, then rolling them up one end to the other, wide on one side and narrow on the other.
- Place 3 roses (one white, one red, one purple) together and gently press them to join.
- Bake per the clay packaging directions. Remove the flowers from the oven and allow to cool completely.
- Lay-out the felted wool balls and gnomes on the table to make sure you like the order of things.
- Thread 4-6 feet of embroidery thread on the needle.
- Thread the needle through the hats of the gnomes and the felted wool balls in the order you desire. Leave plenty of room between each for spacing and plenty of length of thread on each end to allow the garland to be hung.
- Paint the flowers with the craft paint, if desired, to bring out the color more. Allow paint to dry completely.
- Hot glue the flowers to the gnome hats and hang the garland as desired.


Notes
The pattern also includes other garlands. For more fun Valentine's Day crafts and TONS of fun DIY gnome ideas, visit Ruffles and Rain Boots!
Recommended Products
As an Amazon Associate and member of other affiliate programs, I earn from qualifying purchases.


More Valentine Crafts You Might Like
- Valentine Felt Gnomes – You don’t get more easy than these little felt gnomes that are totally in love. Just an old couple that still kisses. Best EVER!
- DIY Cupid Gnome with Free Pattern – A pool noodle gnome is made a bit extra with this fun tutorial full of wonderful accessories and details.
- Valentine Sock Gnome Couple – I adore–ADORE–this couple of gnomes. The socks, the heart, the roses, the cups of coffee. It all just comes together to be so cute!
Please Save This to Pinterest
Your shares are how this site grows and I am sincerely grateful. Know a friend who’d like this? Please share it on Facebook or save it to your favorite easy craft ideas board on Pinterest.
Meet the Creator
Hi there, I’m Sarah Nenni-Daher. I’m a crafty gal and always have at least 14 projects going at once. I am a crafter, designer, DIYer, and pattern maker. I share my creations here and in the Ruffles and Rain Boots® Shop.
Here at Ruffles and Rain Boots®, you’ll find DIY gnomes, crafts, gifts, cupcakes, laser crafts, and so much more. I love sharing video tutorials over on YouTube and chatting with other crafters in my Facebook groups. We’d love to have you!