
Snowflake Stencil Card with Hand Lettering Accent
This snowflake stencil card with a hand lettering accent is a holiday craft. Grab a cup of coffee and let’s get making this gorgeous handmade holiday card.

I partnered with Stencil Revolution to bring you a few holiday crafts with their quality stencils. I’ve put a few of them to the test with these projects:
- Santa’s Little Baker Kit with a Stenciled Apron – It was so much fun making this!
- Nativity Story Stones and Stenciled Gift Bag – Fun, quick, and kids LOVE them!
What You'll Find On This Page
A Snowflake Christmas Card Idea
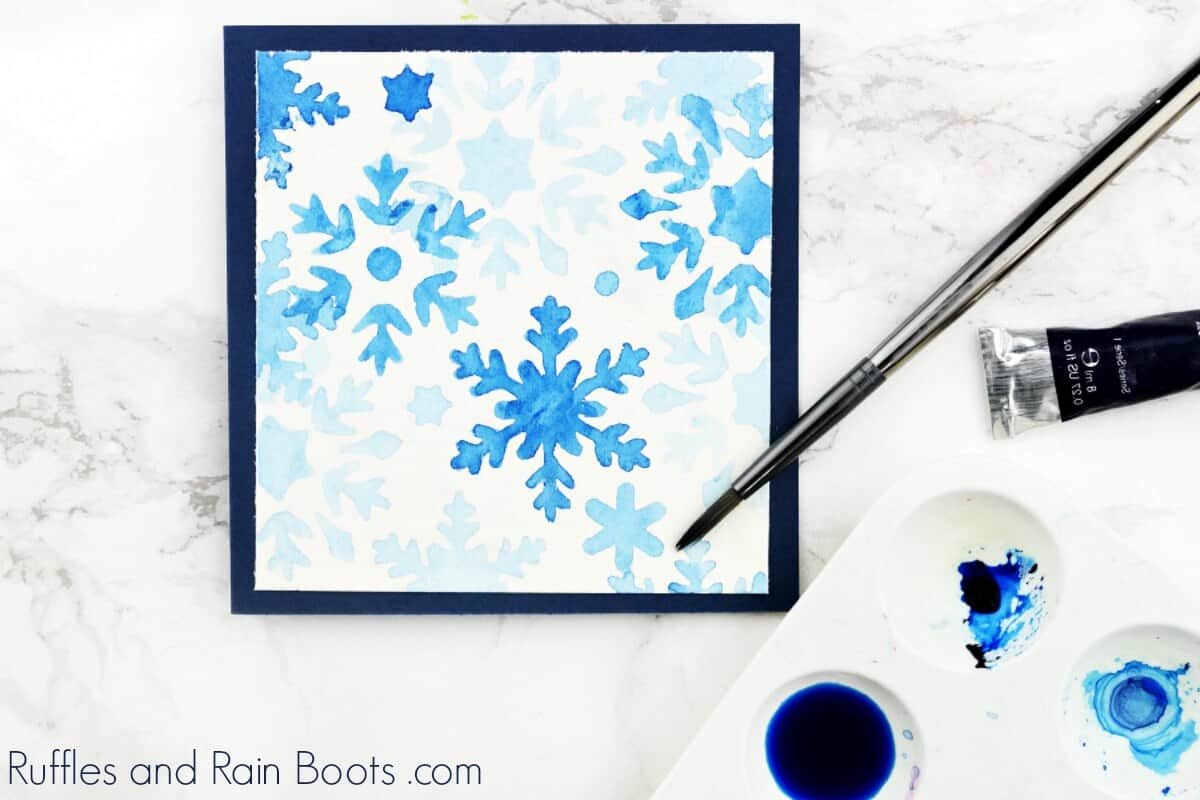
If you love to DIY handmade holiday cards, I know you’ve tried to watercolor snowflakes before. It’s hard, friends. Here on Ruffles and Rain Boots, we’ve tried and failed a few times.
So when I saw this snowflake template from Stencil Revolution, I wondered if I could use it with watercolor. And guess what? It worked like a charm! Even if you’re new to watercolor, I’m going to walk you through how to make this gorgeous snowflake stencil card.
It takes about 30 minutes to make this elegant holiday card design, so let’s get started.
Supplies for Snowflake Stencil Card
This watercolor snowflake card is ridiculously easy when you have the right tools. The best part is that you only need one color of paint!
- 6-inch x 6-inch snowflake template from Stencil Revolution
- watercolor paint – I used Prussian Blue
- small paintbrush and well palette
- watercolor paper – I used 140 lb cold-pressed
- water and artist’s tape (or another low-stick tape)
- white ink pen, cardstock to coordinate with paint, and double-sided tape
RELATED READING: Santa’s Little Baker Kit with a Stenciled Apron

How to Make a Christmas Snowflake Stencil Painting
I’m a visual learner and if you are, too, check out the video I made for you. It’s a quick but helpful tutorial.
Snowflake Stencil Card

This snowflake stencil card with a hand lettering accent is a holiday craft. Grab a cup of coffee and let’s get making this gorgeous handmade holiday card.
Materials
- 6-inch x 6-inch snowflake template from Stencil Revolution
- watercolor paint – I used Prussian Blue
- small paintbrush and well palette
- watercolor paper – I used 140 lb cold-pressed
- water and artist’s tape (or another low-stick tape)
- white ink pen, cardstock to coordinate with paint, and double-sided tape
Instructions
- Prepare your ombré watercolors by placing a small amount of paint in one well. Draw from it and add the paint to three wells. Add only enough water to the first well to moisten the paint. Add increasing amounts of water to the other wells.
- Place the watercolor paper onto a hard surface you can move around easily (I used a clipboard) and tape down the sides. Tape the stencil on top, positioned as you like.
- Start with the most watered-down color on dry paper and fill in your desired parts of the stencil. I moved mine around a bit as you can see in the video. Let it dry.
- Layer the medium saturation paint onto the paper, overlapping where you’d like. Let dry.
- Complete the final layer of deeply saturated paint. Let dry.

Assemble Your Snowflake Stencil Card
- To prepare the snowflake stencil card, cut down the watercolor paper to your desired size. Use a piece of cardstock in your preferred color and affix the snowflake painting to the front with double-sided tape.
- Using a small piece of the coordinating cardstock, hand letter the sentiment of your choice in white pen. A few ideas for the front of the card are:
- joy
- merry
- peace
- Merry Christmas, Season’s Greetings, Feliz Navidad, or Joyeux Noël
- Once lettered, attach the small accent cardstock to the front of the card with double-sided tape.
Get Creativity Delivered Every Week
If you want to join the fun here on Ruffles and Rain Boots, sign up for the once-weekly newsletter. I’ll share freebies and anything new and you’ll be the first to get them all.
Please Share This Lovely Card to Facebook or Pinterest
Your shares are how to grow and we are sincerely thankful.

Meet the Creator
Hi there, I’m Sarah Nenni-Daher. I’m a crafty gal and always have at least 14 projects going at once. I am a crafter, designer, DIYer, and pattern maker. I share my creations here and in the Ruffles and Rain Boots® Shop.
Here at Ruffles and Rain Boots®, you’ll find DIY gnomes, crafts, gifts, cupcakes, laser crafts, and so much more. I love sharing video tutorials over on YouTube and chatting with other crafters in my Facebook groups. We’d love to have you!