
Acrylic and Wood Overlay Ornaments
If you want an elegant laser cut Christmas ornament idea, these acrylic and wood overly ornaments are perfect. This project comes together so quickly due to the ‘cheat’ code I’m sharing.
I’ll share how to upload and size any pre-made acrylic blank, how to design in XCS software, and how to make very quick work of this project. This is a beginner laser DIY.

RELATED READING: Christmas Laser Crafts to Make and Sell
As an Amazon Associate, I could earn from qualifying purchases. There could be affiliate links within this article.
What You'll Find On This Page
Stacked Laser Cut Wood and Clear Acrylic Ornaments
Here at Ruffles and Rain Boots, I’ve been LOVING the xTool S1 40W laser set up I have in place. This machine is literally the easiest (and safest) enclosed laser on the market and they make it so easy to create with it.
Today, I was “cleaning” my craft room and came across 4 shapes of clear acrylic ornament blanks I purchased online. They were originally for a few Cricut projects, but I had an idea and thought I’d try it out on the laser.
Have you joined the Laser Group on Facebook yet? It’s a welcoming, friendly, and open space to get ideas, ask questions, and learn from our peers.
If you would love to work on this beginner laser project but can’t start right now, save, email, or share this. It will be easy to find when you’re ready to begin.

RELATED READING: Easy Highland Cow Door Sign (Beginner Laser DIY)
Deciding on a Laser for a Side Hustle or Full-Time Business?
I own three types of lasers right now: CO2, diode, and fiber (infrared). Below are summaries of each and suggestions on materials. If you have questions, please ask! Not all lasers are right for those looking to start a business or side hustle. If that’s you, choose the P2 or the S1.
- xTool P Series – A fully-enclosed CO2 laser, perfect for cutting acrylic and wood. This is an unrestricted laser when it comes to acrylic, wood, slate, etc. and it’s my top choice.
- xTool S1 – The option I have is a 40 watt diode laser which cuts some acrylic, wood and does amazing engravings. This laser has some acrylic restrictions (no clear, mirror, translucent; primarily opaque) but powers through wood.
- xTool M1 ULTRA – The updated version of the ground-breaking xTool M1 shows up to the party with a printer (can print on wood), a laser, a set of blades, foil, and embossing, as well as a pen tool. Great for crafters!
- xTool F2 – This dual laser is portable! It’s the best-selling, landmark setting laser that contains a diode and an infrared laser. It’s perfect to take to shows, markets, and events.
- WeCreat Vista – This is a fun tool to have if you’d like to work primarily with tumblers or wood. The patented FlipLaser design turns the laser head 90 degrees, allowing you a great tumbler engraving experience.
Layered Wood on Acrylic Ornaments Video Tutorial
If you’re a visual learner, I put together a step by step tutorial of this entire process. I’ll walk you through the software, design elements, and more.
While you’re there, subscribe! We have a lot of fun on the channel.

How to Design in XCS (Free File)
I’m asked ALL THE TIME how to design and what software is needed. Most of the time, people have amazing ideas but they are intimidated by the software. You do not have to have Adobe products to create beautiful designs.
xTool has a very easy to use, proprietary software called XCS (xTool Creative Space). You can download it and play with it before you get your machine.
It’s a robust tool with simple functions that can really do a lot! If you want to use my set of designs for the acrylic blanks I used, download the free acrylic and wood overlay ornament XCS file.
If you’re designing on your own, keep in mind the following:
- load an image into the software of the premade acrylic ornament shapes (background removed) and size correctly (watch how in the video tutorial)
- design images that highlight the clear portion of the ornament. It helps to build directly on the shapes you have in the software to create visually interesting pieces
- create floating elements, like the snowflake and stars in my examples and leave a bit of ‘blank space’ in your designs. The wood will offset the clear well, even without staining
- use elements within the software or import SVG file types to easily and quickly create designs in layers
- add additional depth with details of engraved or scored features and text (use fonts with ligatures, alternates, and swashes)
How to Use the xTool S1 to Engrave and Cut
Once the shapes have been sized and your designs are ready, back the material you will be cutting with the 3M adhesive (remove any air bubbles).

Load the board (3M side down) into the machine and auto-measure the distance. Select the Start Marking button to create processing boundary.
Drag the designs (with or without the shapes set to ignore) and position all pieces within the processing area.

Set the engrave and cut settings for the designs. My settings ar to be used as a starting point; test all materials. Engrave: power = 23, speed 88; Cut: power 90, speed 10.
Frame the design by selecting Frame and watch the processing area; make any adjustments. Start and run the job.
Assemble the Layered Wood Ornaments
Remove all pieces and wipe all outer edges with the dry cloth. Seal with the spray sealant.

Remove the protective layer from the front of an ornament and remove the 3M backing from the wood. Position and repeat for all pieces and ornaments.

This next step is optional. I choose to clamp my projects, whether they’re built with glue or the 3M adhesive. In order to avoid indenting anything, I place a small cut of cardboard over the designs and leave the clamps on for about 10 minutes.

Cut 12 inches of 1/8th inch ribbon for each ornament, fold in half, and put the looped end through the front of the ornament. Run the open ends through the loop, pull tight, and knot at the end.
Remove the protective backing from the other side of the ornament and gift or display.

More Laser Crafts You Might Like
- DIY Laser Cut Wooden Bookmarks – This fun craft can be sold or shared with friends and family; it’s perfect for all readers!
- How to Make Engraved Laser Cut Wine Charms – Including a free file, this beginner laser project tutorial is a great starter project.
- Glowforge Aura vs xTool M1 – If you’re looking for a beginner laser for crafting, take a look at this in depth comparison.
- Learn How to Cut White Acrylic with a Diode Laser – It can be done!
Please Save or Share This Beginner Laser Ornament Idea
Your shares are how this site grows and I am sincerely grateful. Please save this to a DIY laser ideas pin board or share it with a crafty group on Facebook.

Layered Laser Cut Wood and Acrylic Ornaments

These acrylic and wood overlay ornaments are made easy with this step by step tutorial and free design file. Learn how to design for pre-made acrylic ornament shapes and build beautiful, elegant designs for ornaments. In this quick laser ornament tutorial for beginners, I will design the ornaments and create the finished products.
Materials
- Acrylic Ornament Shapes (I used these)
- Phone or Camera
- Basswood Plywood (12x12)
- 3M Adhesive
- Clear Sealant Spray
- Ribbon, 1/8th
- XCS File with Designs (Optional)
Tools
- xTool S1 40W Diode
- XCS (xTool’s Creative Software)
- Air Assist
- Honeycomb Panel (Optional)
- Clean, Dry Cloth for Soot Removal
- Scissors
Instructions
How to Transfer Acrylic Ornament Blanks into Software
- First, take an overhead image of the products. It’s best to put them on a solid color background with even lighting. Be sure to have something easily measured in the image (I used the round ornament).
- Import the image into the design software and remove the background or use remove.bg (my choice for free, background removal software).
- You can attempt image trace, but many times the software doesn’t do a great job. Instead, use the image reference to create a shape and size the image inside the software. Build with simple shapes or create your own (I used the vector tool inside XCS).
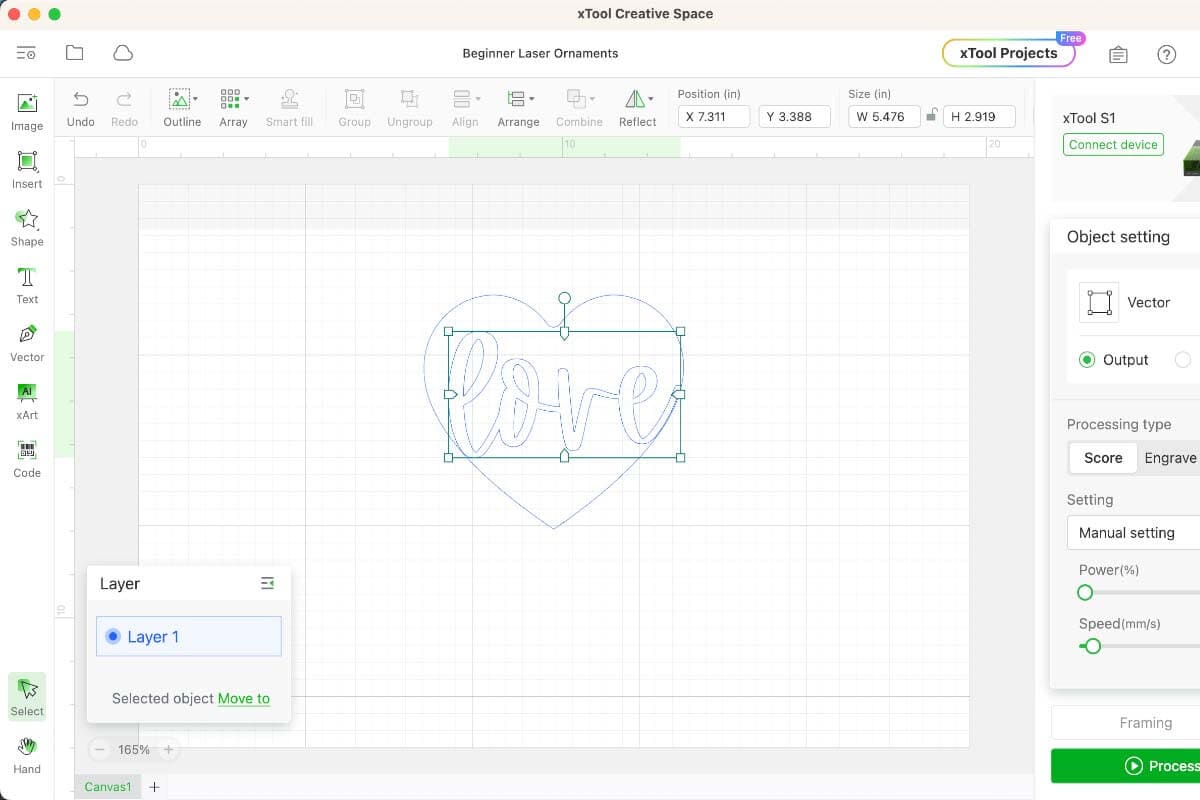
Design Over the Ornament Shapes
- Once you have the correct sizes for the premade acrylic ornament shapes, design images that highlight the clear portion of the ornament. Build directly on the shapes you have in the software to create visually interesting pieces.
I strongly urge you to watch the video tutorial here to see how they come together. Read the "How to Design in XCS" above for tips. - Be sure to join (Combine > Unite) any shapes you want as a single piece and Weld and/or Group the text.
How to Use the xTool S1 to Engrave and Cut
- Once the designs are ready, back the material with the 3M adhesive. Remove any air bubbles - brayer it down with your hand or a tool.
- Load the board (3M side down) into the machine and auto-measure the distance. To do so, drag the laser crosshairs over the material and select distance measure.
- Select the Start Marking button to create processing boundary. Move the laser to the uppermost left of the material work area, hit start, and lock in the first vertex. Move the laser to the bottommost right of the material’s work area, hit start, and lock in the second vertex.
- Drag the designs (with or without the shapes set to ignore) and position all pieces within the boundary box.
- Set the engrave and cut settings for the designs. My settings are below to be used as a starting point; remember to test all materials before you begin.
- Frame the design by selecting Frame and watch the processing area; make any adjustments. Start and run the job.
Assemble the Layered Acrylic and Wood Ornaments
- Remove all pieces and wipe all outer edges with the dry cloth. Seal with the spray sealant.
- Remove the protective layer from the front of an ornament, remove the 3M backing from the wood, and position. Repeat for all pieces and ornaments.
- Cut 12 inches of 1/8th inch ribbon for each ornament, fold in half, and put the looped end through the front of the ornament. Run the open ends through the loop, pull tight, and knot at the end.
- Remove the protective backing from the other side of the ornament and gift or display.
Notes
Engrave Settings: Power 23, Speed 88
Cut Settings: Power 90, Speed 10
Recommended Products
As an Amazon Associate and member of other affiliate programs, I earn from qualifying purchases.


Meet the Creator
Hi there, I’m Sarah Nenni-Daher. I’m a crafty gal and always have at least 14 projects going at once. I am a crafter, designer, DIYer, and pattern maker. I share my creations here and in the Ruffles and Rain Boots® Shop.
Here at Ruffles and Rain Boots®, you’ll find DIY gnomes, crafts, gifts, cupcakes, laser crafts, and so much more. I love sharing video tutorials over on YouTube and chatting with other crafters in my Facebook groups. We’d love to have you!