
DIY Standing Reindeer Gnome
Learn how to create this standing reindeer gnome for Christmas decor or as a product to sell this holiday season. In this step by step process and gnome video tutorial, I’ll show you how to create YOUR OWN PATTERN: a gnome jacket pattern, gnome pants, and a slouchy gnome hat!
This Christmas gnome takes about 45 minutes to put together using a foam base, pre-made gnome boots, and a bit of fabric. The pool noodle base can be substituted for a Styrofoam® cone or ball, as well.

RELATED READING: Easy Reindeer Gnome Pattern (Cute Antlers)
What You'll Find On This Page
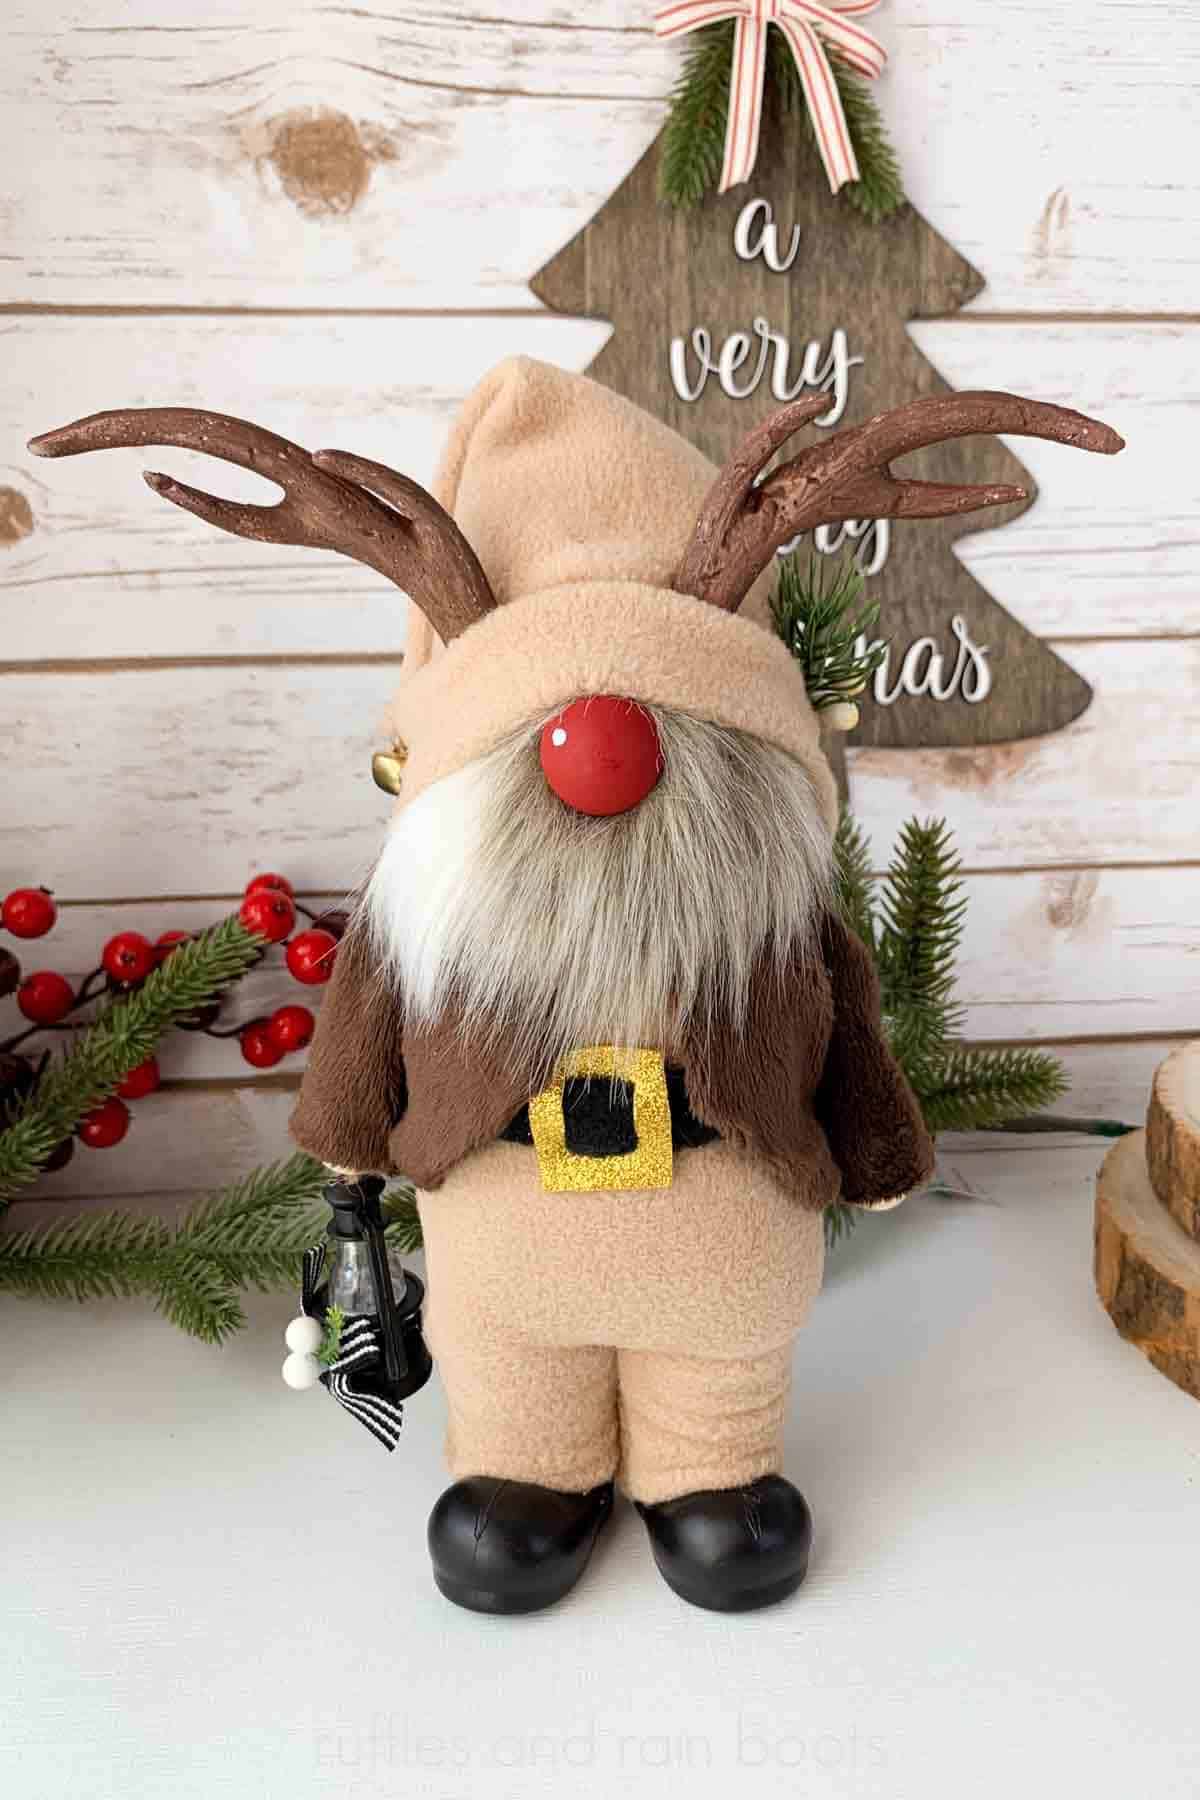
Reindeer Gnome in Boots
Here at Ruffles and Rain Boots, I’m a huge fan of easy Christmas gnome DIY projects. I’ve shared gnome ornament tutorials, a TON of DIY gnomes, oodles of free gnome patterns, and so many other easy projects to add a bit of whimsy into your holiday decor.
This free gnome tutorial is just like my others: step by step tutorials with alternative so you can use what you have on hand or craft on a budget. The difference with this project is that you will learn how to create a gnome pattern yourself – there is no printed pattern for this project.
If you love this project, be sure to share it with a crafty group on Facebook. Can’t get started now? Save this to a DIY Christmas crafts pin board so you can find it when you’re ready to begin.
As an Amazon Associate, I could earn from qualifying purchases. There could be affiliate links within this article.
RELATED READING: DIY Christmas Gnomes – Find Your Favorite!
Easy Gnome Boots for Weighted Gnomes
I am using some pre-made, easy to use gnome boots I purchased from a fellow gnome-maker on Etsy. The gnome boots I am using are high quality and produce very stable gnomes when weighted.
Alternatives you can use are:
- pre-made Santa boots from the craft store
- boot ornaments (prevalent in dollar stores, craft stores, and online during the holidays)
- DIY gnome boots (mid-size like these gnome boots made with fur; just make them 2.75 inches high)

Standing Reindeer Gnome Video Tutorial
If you’re a visual learner, I created a step by step, craft along standing reindeer gnome video tutorial here. This is a thorough look at some of the abstract concepts below, so please consider watching it before attempting this build.
Please Note: due to all of the steps, I encourage you to watch the video tutorial at least once before following the step by step process below.

How to Make the Reindeer Gnome in Boots
Below are the step by step process and images to help guide your through this fun holiday DIY. If you would like a printable version, please scroll to the bottom of this post.
Reindeer Antlers
First, create the antlers. As I mentioned in the video, I’ll be using foam clay and a mold for this set but you can use craft foam or felt and use those, as well.
Break off a chunk of foam clay and divide it in two pieces. Press the foam clay into the mold, taking care to press it firmly into the ridges. Remove excess clay.

Let dry 48 hours and paint with brown acrylic paints and a brush. I used some of the red, dark brown, and a light brown all blended while the paint was wet.

Reindeer Gnome Boots and Body
Use the paintbrush and red acrylic paint to cover the half back / wood bead used for the gnome nose. Let dry, add another coat, and let dry again. Cut the 12 inch dowel in half and sharpen one end of each.
Cut into the boots using scissors to create a larger hole. Fill with small pebbles, and one half of the dowel (flat side down, sharpened side up). Secure the rest of the boot with glue and rocks for weight.

Add the pool noodle on top of the sharpened dowel, pushing them in back of center for balance.

Wrap the body and boots in light brown fleece, add about an inch for a seam allowance, and glue along the horizontal edge to start the pants.
Turn inside out. Slip the glued rectangle onto the body and boots, cut a 2 inch slit (under the pool noodle), remove, and glue the pant legs. Let dry and turn right sides out.

Add the pants onto the body and secure the dowels into the pool noodle with glue. Pull up the pants, add poly stuffing, and tie with twine around the “belly.”
Cut a piece of black scrap fabric 1 wide x 10 inches long. Fold in the long edges to center, securing with glue to create the belt. Cut a rectangle from gold foam, cut two slits for the belt, and run the fabric through. Glue the belt to the body over the twine.

Gnome Jacket Pattern
Wrap the Minky fabric around the gnome body, add about an inch for a seam allowance, and cut to the height you want. My piece was 5.5 H by 10 W.
Fold in half and measure two inches from the bottom and two inches along the bottom. Cut a curve between these two points to get a jacket that flares out. On the wrong side of the fabric, add a hem about 1/4 to 1/2 all the way around, cutting the curve to hem it.

Cut two pieces at 5 H x 3 W for the sleeves. Hem the bottom, put right sides together and glue to secure. When dry, turn them right sides out.

Slouchy Gnome Hat Pattern
Cut a piece of fleece fabric that is 12 W x 9 H. Fold up the bottom on the wrong side of the fabric to add a brim and secure with glue.
Fold the piece right sides together and cut a triangle from just above the brim to 1/4 inch away from the fold. Glue the triangle edge, leaving the brim side open. Let dry and turn right sides out.

Reindeer Gnome Beard
Measure the desired beard height you’d like on the body of the gnome (my beard measured 3 W x 2 H). Cut the piece of faux fur using an X-Acto knife on the back of the faux fur fabric.

Gnome Assembly and Decorations
Glue on the jacket to the body of the gnome. Add on the arms (the video shows how to create a seamless look).

Glue the faux fur on top of the front of the jacket. Split the fur to the fabric backing, add hot glue, and press on the gnome nose.

Slip on the hat and secure the back with pins. Secure the brim to the top of the nose with glue. Unpin the back and secure with glue. Add a small amount of stuffing to the hat.

Scrunch a band into the front of the hat and pin both sides. Secure each with glue going VERY slowly – do not move on until the first side is set. Cut the foam antlers to fit the band space on the hat, add wire into the foam, and secure into the hat by cutting the fabric and pressing into the pool noodle. Add a small amount of hot glue to the antler and fabric to secure in place.

Glue the 1/2 inch wood balls into the ends of the sleeves and add greenery and decorations. Add a small white dot for an accent on the nose and let dry.

More Christmas Gnome Crafts You Might Like
- DIY Reindeer Gnomes Pattern and Tutorial – Using the Internet’s most popular gnome pattern, create one or both styles of these adorable holiday gnomes.
- Easy Reindeer Gnome Ornament – This quick and easy holiday DIY makes over a craft store staple af
- Reindeer Gnome Garland – It’s cute, it’s quick, and uses up those tiny faux fur scraps you’ll have left over.
- 3 Minute Sock Gnome DIY – This ridiculously cute fast is also ridiculously fast to make. It’s perfect for gifts and is a good craft for fund raising opportunities.
Please Save or Share This Fun Christmas Gnome Idea
Your shares are how this site grows and I am grateful. Please share this with a crafty group on Facebook or save it to a DIY Christmas ideas pin board.

Standing Reindeer Gnome in Boots

Although this looks like a lot of work, it's a quick DIY gnome for Christmas using basic craft supplies and fabric. This standing reindeer gnome is a perfect holiday decor piece and is a good size for shipping in case you sell. Learn how to make a gnome jacket pattern, gnome pants, and a slouchy gnome hat all on your own!
Materials
- 4 inches of Pool Noodle (or 6 inch Styrofoam Cone)
- 12 inch 1/4" Dowel
- Fleece and Minky Fabric in Brown Hues, Black Scrap Fabric
- Pre-made Gnome Boots (or Others)
- Foam Clay (Optional; can use fabric, felt, or foam)
- Small Rocks or Pebbles
- Gold Foam
- 2, 1/2 inch Wood Beads
- 1, 1 inch Wood Flat Back
- Greenery Accents
- Bell and Lantern Accents
- Brown, Tan, Red, and White Acrylic Paint
- Twine
- Poly Fil Stuffing
- 14 Gauge Wire (to Secure Antlers)
Tools
- Pencil Sharpener
- Scissors
- Hot Glue Gun and Glue Stick
- Needle and Thread, Optional
- Paintbrush
- Antler Mold (I Used This Set)
Instructions
Reindeer Antlers
- Break off a chunk of foam clay and divide it in two pieces.
- Press the foam clay into the mold, taking care to press it firmly into the ridges. Remove excess clay.
- Let dry 48 hours and paint with brown acrylic paints and a brush.
Reindeer Gnome Boots and Body
- Use the paintbrush and red acrylic paint to cover the half back / wood bead used for the gnome nose. Let dry, add another coat, and let dry again.
- Cut the 12 inch dowel in half and sharpen one end of each.
- Cut into the boots using scissors to create a larger hole. Fill with small pebbles, and one half of the dowel (flat side down, sharpened side up). Secure the rest of the boot with glue and rocks for weight.
- Add the pool noodle on top of the sharpened dowel, pushing them in back of center for balance.
- Wrap the body and boots in light brown fleece, add about an inch for a seam allowance, and glue along the horizontal edge to start the pants. Turn inside out. Slip the glued rectangle onto the body and boots, cut a 2 inch slit (under the pool noodle), remove, and glue the pant legs. Let dry and turn right sides out.
- Add the pants onto the body and secure the dowels into the pool noodle with glue. Pull up the pants, add poly stuffing, and tie with twine around the "belly."
- Cut a piece of black scrap fabric 1 wide x 10 inches long. Fold in the long edges to center, securing with glue to create the belt. Cut a rectangle from gold foam, cut two slits for the belt, and run the fabric through. Glue the belt to the body over the twine.
Gnome Jacket
- Wrap the minky fabric around the gnome body, add about an inch for a seam allowance, and cut to the height you want. My piece was 5.5 H by 10 W.
- Fold in half and measure two inches from the bottom and two inches along the bottom. Cut a curve between these two points to get a jacket that flares out.
- On the wrong side of the fabric, add a hem about 1/4 to 1/2 all the way around, cutting the curve to hem it.
- Cut two pieces at 5 H x 3 W for the sleeves. Hem the bottom, put right sides together and glue to secure. When dry, turn them right sides out.
Slouchy Gnome Hat
- Cut a piece of fleece fabric that is 12 W x 9 H. Fold up the bottom on the wrong side of the fabric to add a brim and secure with glue.
- Fold the piece right sides together and cut a triangle from just above the brim to 1/4 inch away from the fold.
- Glue the triangle edge, leaving the brim side open. Let dry and turn right sides out.
Reindeer Gnome Beard
- Measure the desired beard height you'd like on the body of the gnome.
- Cut a piece of faux fur using an X-Acto knife on the back of the faux fur fabric.
- Note: my beard measured 3 W x 2 H.
Gnome Assembly and Decorations
- Glue on the jacket to the body of the gnome. Add on the arms (the video shows how to create a seamless look).
- Glue the faux fur on top of the front of the jacket.
- Split the fur to the fabric backing, add hot glue, and press on the gnome nose.
- Slip on the hat and secure the back with pins. Secure the brim to the top of the nose with glue. Unpin the back and secure with glue. Add a small amount of stuffing to the hat.
- Scrunch a band into the front of the hat and pin both sides. Secure each with glue going VERY slowly - do not move on until the first side is set.
- Cut the foam antlers to fit the band space on the hat, add wire, and secure into the hat by cutting the fabric and pressing into the pool noodle. Add a small amount of hot glue to the antler and fabric to secure in place.
- Glue the 1/2 inch wood balls into the ends of the sleeves and add greenery and decorations. Add a small white dot for an accent on the nose and let dry.
Notes
All fabric pieces should be cut with the stretch on the horizontal plane.
Recommended Products
As an Amazon Associate and member of other affiliate programs, I earn from qualifying purchases.


Meet the Creator
Hi there, I’m Sarah Nenni-Daher. I’m a crafty gal and always have at least 14 projects going at once. I am a crafter, designer, DIYer, and pattern maker. I share my creations here and in the Ruffles and Rain Boots® Shop.
Here at Ruffles and Rain Boots®, you’ll find DIY gnomes, crafts, gifts, cupcakes, laser crafts, and so much more. I love sharing video tutorials over on YouTube and chatting with other crafters in my Facebook groups. We’d love to have you!