
DIY Polka Dot Ornaments Tutorial – A Fun Craft for Kids
These DIY polka dot ornaments are fun and easy to make in about 30-minutes. Grab the kids and let them have fun with glittery dots!

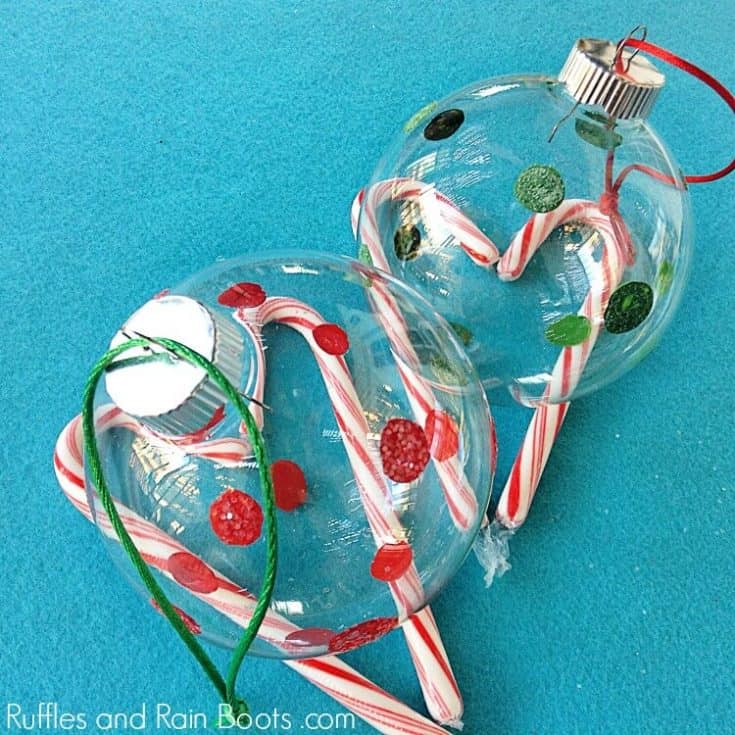
Glittery Polka Dot Ornaments
Here at Ruffles and Rain Boots, we love to share fun, easy, and quick crafts. This holiday season, we’re serving up some ornament fun and these new glittery polka dot ornaments are just perfect.
This is a craft done is less than 30-minutes, even when you make an entire package of ornaments. These are perfect accent ornaments to fill a tree’s centers because they will reflect the light really well. Let’s make some glittery, fun, polka dot ornaments!

Supplies for Polka Dot Ornaments
This is such an easy craft for Christmas that the kids can do their own. I know my 6-year-old is so proud when she does the same craft as I am doing. Are yours the same? Here’s what we need to make these cute polka dot ornaments for our tree:
- clear plastic ornaments (can use glass if your kids are older)
- acrylic paint in red and green
- sponge dobber brush or regular paintbrush
- glitter in red, green, and/or iridescent
- glue (just regular PVA school glue)
- ribbon or string to tie
- foam brush (if you want to “seal” the glitter)
RELATED READING: Salted Caramel Hot Cocoa Ornaments

How to Make DIY Polka Dot Ornaments with Glitter
This is a fun – and ridiculously easy – DIY project for a rainy day. After you’ve gathered your supplies, lay out a piece of newspaper, foam core, or something else to contain any glitter. Another tip: be sure to hang these ornaments out of the way to dry, so go ahead and string them with ribbon if they aren’t already.
DIY Polka Dot Ornaments
These DIY polka dot ornaments are fun and easy to make in about 30-minutes. Grab the kids and let them have fun with glittery dots!
Materials
- clear plastic ornaments (can use glass if your kids are older)
- acrylic paint in red and green
- sponge dobber brush or regular paintbrush
- glitter in red, green, and/or iridescent
- glue (just regular PVA school glue)
- ribbon or string to tie
- foam brush (if you want to “seal” the glitter)
Instructions
- Paint a circle on the ornament. You can choose to use a dobber sponge for a perfect circle or a regular brush if you’d like to give it a more organic look. Let the circles dry.
- Add glue to the dried paint circles and sprinkle on glitter. Let dry.
- If you’d like to seal the glitter in, use a bit of glue on top of the circle. Be sure to paint only the circle with glue as it will be visible on the clear ornaments.
Notes
For more Christmas crafts, visit Ruffles and Rain Boots.
RELATED READING: How to Make the Best Set of Grinch Ornaments
Be Sure To Follow Along with Ruffles and Rain Boots
We love making crafts here at the ‘Boots and would love to share them with you. Sign up to receive our weekly newsletter and you’ll get access to the Hand Lettering Library (full of free practice sheets and instructions) and the Exclusive Library (full of free cut files for cutting machines, tips on our favorite craft mediums, and all things fun)!
Please Save This to Pinterest or Share on Facebook
Your shares are how this site grows and I am sincerely grateful.

Meet the Creator
Hi there, I’m Sarah Nenni-Daher. I’m a crafty gal and always have at least 14 projects going at once. I am a crafter, designer, DIYer, and pattern maker. I share my creations here and in the Ruffles and Rain Boots® Shop.
Here at Ruffles and Rain Boots®, you’ll find DIY gnomes, crafts, gifts, cupcakes, laser crafts, and so much more. I love sharing video tutorials over on YouTube and chatting with other crafters in my Facebook groups. We’d love to have you!