
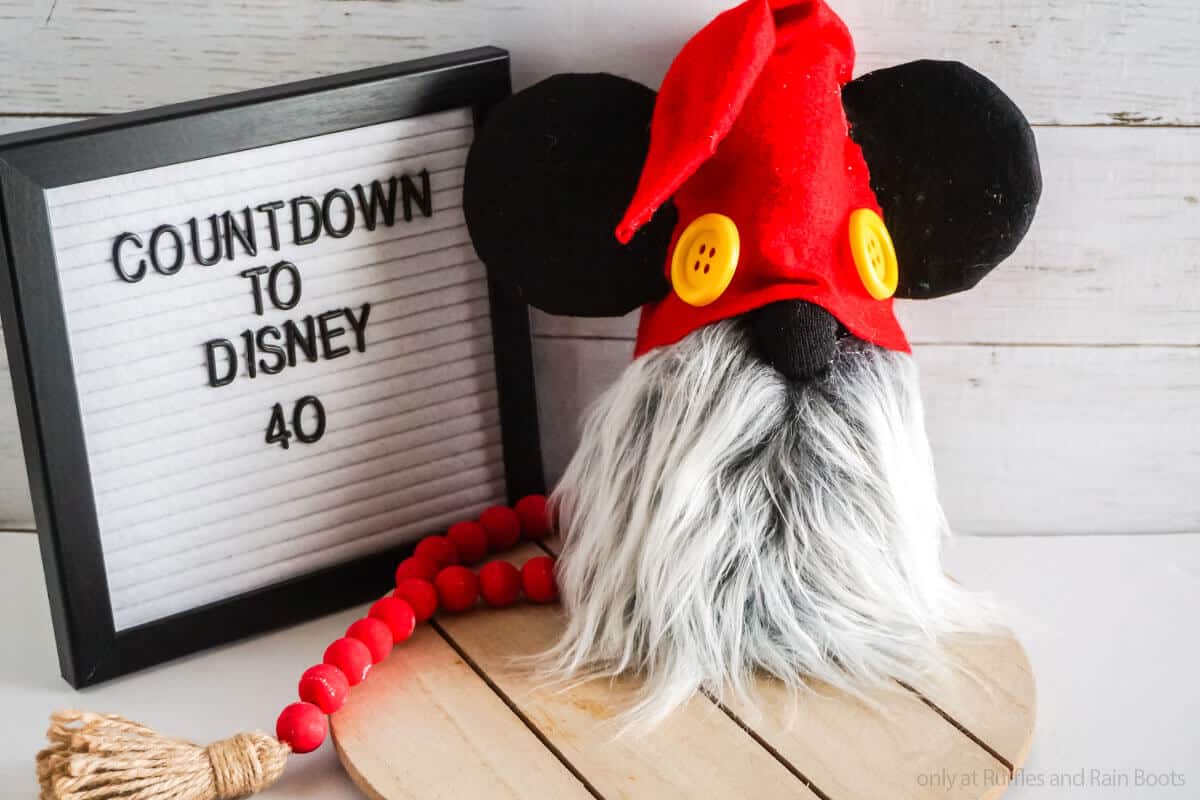
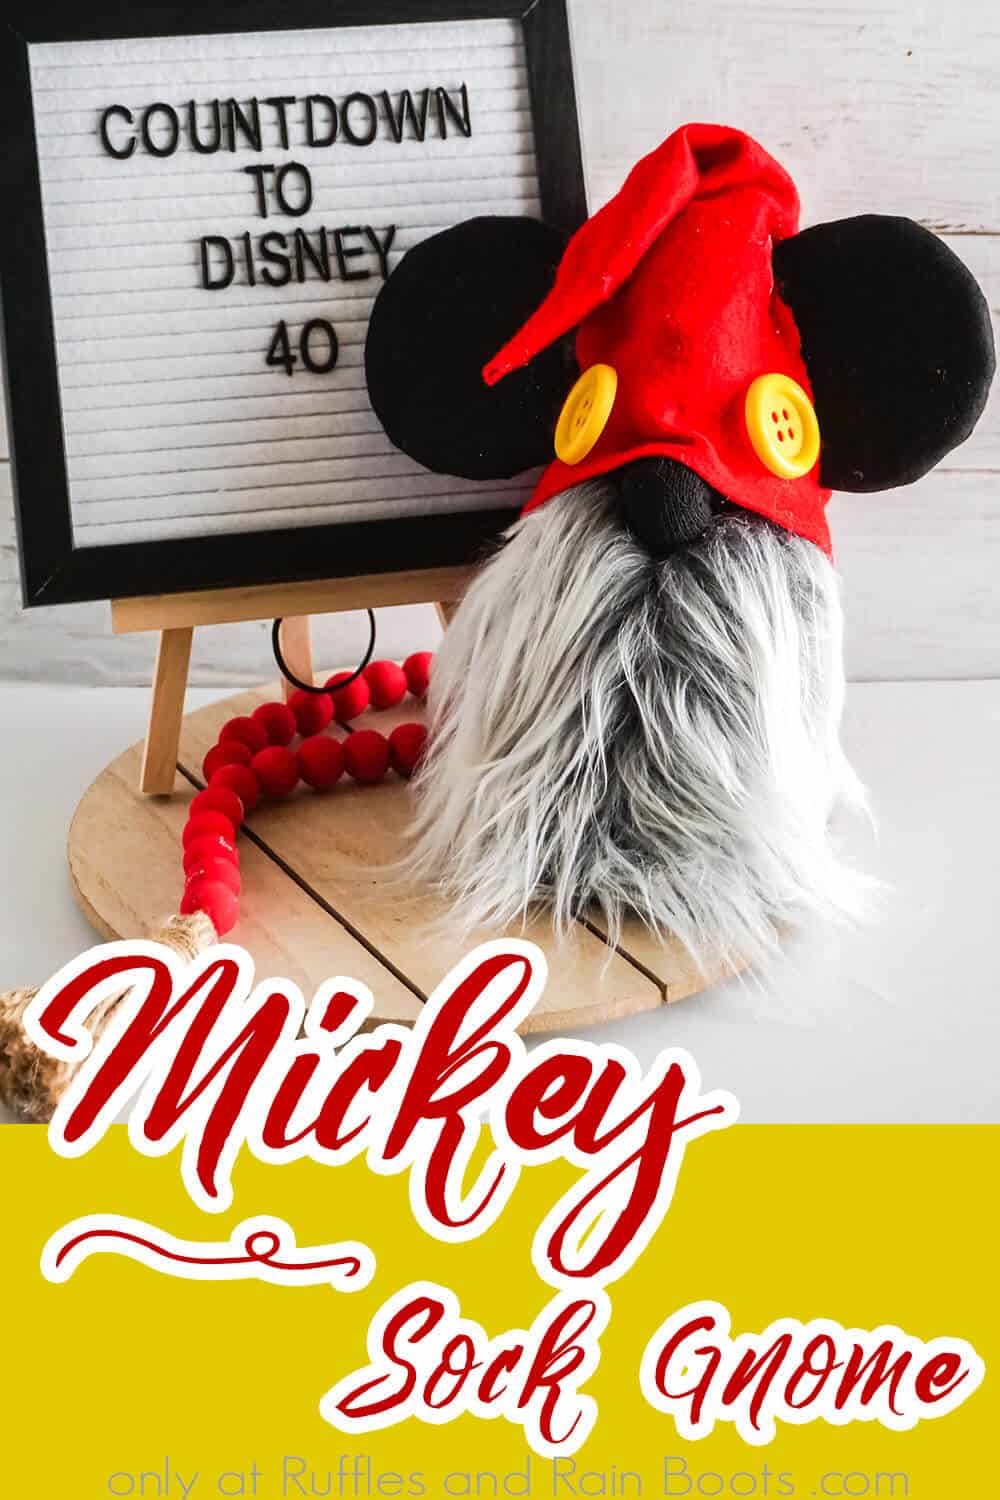
This Mickey Gnome is the Cutest Disney Countdown Gnome Ever!
I can’t get over how cute this simple Disney countdown gnome is! This no-sew Mickey gnome is so fun, and it makes the perfect (and fast) DIY countdown idea I’ve ever seen.
Disney Countdown Gnome
Here at Ruffles and Rain Boots, we are a little Disney-obsessed lately. Making all the Mickey ears you could ever want, getting our food budget knocked out, and just basically getting ourselves ready to go, it’s been a feat! And, just as I’m excited, the kids are equally so. They kept asking and asking how many days until we go. I couldn’t take it anymore!
RELATED READING: ADORABLE BOB ROSS GNOME
So, I made this absolutely adorable Disney countdown gnome. I seriously love this little guy. He’s a no-sew gnome, so I automatically have an inclination. But then you add to it that he’s a Mickey gnome?! Oh, I was never going to be able to do anything but love. If you’re ready to make an irresistibly cute DIY Disney countdown craft, well, let’s get started.

No Time to Make This Now? Pin it for Later
You’re busy, I get it. Pin this to your favorite DIY crafts board on Pinterest and it’ll be here for when you’re ready.
The Original Mickey Mouse Gnome
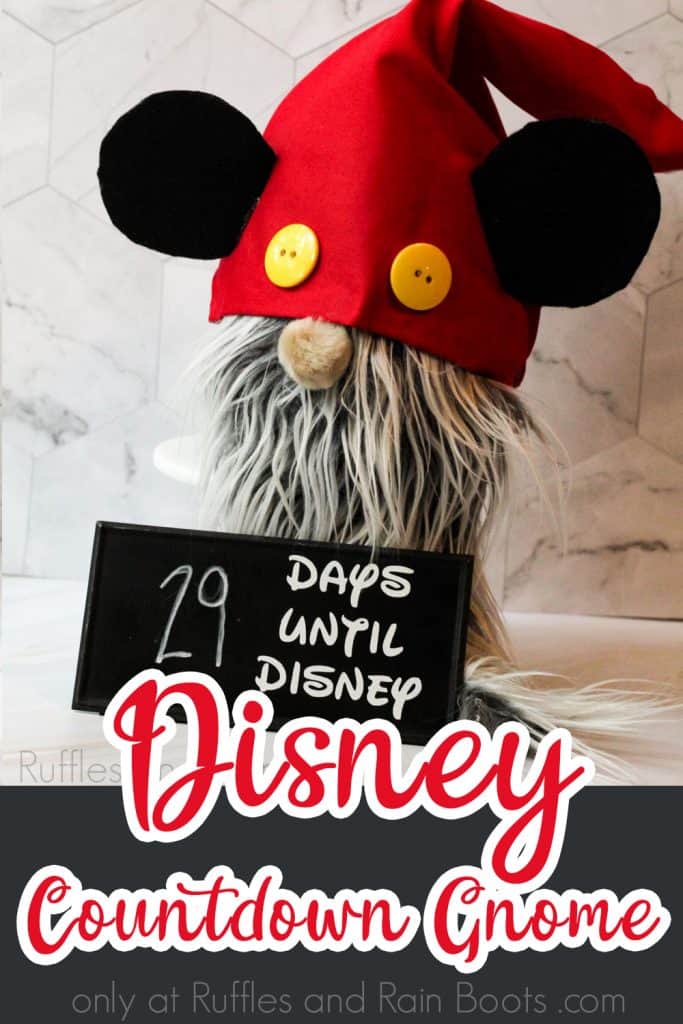
When I first made this years ago, there weren’t any Mickey gnomes out there – now, you have tons of options! When it debuted, this original design looked a bit different.
He had a cut little pompom nose, small buttons, and the sweetest little drag-the-floor beard. And friends, he was an immediate favorite in our house! Of course, it could have been that he was also helping to countdown our Disney vacation…
But recently, a reader asked for a video tutorial (check out all the gnomes here on YouTube), so this little guy was remade.
Tips to Make This Mickey Gnome
- Do not cut the mongolian fur with scissors. Never. You’ll be so sad if you do. It will cut off the ends of the fur and then it will look all choppy. Just don’t. Use an exacto knife and cut from the back of the fur, only cutting the fabric. See? Easy, right?
- No pom pom for the nose? No worries! You can use a wooden bead or make one out of polymer clay. You could put another button there or even make a ball of pantyhose. Don’t let the nose fool you, it’s easy.
- I filled my Disney countdown gnome with rice. But you can also use dried beans or beads, anything with a little weight to it that will help keep your Mickey sock gnome from falling over.
- Click here to get a downloadable Disney countdown SVG!

How Do I Make this Disney Countdown Gnome?
I’m so glad you asked. Below is our written tutorial. If you’re making a DIY Disney countdown ideas playlist on YouTube, here is our Mickey Mouse gnome video tutorial.
Disney Countdown Gnome

I can't get over how cute this simple Disney countdown gnome is! This no-sew Mickey gnome is so fun, and it makes the perfect (and fast) DIY countdown idea I've ever seen.
Materials
- Black felt
- 2 Yellow buttons
- Red felt
- Black ankle sock
- cardboard/cardstock or green scrubbies (my preferred form for Mickey ears because it's pliable)
- Grey craft fur
- Polyfill or cotton stuffing
- Rice or polyfill beads
- Small Letterboard
- Rubber Band or Twisty Tie
Tools
- Hot glue gun/sticks
- Scissors
- Pencil
- Circle to trace (2.5 to 3 inches)
Instructions
- Fill the sock halfway with polyfill beads to help weigh and position your gnome. Finish filling with cotton stuffing but leave enough room to tie a knot in the top of the sock.
- Tie a knot in the top of the sock and secure with hot glue in case the kids play with it.
- Pinch up a small amount of the polyfill through the sock edge, making a ball, about 2/3 of the way up from the bottom of the sock to form a nose. With your rubber band or twisty tie, pinch off this nose shape to hold it in place permanently.
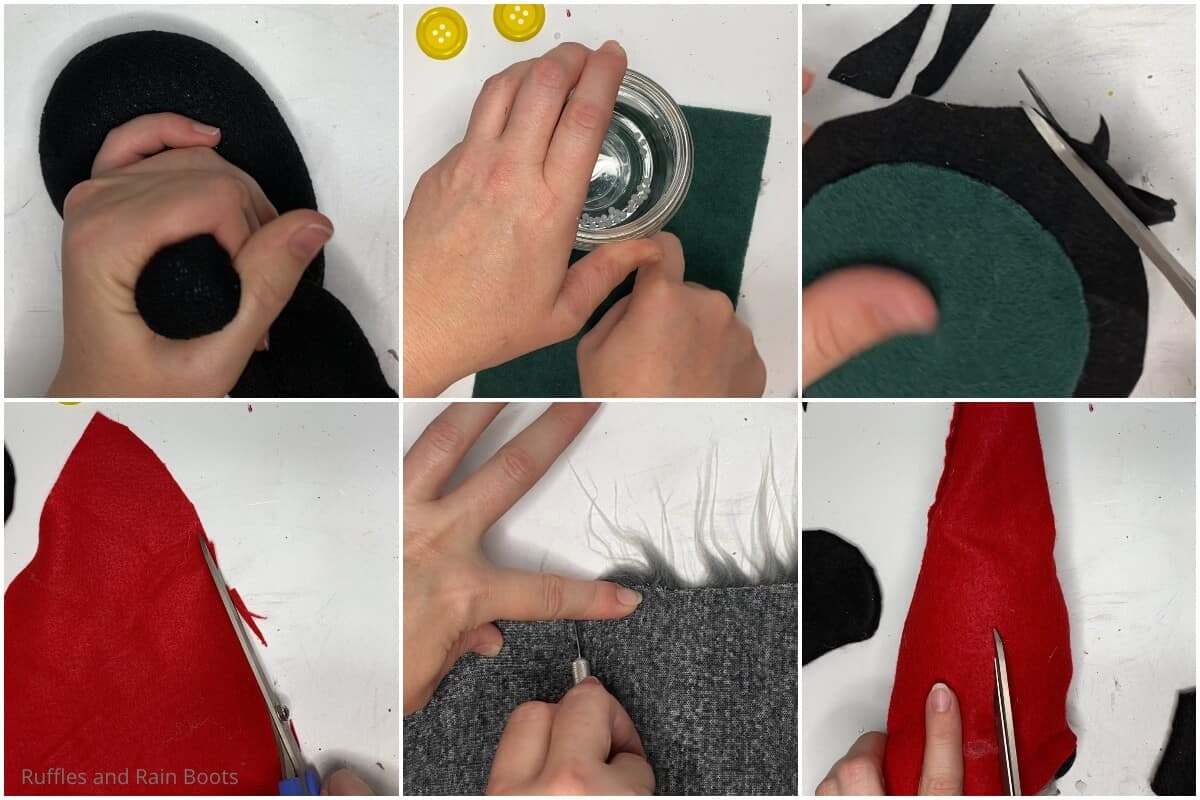
- Cut the faux fur for a beard in a large "u" shape, sized by laying the gnome down onto the fur and basing the size of the "u" on how wide and low you'd like the beard to be. Use a craft knife to cut carefully through the fur backing only, not the fur itself, then pull the fur apart gently.
- Hot glue the beard just under and wrapping around the nose of your sock (I only secured the top of the fur but you can glue down the sides, as well, if desired).
- Cut out a large triangle of red felt that is wide enough to wrap around the gnome's head, plus 1-2 inches.
- Fold the red triangle in half, forming a nice cone that fits nicely over the gnome's head, then hot glue the triangle into this cone shape and trim any excess red felt.
- Place the hat low over the nose of the gnome, add polyfill inside the hat, as desired, to give your gnome a bit more of a head, and hot glue the hat in place with a nice little wrinkle (that's literally my favorite part) over the nose. Then pull the hat down in the back and hot glue it in place, opening up the face.
- To create a pair of Mickey Mouse ears, trace and cut out two 3-4 inch diameter circles out of your chosen form (cardboard or the scrubby).
- Use a second form (or estimate it) to make a small 1-inch cut-out on the bottom of each ear shape that will fit against the gnome body to provide stability to the ears.
- Use the ear form to trace out two pieces of black felt that are the same size as the ear form, plus 1/4-inch hem allowance. Cut 1/4-inch long slits around the edge of these two pieces of felt, spaced about 1/2-inch apart.
- Place one ear form onto one black felt cutout and fold the edges over, hot gluing them in place and overlapping the flaps created by cutting the slits, as necessary. Trim any excess felt to make the back of the ear as flat as possible. Repeat with the second ear shape and black felt cutout.
- Use each half-covered ear as a template to trace and cut out a piece of black felt the same size as the back of the ear shape. Glue this in place on the back of the corresponding ear.
- Cut two slits in the hat on either side of the head long enough for the ears to fit inside, about 1 inch from the bottom edge of the hat. Tuck the ears inside and hot glue them in place, taking care to keep the hat edge, sock and ear shape in contact so as to provide the most stability for the ears as possible.
- Fold the hat's point over and hot glue it in place with a little droop.
- Glue on two yellow buttons on the front of the hat.
- Use the letterboard or use an SVG file to print out “Days Until Disney” onto a small chalkboard and enjoy!

Notes
For more fun Disney craft ideas, visit Ruffles and Rain Boots
More DIY Disney Crafts You Might Like
- DIY Disney Mickey Ears that will Wow Your Biggest Fan – If you really want to be prepared for your Disney vacation, you’re going to need some Mickey ears. And the best way to get ’em? DIY ’em.
- Disney Rock Painting (Stitch) – If you love Disney chances are that Stitch has a special place somewhere in your heart. This easy rock painting Disney craft is so fun, I can’t help but love it.
- Disney Movie Crafts – From classic to the more modern, there’s a craft here for almost every Disney kid-friendly movie ever!
Please Save This to Pinterest
Your shares are how this site grows and I am sincerely grateful. Know a friend who’d like this? Please share it on Facebook or save it to your favorite Disney crafts board on Pinterest.

Meet the Creator
Hi there, I’m Sarah Nenni-Daher. I’m a crafty gal and always have at least 14 projects going at once. I am a crafter, designer, DIYer, and pattern maker. I share my creations here and in the Ruffles and Rain Boots® Shop.
Here at Ruffles and Rain Boots®, you’ll find DIY gnomes, crafts, gifts, cupcakes, laser crafts, and so much more. I love sharing video tutorials over on YouTube and chatting with other crafters in my Facebook groups. We’d love to have you!