
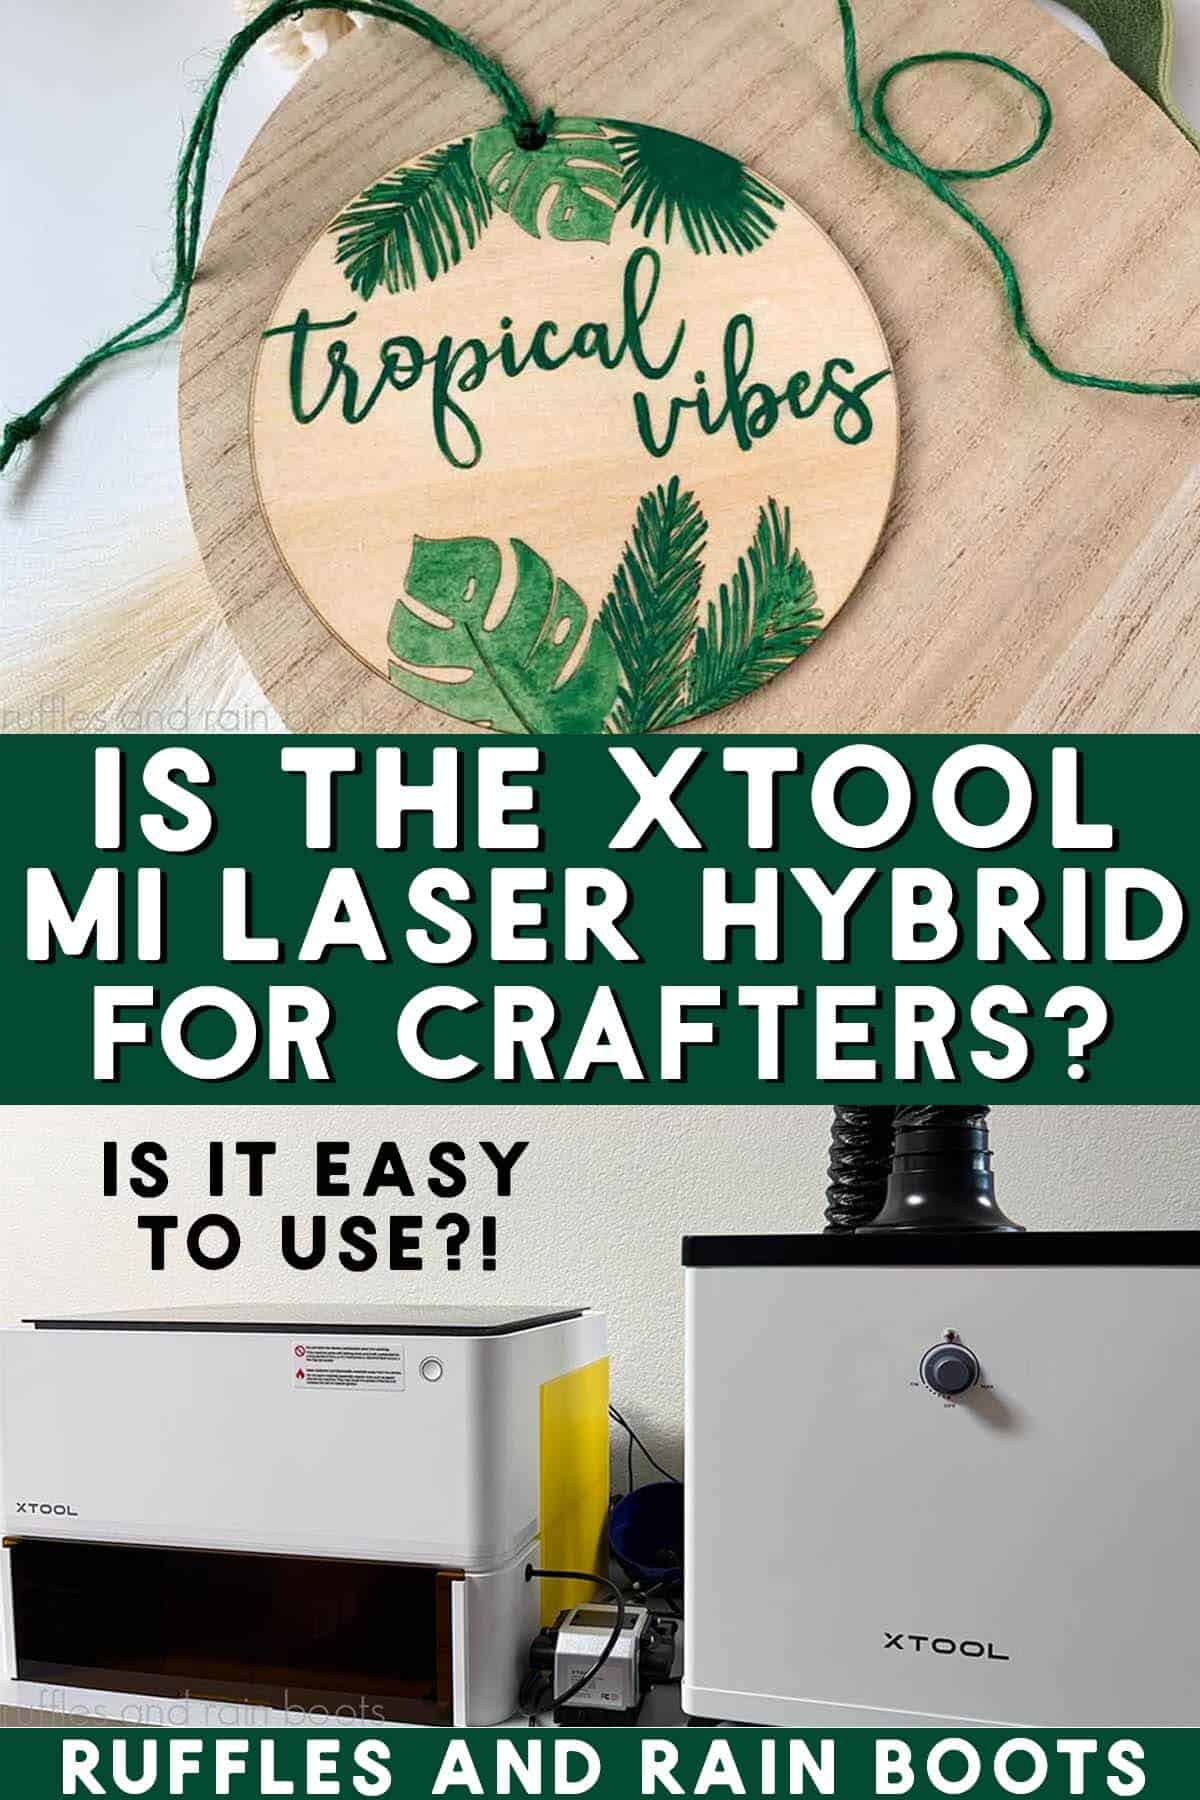
xTool M1 for Beginners – A Crafter’s Tool
If you’re reading this, you are here to find out if my xTool M1 review will tell you whether this laser cutter and engraver and blade cutting machine is worth it. Is it good for crafters? Is it safe to use at home?
Included in this M1 review are SO many projects I made to test the machine, my key takeaways, accessories I recommend, and who this laser blade cutting machine is good for. I’ll also share what I believe should be improved and expanded in the offering.

The M1 was given to me by xTool, however, I was not paid to write this post. All opinions, projects, videos, and suggestions are my own and are uncompensated. There are affiliate links within this article, which means I could be compensated for qualifying purchases.
RELATED READING: See My xTool M1 Ultra Review – This is Packed Full of New Features
What You'll Find On This Page
xTool M1 Review
Here at Ruffles and Rain Boots, we’re finally getting settled in Texas. Once everything was unpacked, my husband and I started researching a laser machine to add to the workshop.
We’d only done a few laser comparisons when I received an email from xTool about their M1 laser engraver, cutter, and blade cutting machine. A two-in-one tool intrigued me because I use my blade cutters all the time.
Have you joined the Laser Group on Facebook yet? It’s a welcoming, friendly, and open space to get ideas, ask questions, and learn from our peers.
This article is in depth, so use the table of contents above (click to expand) to get to a section. Some might just be looking for a recommendation: should I buy the xTool M1? My short answer is: it depends on who you are.
Deciding on a Laser?
I own three types of lasers right now: CO2, diode, and fiber (infrared). Below are summaries of each and suggestions on materials. If you have questions, please ask! Not all lasers are right for those looking to start a business or side hustle. If that’s you, choose the P2 or the S1.
- xTool P Series – A fully-enclosed CO2 laser, perfect for cutting acrylic and wood. This is an unrestricted laser when it comes to acrylic, wood, slate, etc. and it’s my top choice.
- xTool S1 – The option I have is a 40 watt diode laser which cuts some acrylic, wood and does amazing engravings. This laser has some acrylic restrictions (no clear, mirror, translucent; primarily opaque) but powers through wood.
- xTool M1 ULTRA – The updated version of the ground-breaking xTool M1 shows up to the party with a printer (can print on wood), a laser, a set of blades, foil, and embossing, as well as a pen tool. Great for crafters!
- xTool F2 – This dual laser is portable! It’s the best-selling, landmark setting laser that contains a diode and an infrared laser. It’s perfect to take to shows, markets, and events.
- WeCreat Vista – This is a fun tool to have if you’d like to work primarily with tumblers or wood. The patented FlipLaser design turns the laser head 90 degrees, allowing you a great tumbler engraving experience.
Who Should Buy the xTool M1 Machine – Is It for Crafters?
After using this tool, I’ll say the M1 is robust. If you are a home crafter or a home crafter who sells their creations, the xTool M1:
- is an affordable option when compared to other lasers.
- is easy to set up (they have a step by step video I followed).
- combines a laser and cutting machine to maximize space.
- working area is very generous.
- is simple to maintain (a diode laser has less maintenance and a longer life vs CO2).
- can work with a variety of items you likely have in your craft stash.
- is one of the safest on the market as it’s a FULLY-ENCLOSED laser.
If you are looking to start a high-production laser cutting or engraving business, the M1 is not for you. This machine will not produce the scale you need at the rate in which you need it done. Consider this xTool CO2 laser for speed, accuracy, and power.
Additionally, if you’re a crafter who has a cutting business, this is not the cutting machine for you (add it for the safe laser option). As of publication, there is only one cutting blade and the machine (while fast) doesn’t have a rotary blade (or any attachments) limiting it against others in the market.

Have you joined the Laser Group on Facebook yet? It’s a welcoming, friendly, and open space to get ideas, ask questions, and learn from our peers.
RELATED READING: WeCreat Vista Laser Review – A Fun Beginner Laser
My Key Takeaways After Using the M1 Laser
- The xTool M1 10 watt laser is a FUN, multi-purpose tool, light enough to set up on my own.
- Always do test cuts (details below).
- The magnetic attachments for the blade and laser assembly are brilliant.
- It’s an investment, but not poorly-priced when compared to CO2 lasers.
- The camera inside is valuable but not foolproof.
- Lasers can be scary, but the safety features on the M1 reduces anxiety.
- The first step after setting the M1 up should be a forced test. A drop down menu for testing should be written into the software for both the first time use AND for new material testing.
- The free software (XCS) could be improved with regards to fonts, the vector feature, and compatibility with Lightburn. I LOVE that I can provide “cut ready” files for my readers, including with power, speed, and other factors included.

Watch My xTool M1 Review and Unboxing (2 Projects)
I’m a visual learner, so offering videos is part of the fun here at Ruffles and Rain Boots. If you prefer to see this tool in action, watch the brief review and unboxing of the xTool M1.
In the video, I’ll show you:
- the inside of the xTool M1 laser and cutting machine and how it works,
- how big the enclosure is without the riser and honeycomb (it’s generous),
- how to set up a project (or two)
- the ease of positioning items for cutting vs using the triangle prism risers, and
- an inside look at the XCS software and my frustrations with it.

Faux Leather Earrings with xTool M1
In this video, I’ll also share two quick projects from start to finish. The first is a set of PU leather earrings made with the blade cutting portion of the M1. Aside from waiting for the glue to dry, it took only 8 minutes to make them!

Score and Cut Wood Laser Ornament
Another project in the video shows how easy it was to use a free SVG from this set to create a score and cut wooden ornament. Processing time on the laser was just over 3 minutes and, as you can hear in the video, I was very impressed.

Glowforge Aura or xTool M1?
If you’re wondering if you should get the Glowforge vs xTool, it’s a good question – the new launch has a lot of hype! I can tell you that we removed it from our buying options after looking at the specs and reading a few reviews.
The reason I’m highlighting this particular Glowforge is because the Aura is the machine most like the xTool M1. It has a diode laser and is a smaller, crafter-focused laser offering. But, in my opinion, it is not a great buy unless you only want to work with flat items.
UPDATE: my complete deep dive into these two machines can be found here: Glowforge Aura vs xTool M1 – Which is Better?
This review of the Glowforge Aura from Haje at TechCrunch detailed how there is no framing ability – a feature I have used for all laser cutting and engraving with the M1. Haje’s review (and this review from USA Today) also highlighted the Glowforge Personal Filter didn’t work as indicated, filling areas with smoke. That’s an expensive add-on not to work.
The specs on the two machines differ with the M1 coming out on top. As of July 2023:
- xTool’s M1 cuts up to a 1/2 inch of wood, the Glowforge Aura up to 1/4 inch.
- The Aura has a MAX of 3/4 inch for engraving, while the M1 is larger with the riser.
- Everything must be FLAT with the Aura – cuts or engraving, it all has to be flat. No tumblers, no cups, no flasks, no rounded charms, no phone stands – ALL FLAT.
- The maximum material size of the xTool M1 is 12×15 vs the Aura’s 12×12 inches.
- xTool’s M1 is a combination cutter, allowing more versatility with the blade.
- The Glowforge Aura maxes out at 6 watts vs the 10W M1 I have (they have a 5W).
- xTool’s M1 will connect via USB and Wi-Fi vs only Wi-Fi for the Aura. This is bad when engraving or cutting longer projects because Wi-Fi can drop causing interruptions.
What Can the xTool M1 Cut and Engrave?
The M1 can laser cut wood, some foam, paper, acrylic (not blue or clear), fabric, felt, leather, and rubber. I’m very excited to try this on silicone because of vinyl limitations.
xTool’s M1 can engrave more than 300 materials, including wood, stone, glass, plastic, leather, faux suede, chipboard, and metal. I’ve already practiced with quite a few of the materials (and even tested some that did not work).
The blade feature behaves similar to other blade cutting machines and cuts fabric, paper, felt, and vinyl. I want to test the laser on fabric, but am curious if the thicker faux leather I have from other brands will work.

Do I Need To Do Test Cuts of Materials?
The short answer, friends, is YES (picture me screaming from a rooftop). You can sort of get it right the first time, especially when the default settings match the materials from xTool.
That said, materials are really unique and even the glue density in plywood can greatly alter the final results. Create some test arrays using this free test array set up in XCS software video.
What M1 Accessories Do I REALLY Need?
If we’re similar, you do a lot of research before adding something new to your set up. I am concerned with function (and efficacy), the space they take up, and the price.
I’ve been testing many accessories. Some I think are a MUST buy and others you MIGHT need, depending on your current set up, where you’ll be crafting, and what you want to work on. These are my top M1 accessory recommendations.
xTool M1 Air Assist Tool
A must-buy is the xTool smart air assist. I bought it myself after playing with the M1 for a while (it was not given to me as part of the review). I believe it should come standard with the unit because of the difference it makes in the final product.
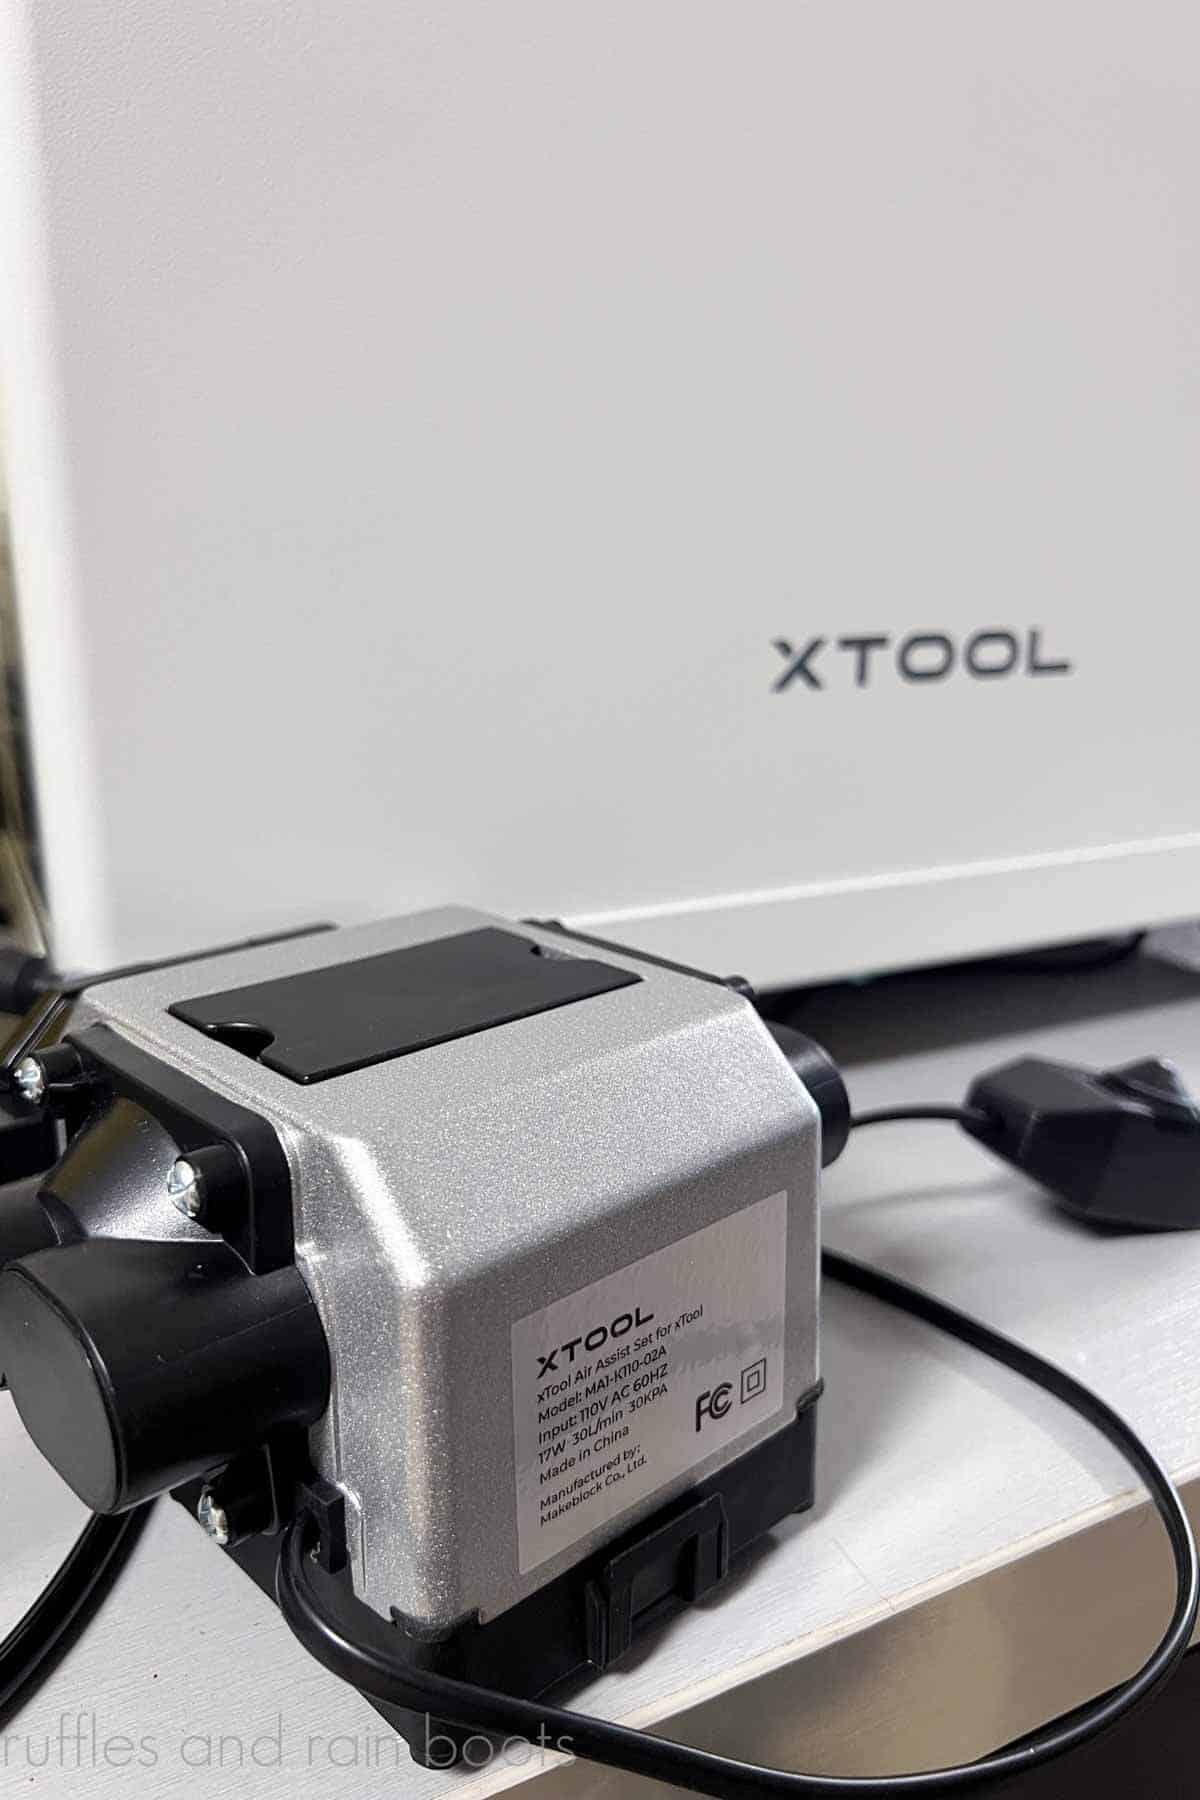
There are after-market fans, but this one is designed for the M1 and routes all hoses safely out of the way of the laser but inside the machine. My key reasons for using and suggesting it are:
- that it keeps the laser lens cleaner than without it.
- that Air Assist dissipates the kerf (the stuff the laser takes from the blank), reducing fire risk and damage to the final product.
- the cuts are cleaner and not scorched (the black soot stuff) WITHOUT masking.
- it’s easy to set up (the video tutorial is amazing) and operate.
- that it seamlessly works with the honeycomb riser.
Do You Remove the Blade Housing When Using Air Assist with xTool M1?
The answer is, yes. When you are working with the laser and are using the air assist module, you will remove the blade housing.
Because the housing is magnetic, it’s very easy to do. Simply pull down on the blade housing as if you were swapping the blade and leave it out when processing.

xTool Smoke Purifier Accessory
The xTool M1 comes with a ducting system which is designed to vent out a window. That won’t work for me because I live in Texas and it’s 1,000 degrees in the shade – venting my AC out a window is not an option. There’s also a LOT of bugs.
My favorite M1 accessory is Air Purifier (NEW MODEL) simply because it works so well. I was skeptical of the claims as to its efficacy (and quiet operation) until I used it. It isn’t the only system on the market, but again, it fits perfectly on the xTool M1.

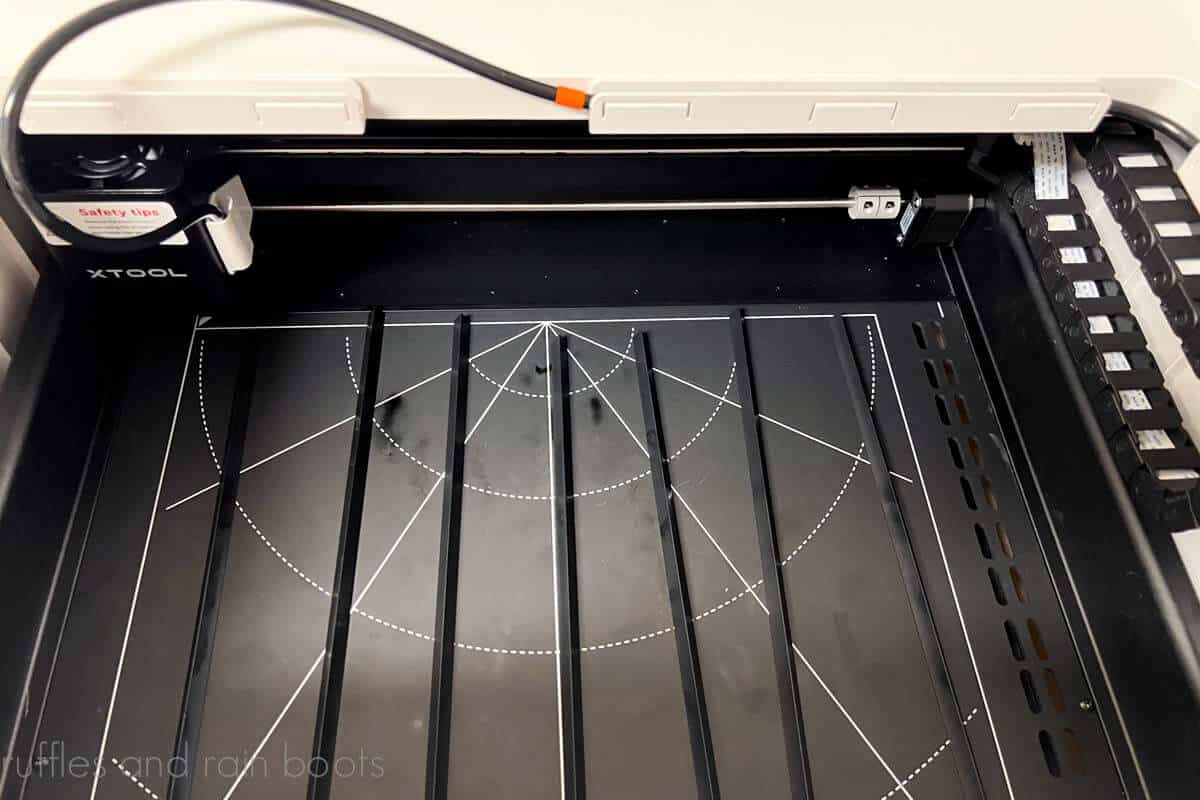
Riser Base with Honeycomb Panel (This is Not for Everyone)
This is wholly based on the type of set up you want to craft, but I do recommend the riser base with honeycomb panel. The pre-assigned heights make for easy material match up and it’s very easy to set up.
This M1 accessory elevates the machine (safely) while increasing the distance from the laser, allowing for larger projects and accessories like the rotary attachment. It also reduces burning and scorching by increasing air flow.

How this works is that you remove the baseplate from the M1 and slide the honeycomb plate into the riser’s shelves. NOTE: the baseplate is put below the honeycomb plate on the bottom rack to protect your work surface. The material sits atop the honeycomb plate for cutting and can be secured with included magnetic pins.
I’ll be detailing this accessory in action in future projects. Again, not everyone will need this riser, but I have found it useful for what I want to create.
Is the xTool M1 Software Any Good?
The proprietary software used with the M1 is called, “xTool Creative Space,” or XCS. Updates are coming often – the first week I had the tool, there was a huge update which added 5 very helpful features.
The software is good but needs improving (much like other proprietary software for blade cutting machines). I do believe a test menu should be built into the software, as we have to test when working with new materials. Update: they added this!

If you’re familiar with blade cutting software, XCS is similar. There is an import action (for SVG, XCS, and other file types), a basic shapes action, font action, photo manipulation, and a couple of surprising additions like a vector tool and an AI component. Additionally, there are materials and cut or laser function pop out menus.
When considering whether or not to invest in an xTool, you can download the XCS software for free and toy around. Watch the review video I shared – you will see that it only took me about 10 seconds to figure out the pop up menu.
Overall, this software can be improved. I’m not able to use the swashes or ‘extras’ on my fonts. However, I LOVE that I can create files for others with the cut, score, or engrave and power settings included.

What File Types Can I Use with the M1 and XCS?
XCS file types are the bees knees with this software because, as mentioned, you can import with settings. This means you can create a custom file, save your settings, and always have it prepared for immediate use.
My preferred file type aside from XCS are vector files, specifically SVG. You can load DXF into the software, as well, however, it’s old tech and I don’t love the quality. With these file types, you can score, engrave, and cut.
Finally, you have the ability to import raster files in the following formats: PNG, JPG (and JPEG), CR2, TIFF, and BMP. These are all great for engraving on wood and this tutorial is outstanding if you want to laser engrave a photo.
xTool M1 Project Ideas
I’ve been busy with this tool to the point my husband now comes home from work and asks, “What did you make with your laser today?” And then I show him…
First I used the blade set up to make PU leather keychains and earrings (note: you can use the laser to cut real leather, but NEVER cut PU/PVC vinyl with the laser). I followed that up with engraving felt (and cutting) and scoring (and cutting) faux suede bookmarks.
Next up, I tested different wood to create ornaments. I was able to all of the wood options of score, engrave, and laser cut.
I moved onto engraving and cutting wood by creating keychains and stocking tags. I tested the engraving function on chipboard, wood, and anything else I could stick under that laser. And then I tackled a bigger project with lots of parts when I made a summer door sign using Dollar Tree materials (oh, you can bet I put DT items under that laser)!

All of that said, you can get some amazing free projects inside the XCS software just by clicking the PROJECTS tab. The settings are in each project (if not standard) to help you get started.
Over the next couple of weeks, I’ll be sharing my top crafts to make with the M1 hybrid laser. Be sure to subscribe to my weekly newsletter for updates and any details on sales!
My Frustrations with and Cons of the xTool M1 Laser
Not everything is perfect, friends, and you know I’ll share. It was an easy set up but I could have used a guiding hand when starting the actual project builds.
When I did my first cut job (a star from the shapes menu), there was no “step 1, step 2” to this machine. I chose laser cut, materials, measured, and expected to cut out a star. Instead, I started to engrave a big, chunky star into the basswood before bailing on the project (it’s very easy to quit a project).
As I mentioned above, testing is a way of life with most of our crafting machines and the M1 is no exception. If you’re new to laser cutting, scoring, and engraving like I was, it would have been VERY helpful to have a guided quick start guide built into the software.
Another problem with the set up is that the Air Assist isn’t included. It’s not a huge expenditure but it makes such a big difference in keeping the laser clean AND in the end project’s quality that I think it should be part of the tool.
Another frustration with the M1 is that, as of July 2023, there are no blade attachments. With other cutting machines in my craft room, I rely on the rotary blade often to provide a stellar output.
My final “gripe” with the tool is that I can’t cut clear acrylic (and teal, blue, and a couple of other colors). The diode laser’s inability to cut clear acrylic means I’ll still have to buy those blanks (or cut them with my router).
The xTool M1 Investment: How to Buy an M1 Laser
Now, if you’re all the way down here you are seriously considering this the xTool M1 / M1 Ultra laser and blade cutter. If you haven’t searched for it already, I’m going to tell you that it is an investment.
Because I believe you should make an informed decision, feel free to use the comments or connect with me on social to ask any questions.
Please Save or Share This Quick Look at the xTool M1
Have you joined the Laser Group on Facebook yet? It’s a welcoming, friendly, and open space to get ideas, ask questions, and learn from our peers.
Overall, I think this is a great buy for a home crafter or a crafter who sells items and wants to expand their offerings. It’s a perfect tool for items that are difficult to make or customize with a standard blade cutter.
What do you think of the M1?

Meet the Creator
Hi there, I’m Sarah Nenni-Daher. I’m a crafty gal and always have at least 14 projects going at once. I am a crafter, designer, DIYer, and pattern maker. I share my creations here and in the Ruffles and Rain Boots® Shop.
Here at Ruffles and Rain Boots®, you’ll find DIY gnomes, crafts, gifts, cupcakes, laser crafts, and so much more. I love sharing video tutorials over on YouTube and chatting with other crafters in my Facebook groups. We’d love to have you!