
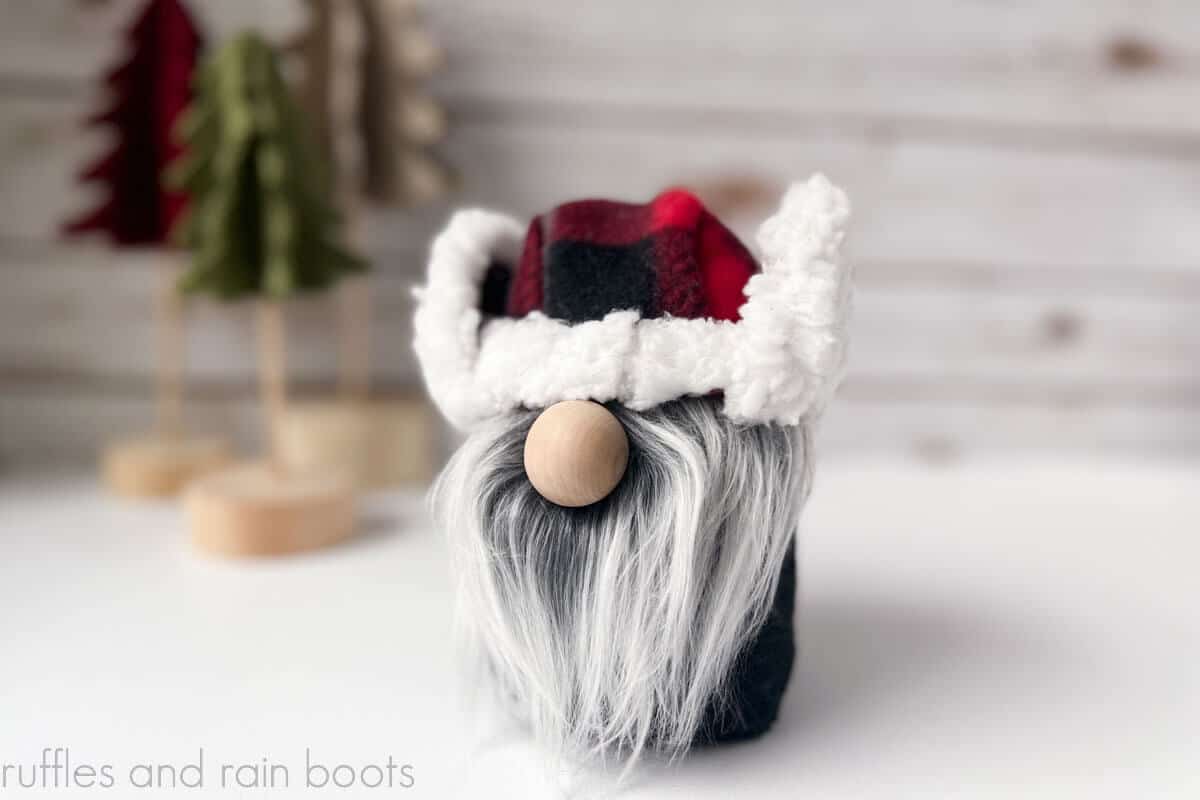
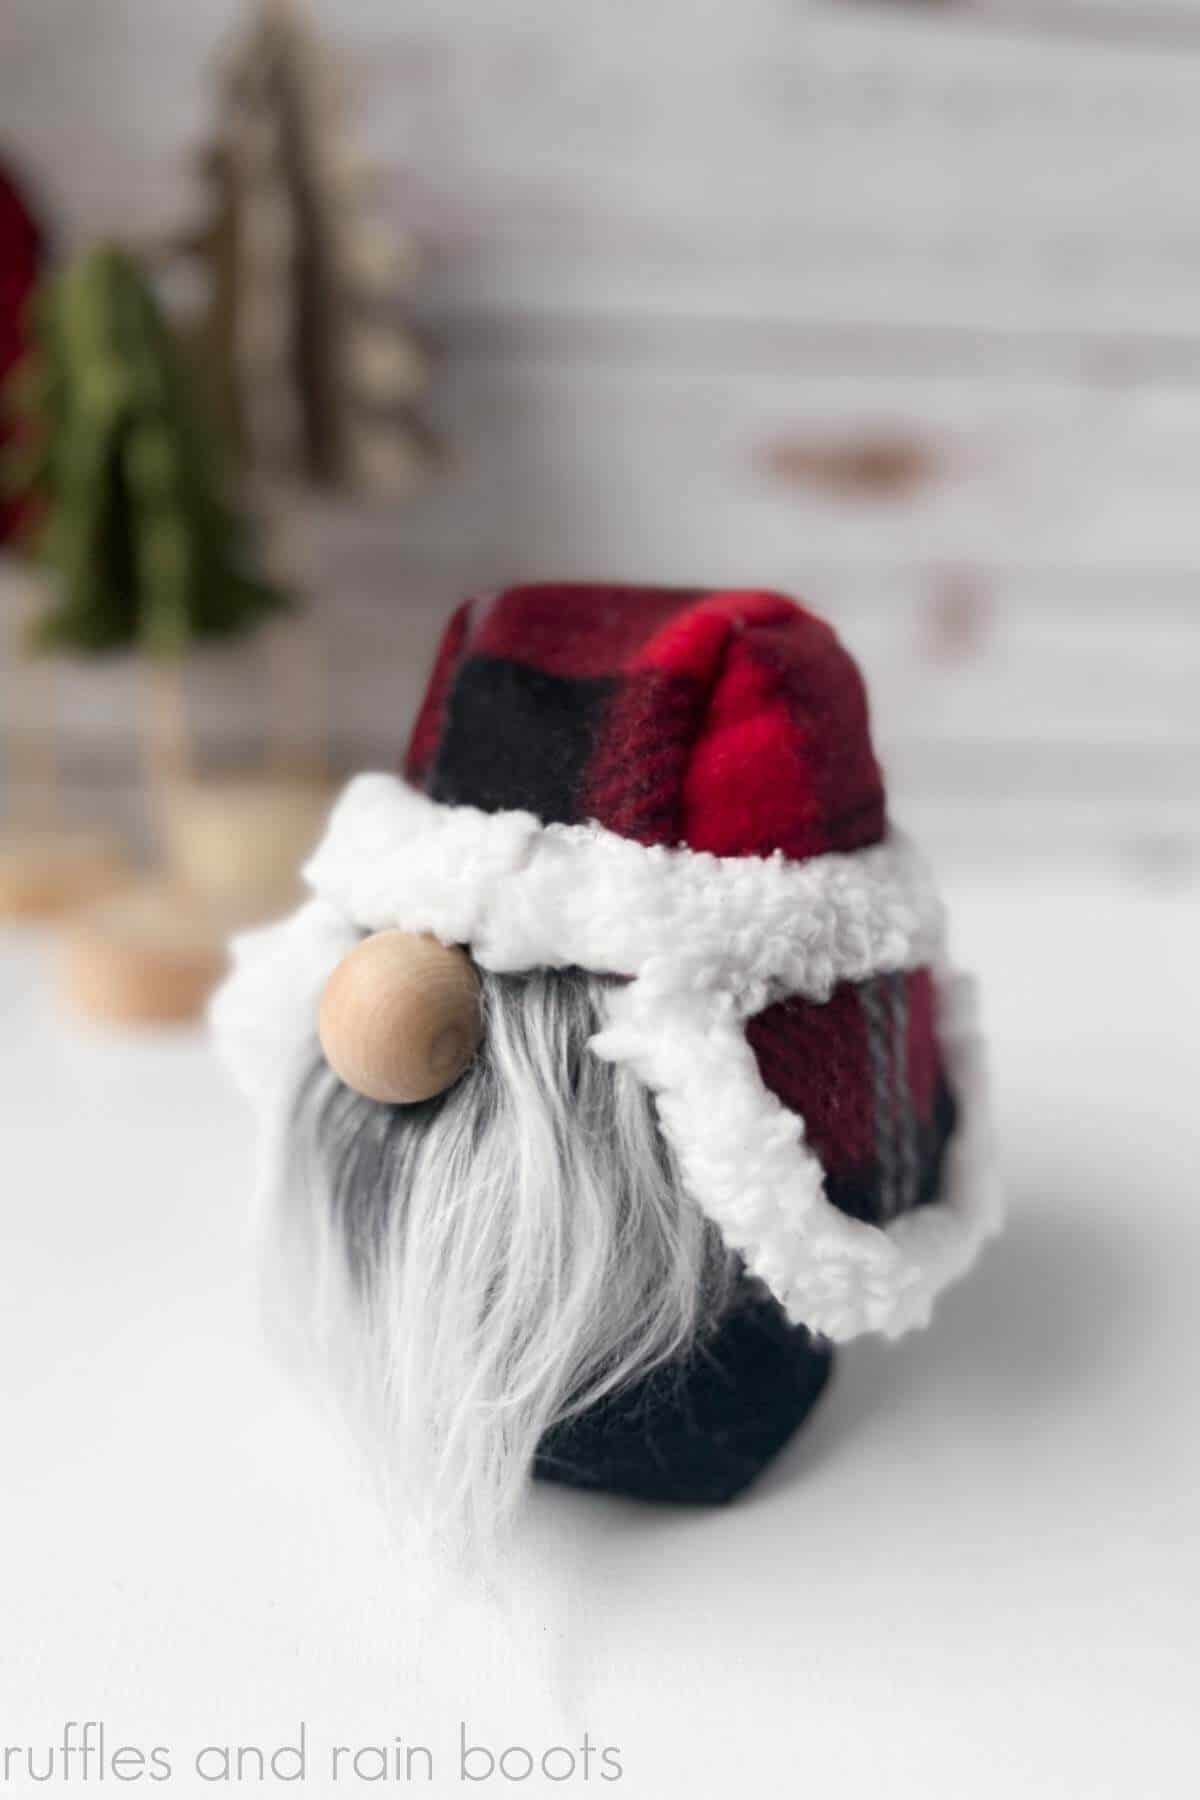
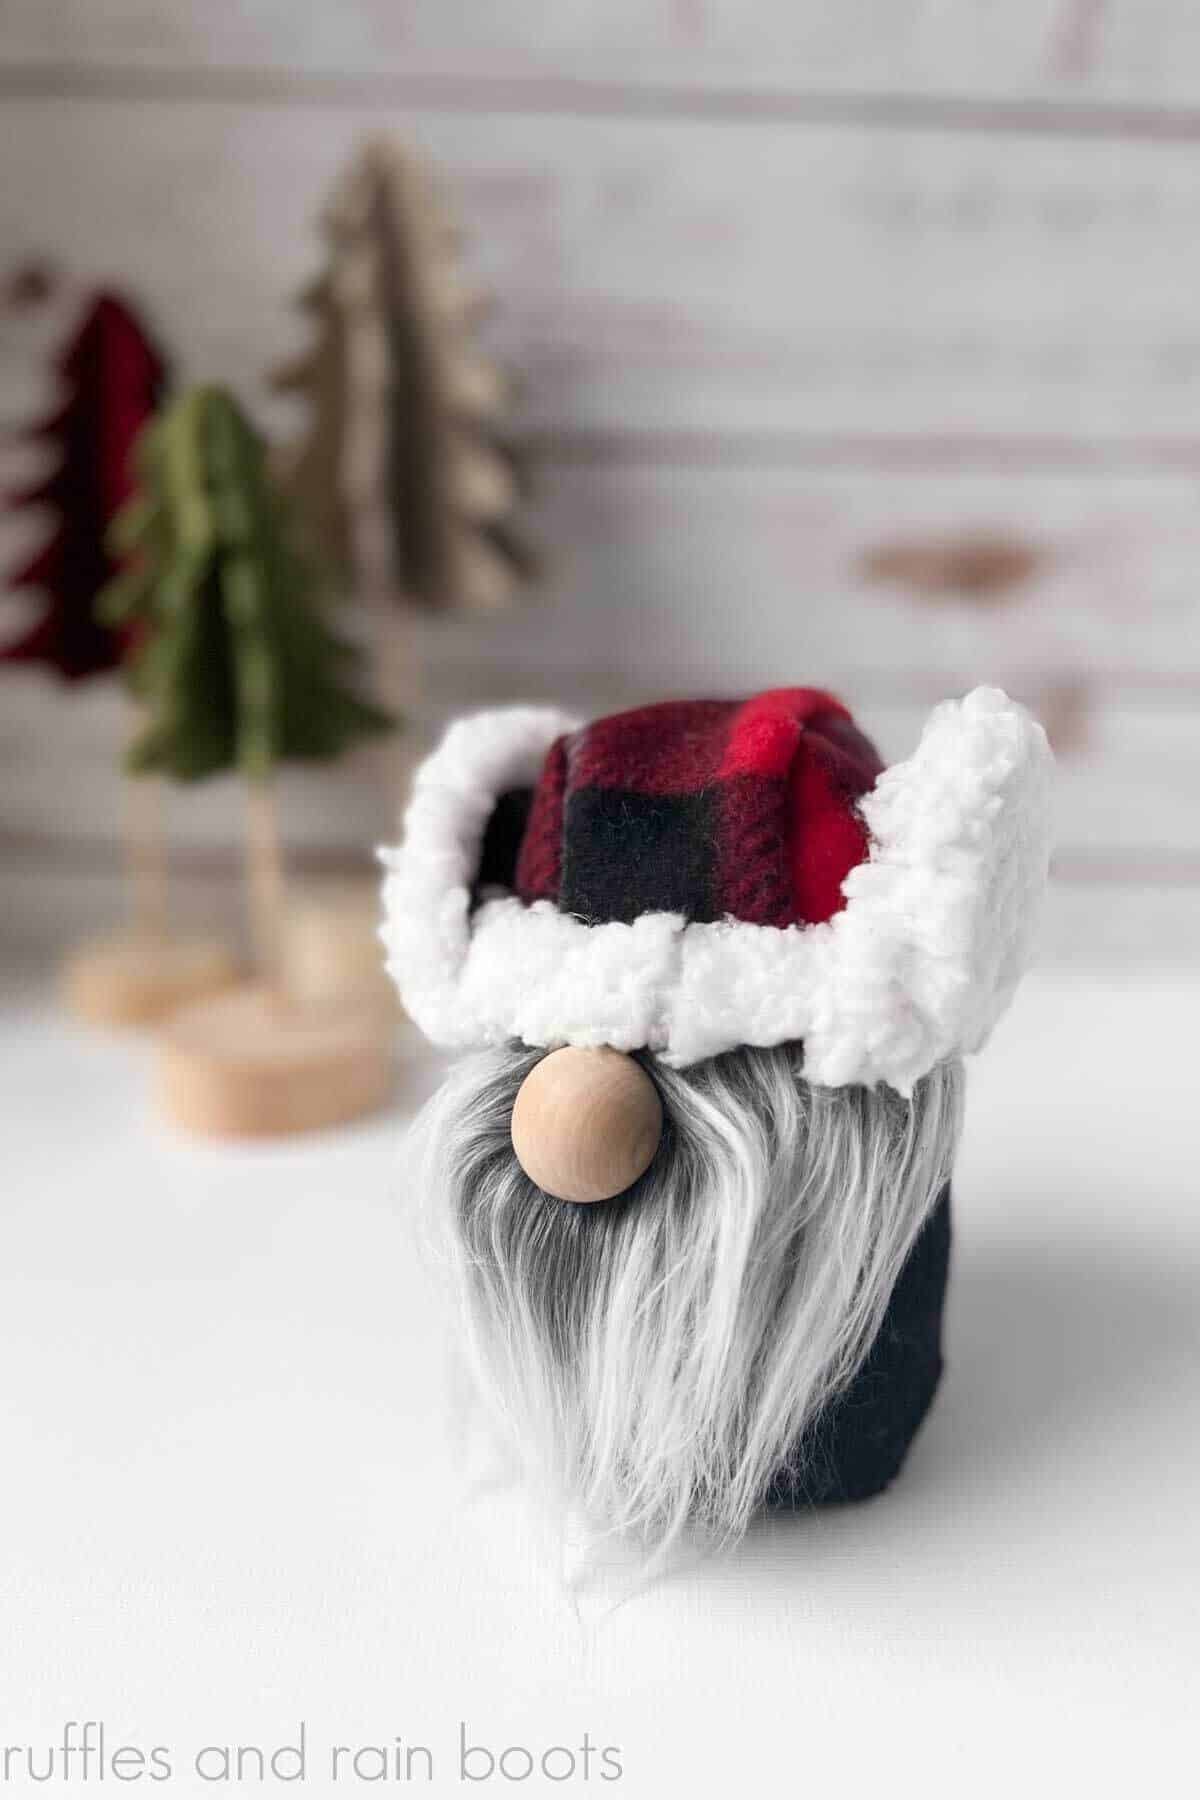
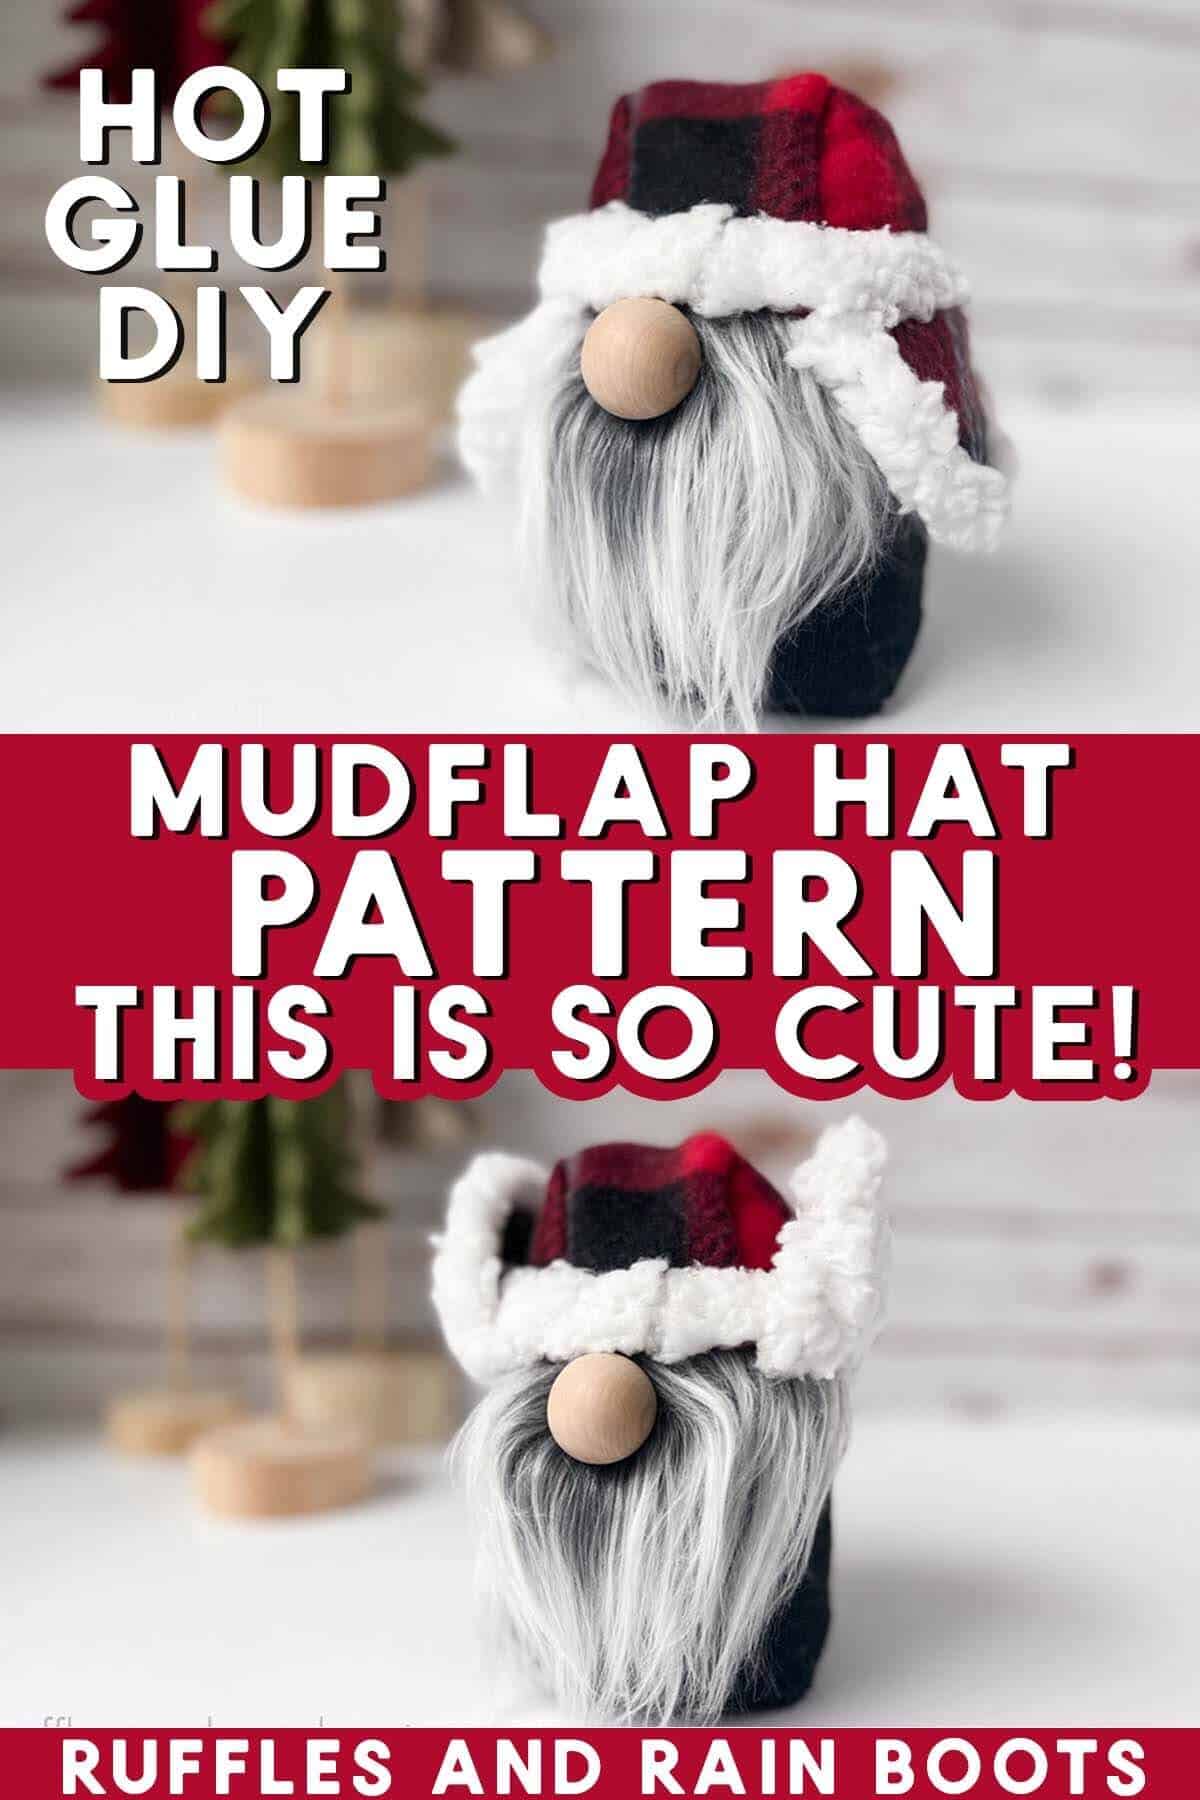
Hunter Gnome with Mudflap Gnome Hat
This mudflap gnome hat pattern makes creating a hunter gnome, a DIY winter gnome, or even a “Cousin Eddie” gnome a breeze. Use this tutorial and a hot glue gun to create a no-sew winter hat that will have everyone talking.
You will need fleece and Sherpa fleece for this easy hat, so check your stash. This fun design can be placed onto a sock gnome body, a cone gnome body, or even a sewn body and can be easily sized up for very large bodies.
RELATED READING: The Most Popular Gnome Ornament DIY on the Internet
What You'll Find On This Page
Mudflap Gnome Hat Pattern
Here at Ruffles and Rain Boots, I’ve been making easy gnomes for years now and I’m so happy they’ve become popular. For nearly as long as I’ve been sharing them, I’ve had a request for a no-sew hunter hat pattern with ear flaps and a fuzzy fleece lining.
And years ago, I made it… but FORGOT to actually share it.
This week, I had a request for it and thought I should finally get it out into the world. So, world: meet the easy, no-sew mudflap hat pattern for gnomes.
No Time to Make This Now? Please Save or Share
If you’ve been looking for this easy gnome hat pattern style but now need to hunt down the perfect fleece, save or share this. Use the sharing buttons to save this to a gnome DIY pin board or share it on Facebook to easily find this later.
As an Amazon Associate, I could earn from qualifying purchases. There could be affiliate links within this article.
Materials and Supplies Needed for This Gnome DIY
This is one of the most simple gnome hats to make, friends. Though you can use other fabrics, fleece has stretch, which makes it the perfect material for this earflap hat. You will need:
- fleece (pattern or solid color; Blizzard or other medium weight)
- Sherpa fleece – I used this fleece (check it the link because it can be named different things)
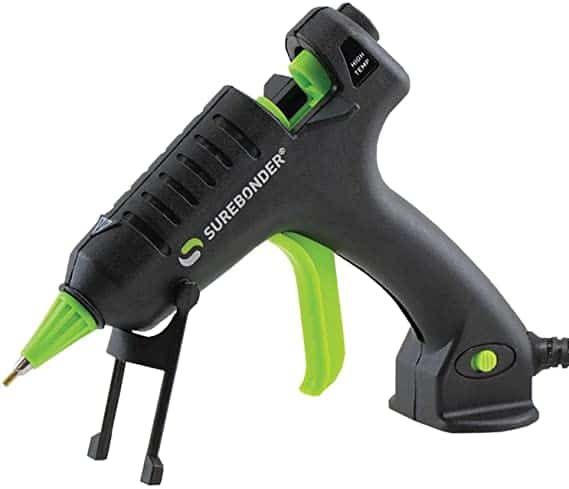
- hot glue gun and glue sticks – use a detailed tip glue gun like this for accuracy
- scissors or a rotary cutter
- gnome body (any style, I used the stable sock gnome body)
- faux fur (I used Mongolian)
- gnome nose (wooden bead, wood round, pom pom, stuffed fabric, etc.)
Note: I have never seen fleece at the dollar store (like Dollar Tree), but it is always available at Joann’s craft store, Michael’s, or even on Amazon.

RELATED READING: Free Felt Gnome Hat and Body Pattern!
How To Assemble the Winter Hat with Ear Flaps
Keep this page open and follow the steps below, using the comments section for any questions. If you’re a visual learner, you can watch the mudflap gnome hat video tutorial here.
First, cut the pattern pieces from fleece and the Sherpa. Then, use hot glue to join the center hat panel to one side hat panel, right-sides together. Set it aside to dry.
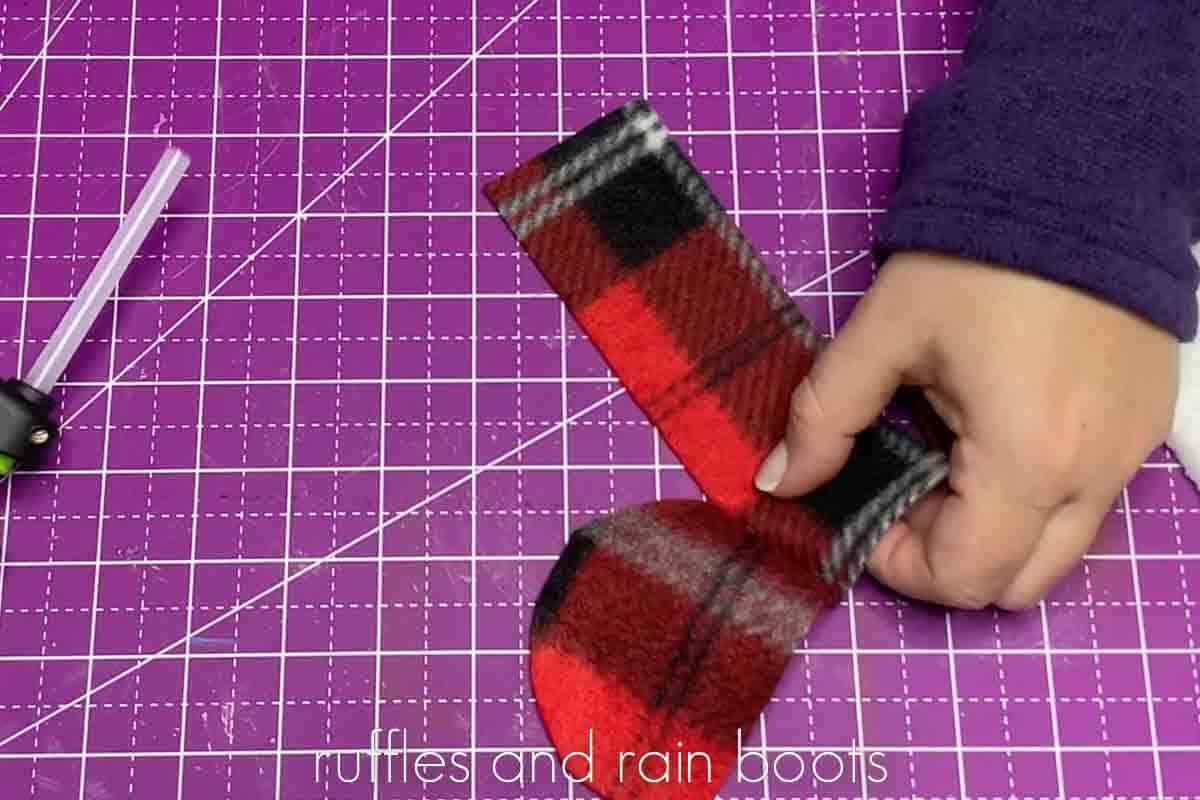
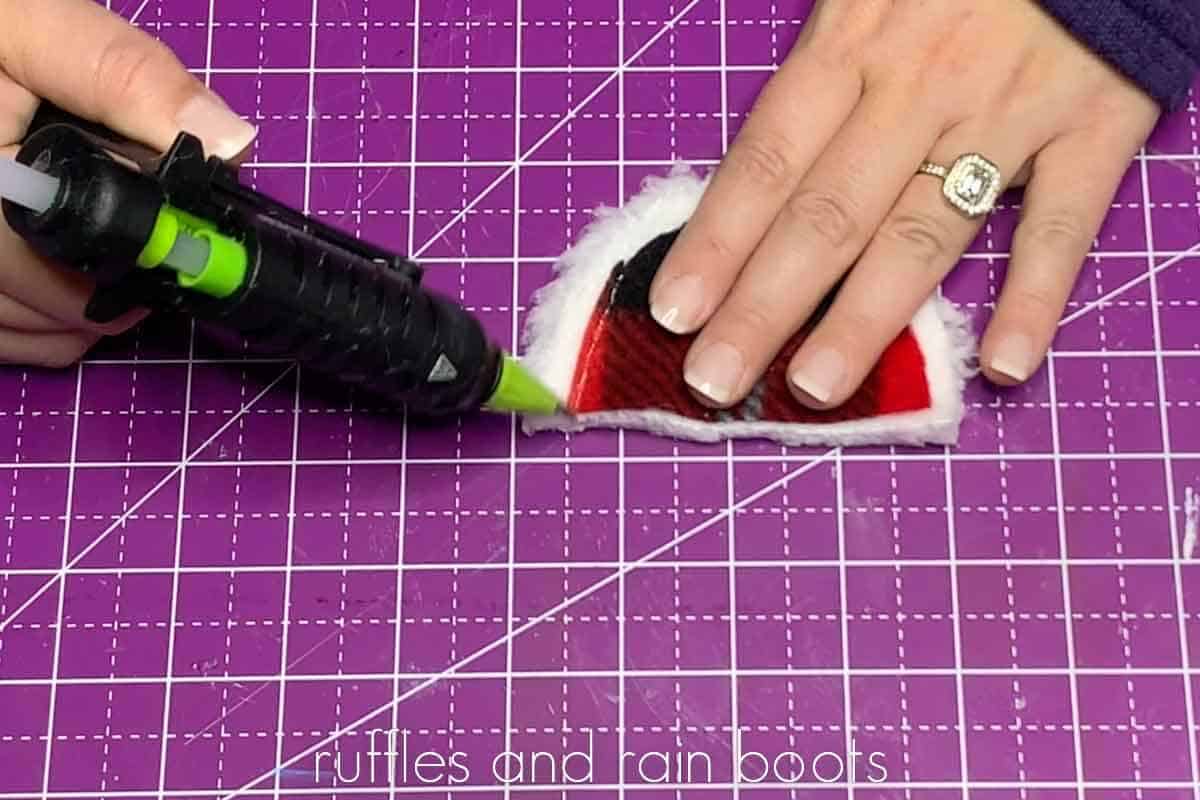
Next, attach one side flap to the Sherpa side flap piece. Repeat for the other flap and set both aside.
Glue on the second side hat panel to the center panel. Let dry completely and turn right sides out.
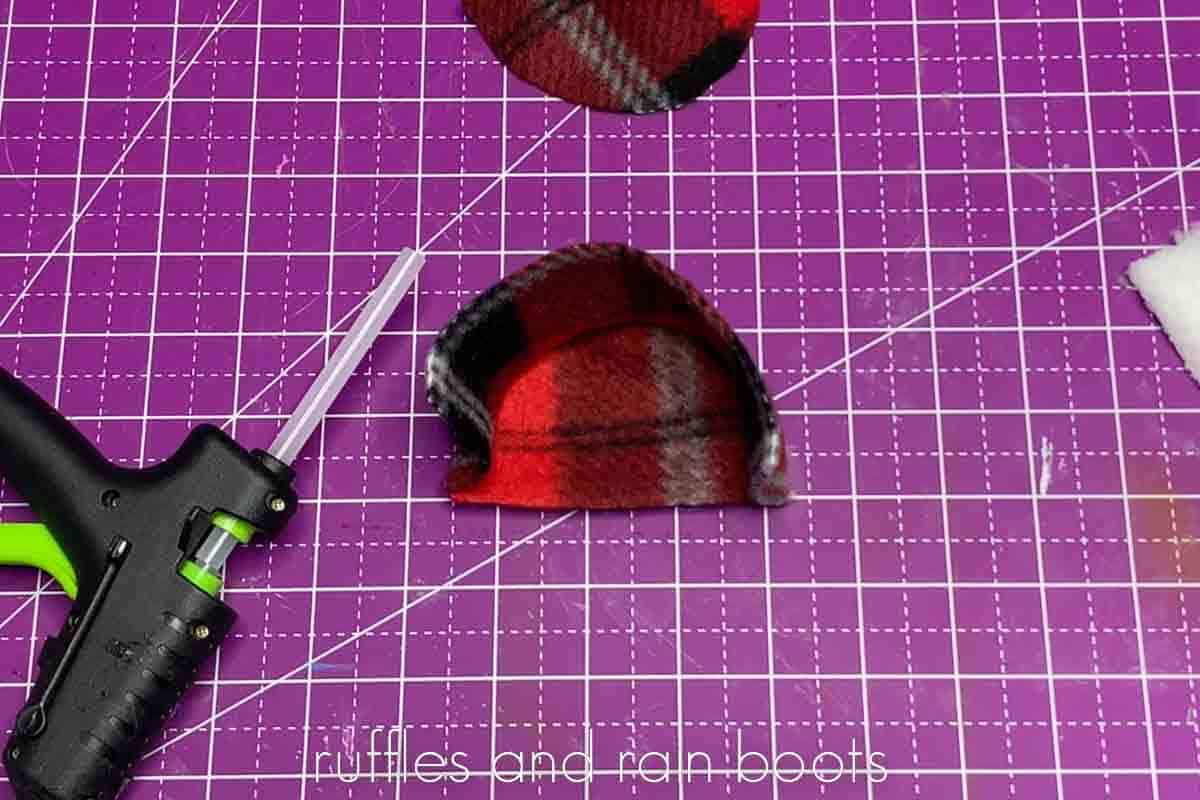
Attach a side flap to the hat crown by lining up the fleece edges (not the Sherpa). Repeat with the other side.
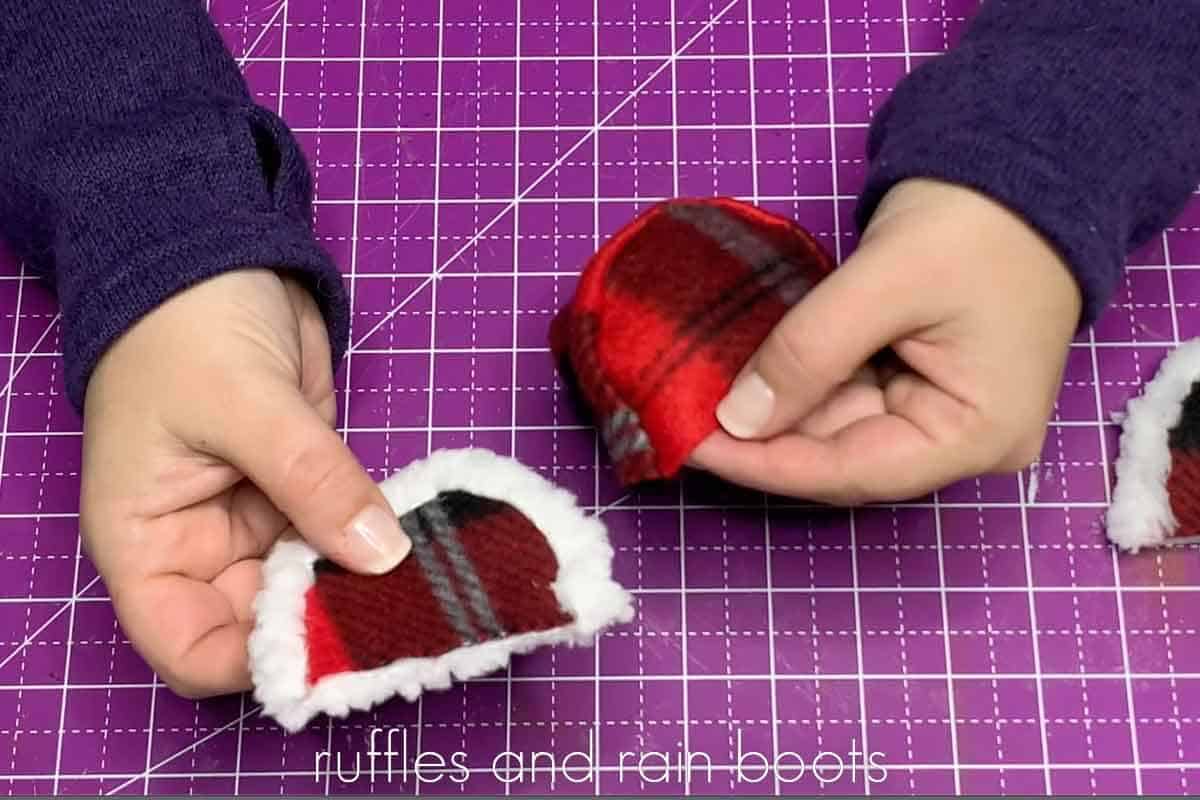
Attach the trim around the entire crown or just the front and back. Add to a DIY sock gnome body (or other style) and you’re done!

What Size Gnomes Does This Hat Pattern Fit?
As mentioned in the notes above, the ear flap hat pattern can be used on sock gnomes, felt gnomes, cone gnomes (with and without a rounded top), and sewn body gnomes. The width of this hat opening as prepared per the pattern is 4 inches.
This means that the body can be up to 4 inches around (with a thick faux fur beard and nose). It is ideal for gnomes from 6 inches to 14 inches, however, the pattern can be sized up on a personal home computer, as well.
How to Download and Use the Mudflap Hat Pattern
The mudflap hat pattern can be found here (or below in the materials list). Add it to your cart, checkout, and print the pattern at home. And I would LOVE to see what you make, whether it’s a winter gnome, a Cousin Eddie, gnome, or a fun hunting gnome.
At this time, all patterns are print-at-home and nothing will be mailed to you.
The gnome hat pattern is for personal use, however, you can obtain a commercial use license while checking out. It offers a very generous licensing for all small businesses.
More Easy DIY Gnome Patterns and Projects You Might Like
- Mini Gnome Pattern – From 5-7 inches tall, these mini gnomes pack quite the punch. This pattern is perfect for tiered-tray sized gnomes and is VERY economical to ship.
- Medium Sized Gnome Pattern – One of the most popular gnome patterns on the Internet, this produces 10-14 inch gnomes and allows you to really get wild with decorations because it has a sturdy base.
- Jacket and Pants Pattern – Designed for cone gnomes (and cone like sewn or glued gnome bodies), this adorable set takes the guesswork out of trying to figure out proportions and extras for gnome clothes.
Please Save or Share This Fun Gnome DIY
Your shares are how this site grows and I am sincerely grateful. Please save it to a DIY pin board or share it with a crafty group on Facebook.
Mudflap Gnome Hat Pattern
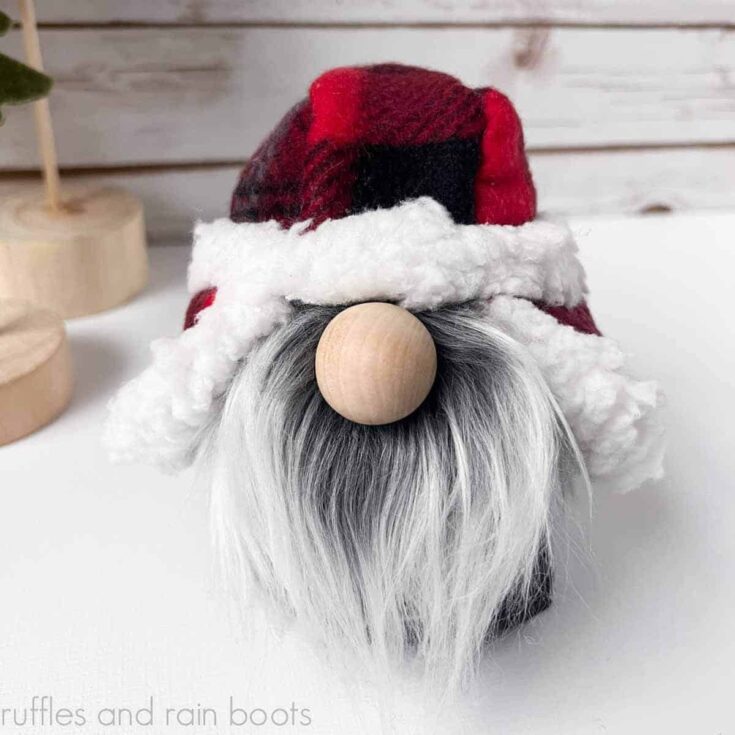
This DIY mudflap gnome hat pattern comes together easily with hot glue and is a great addition to a winter gnome, hunting gnome, or any rugged-style design. The gnome hat is made using fleece, so it is an inexpensive hat to create for sock gnomes, cone gnomes, and sewn body gnomes. Includes a full written and step by step video tutorial.
Materials
- Mudflap Hat Pattern
- Fleece
- Sherpa Fleece
Tools
- Hot Glue Gun and Glue Sticks
- Scissors or Rotary Cutter
Instructions
- Cut pattern pieces from fleece and Sherpa fleece. Note: if using a non-stretchy fabric like cotton, add the allowance listed in the pattern. Note: there is a full video tutorial for the assembly of this pattern here.
- Use hot glue to join the center hat piece and a fleece hat side panel together (right-sides of the fabric together). Set aside to dry because fleece will shift easily when glue is wet.
- While waiting for the glue to dry, join a Sherpa and fleece flap piece together. Repeat for the other side.
- Add the other fleece hat side to the center hat piece to finish the crown and set aside to dry completely. Turn right sides out.
- Attach a side flap piece bottom to the bottom side edge of the crown. Repeat and set aside to dry.
- Attach the trim with hot glue in one of two ways and the mudflap gnome hat is done!
- Place the gnome hat onto a body style of your choice and add stuffing to the crown, if desired. Glue to attach to the hat to the body.
Notes
This gnome hat pattern fits socks gnomes, cone gnomes, and sewn gnome bodies alike.
The pattern can be sized up easily for larger gnomes.
Recommended Products
As an Amazon Associate and member of other affiliate programs, I earn from qualifying purchases.

Meet the Creator
Hi there, I’m Sarah Nenni-Daher. I’m a crafty gal and always have at least 14 projects going at once. I am a crafter, designer, DIYer, and pattern maker. I share my creations here and in the Ruffles and Rain Boots® Shop.
Here at Ruffles and Rain Boots®, you’ll find DIY gnomes, crafts, gifts, cupcakes, laser crafts, and so much more. I love sharing video tutorials over on YouTube and chatting with other crafters in my Facebook groups. We’d love to have you!