
DIY Pumpkin Vase – A Pumpkin Flower Centerpiece to WOW!
Make your own pumpkin vase from a fresh or faux pumpkin. Grab a pumpkin and some flowers, and let’s get started with this fun Fall centerpiece.
You can create a DIY pumpkin vase using faux or fresh flowers, making this perfect to bring to a holiday gathering or to use as home decor.

RELATED READING: Mason Jar Pumpkins – These are Popular for a Reason!
What You'll Find On This Page
A Fresh Fall: Pumpkin Flower Arrangements
Here at Ruffles and Rain Boots, late Fall can be a bit rainy, but it makes me appreciate late summer so much. Those cooling, sunny days are an absolute joy.
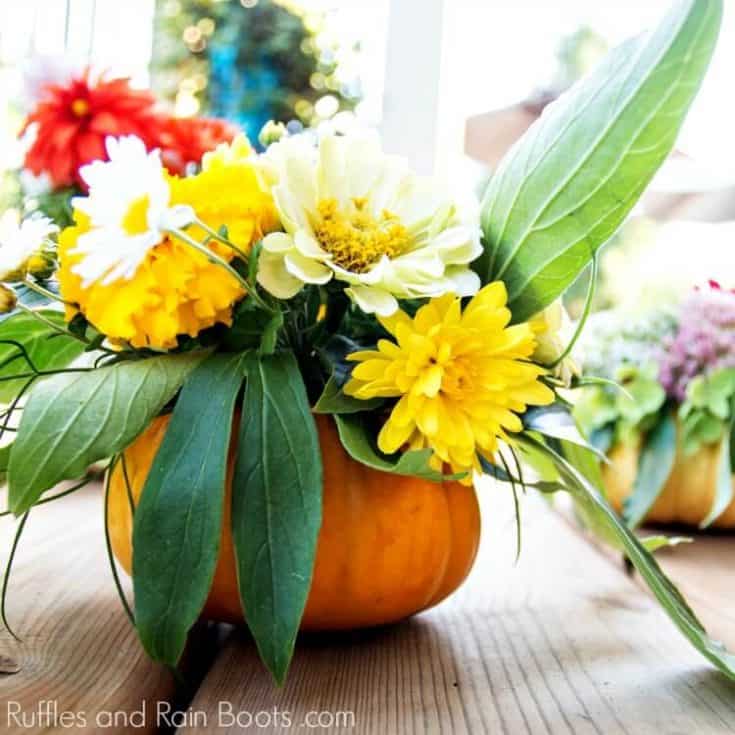
Fresh flowers are a staple in our house. Sometimes they’re dandelions picked by my daughter, others a big bouquet from the market. Either way, this pumpkin vase is the perfect way to welcome in the changing seasons, no matter what goes in it.

Supplies for a DIY Pumpkin Vase (Faux or Fresh)
This pumpkin vase can be made with either a fresh pumpkin or a faux pumpkin. I’m looking for a faux Cinderella pumpkin to put together soon. There is just something about those short, squatty pumpkins…
- fresh or faux pumpkin (mini or normal size)
- small, sharp paring or carving knife
- spoon
- fresh water
- selection of flowers and greenery*
- optional, small jar or vase to fit inside
If you have one near you, try Trader Joe’s for fall arrangements of fresh flowers. Pick up a bunch and add some large leaves, eucalyptus stems, and grasses.
NOTE: Without a jar or vase holding the water, a fresh pumpkin vase will last about two weeks. It will last a bit longer if you use the vase inside.

How to Make This Fall Centerpiece Idea
Pumpkin Vase
You'll love this super simple pumpkin vase!
Materials
- fresh or faux pumpkin (mini or normal size)
- small, sharp paring or carving knife
- spoon
- fresh water
- selection of flowers and greenery*
- optional, small jar or vase to fit inside
Instructions
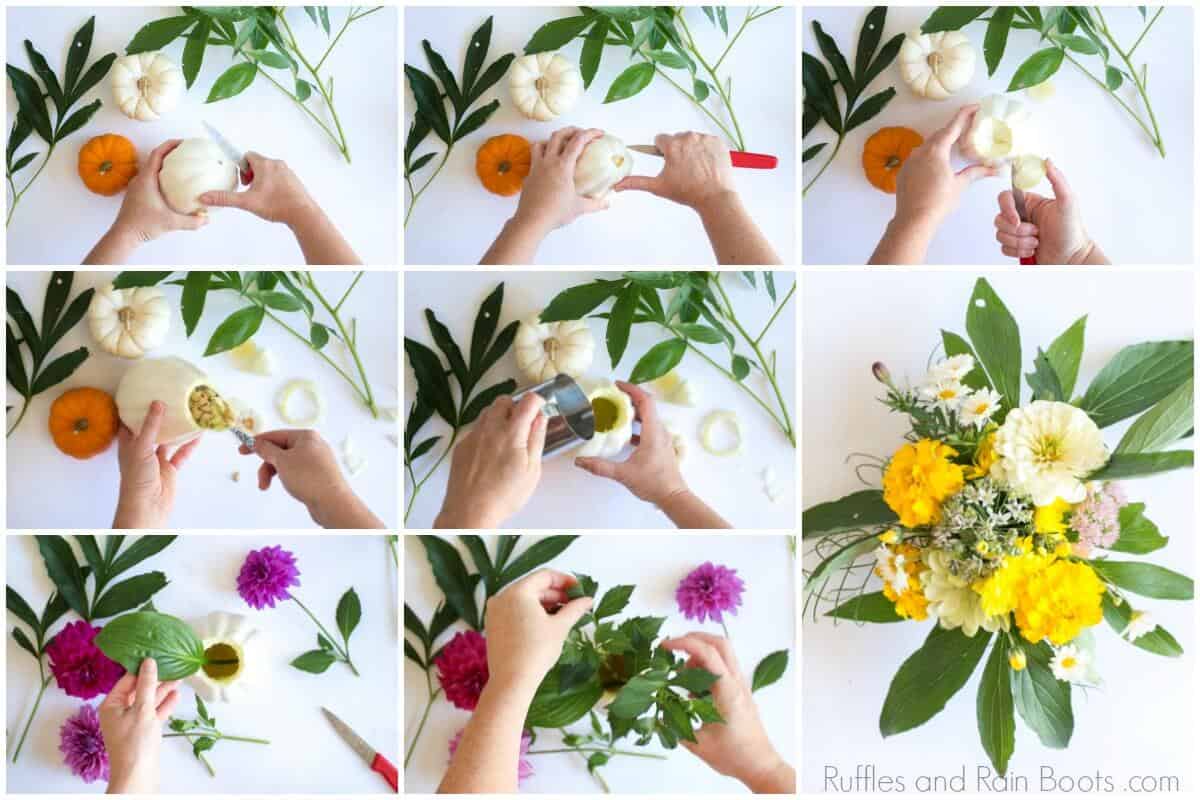
- Wash and dry the surface of the pumpkin. Slice the bottom of the pumpkin slightly if it wobbles.
- Carve out a small round opening at the top of the pumpkin and scoop out the seeds and a good bit of the flesh.
- Add water and build the floral arrangement: greenery on the bottom fanned out over the edge, tall flowers in the center, and shorter flowers on the sides.
Notes
For more fun fall crafts, visit Ruffles and Rain Boots.
Please Share or Save This Fall Decor and Gift Idea
Your shares are how we grow and we are sincerely grateful. Please share this with a crafty group on Facebook or save it to a fall DIY pin board.

Meet the Creator
Hi there, I’m Sarah Nenni-Daher. I’m a crafty gal and always have at least 14 projects going at once. I am a crafter, designer, DIYer, and pattern maker. I share my creations here and in the Ruffles and Rain Boots® Shop.
Here at Ruffles and Rain Boots®, you’ll find DIY gnomes, crafts, gifts, cupcakes, laser crafts, and so much more. I love sharing video tutorials over on YouTube and chatting with other crafters in my Facebook groups. We’d love to have you!