
Make these Princess Belle Minnie Ears for Disney and Wow Them!
These Princess Belle Minnie ears for Disney are the most stunning no-sew Mickey ears! It’s a fun Beauty and the Beast craft that is definitely wow-worthy.

Princess Belle Minnie Ears for Disney
Here at Ruffles and Rain Boots, we are definitely soul-sisters with that beautiful Princess Belle. The books, the desire to learn, the idea that not every guy that’s hitting on you is a great guy (looking at you, Gaston). Seriously, if Belle was a real person, we’d be best friends.
RELATED READING: ULTIMATE LIST OF DIY NO-SEW MICKEY AND MINNIE EARS FOR DISNEY
And that’s exactly what had me thinking about making Princess Belle Minnie Ears for Disney. And when I stumbled on an idea to make magic rose Mickey ears? Oh, I couldn’t stop myself from figuring out how to make them in the most efficient, easy way. These Beauty and the Beast Mickey ears may look complex, but I’m telling you honestly that they may be some of the easiest Minnie ears I’ve ever made. Let’s get started.

No Time to Make This Now? Pin it for Later
You’re busy, I get it. Pin this to your favorite No-Sew Mickey ears for Disney ideas board on Pinterest and it’ll be here for when you’re ready.

Tips to Make Beauty and the Beast Mickey Ears
- Don’t go overboard on the glitter. I know, I know, often, you just can’t have enough glitter in your life, but these Princess Belle Minnie Ears for Disney really are not supposed to be glitter-overload. Just enough to make it “magic” in those magic rose Mickey ears. And no more.
- If you wanted to add lights to the bow and maybe even inside the pretty “glass bubble”, that can absolutely be done. I just didn’t want to because I felt like these Beauty and the Beast Mickey ears were gorgeous enough as they were. But, if you would like to add lights, I love these fairy lights. It’s a great deal on them and I have yet to open a pack that didn’t immediately turn on.
- You can use a serrated knife to cut the portion of the bubble on the bottom, but I used a scroll saw. I am pretty sure you could even use a jig saw, although that might be difficult. Whatever you do, be careful.

As an Amazon Associate, I could earn from qualifying purchases.
How Do I Make this Adorable Set of Belle Minnie ears?
I’m so glad you asked. Below is our written tutorial. If you’re making a DIY mouse ears playlist on YouTube, here is our Princess Belle Minnie ears video tutorial (full video).
Princess Belle Minnie Ears for Disney

If these Princess Belle Minnie ears for Disney aren't the most stunning no-sew Mickey ears! These unique Beauty and the Beast Mickey ears are wow-worthy.
Materials
- 2 Fillable Plastic Clear Oval Ornaments
- 1 Black Headband
- Yellow Craft Felt
- Yellow 4-inch wide Tulle Ribbon
- 2 Faux Rose Buds
- 1 Small Rose
- Small Amount of Silver Glitter
Tools
- Hot Glue Gun & Glue
- Scissors
- Scroll Saw (or other cutting implement)
Instructions
- Lay headband over oval ornaments and sketch where you want the ears to sit on the headband.
- Cut out area of ornaments that is unnecessary with the scroll saw (or your chosen cutting implement). Take care to cut off the round protuberance you’d traditionally thread with a ribbon for an ornament.
- Trace the now-open shape of the bottom of the ear onto the yellow felt.
- Repeat with the other ear and cut out both shapes.
- Hot glue a rose bud inside each ear. Use as little hot glue as possible.
- Add a portion of glitter (about ¼ teaspoon) to each ear.
- Close each ear with the other half of the clear plastic ornament.
- Make sure the opening is aligned for each portion of the plastic ornament.
- Hot glue the yellow felt cut-out to each corresponding opening of each ear.
- Trim any excess felt.
- Add a dab of hot glue to the top or sides of the two ornament halves to make sure it will no longer open.
- Affix each ear to the headband, with about 3-inches between them, or as desired.

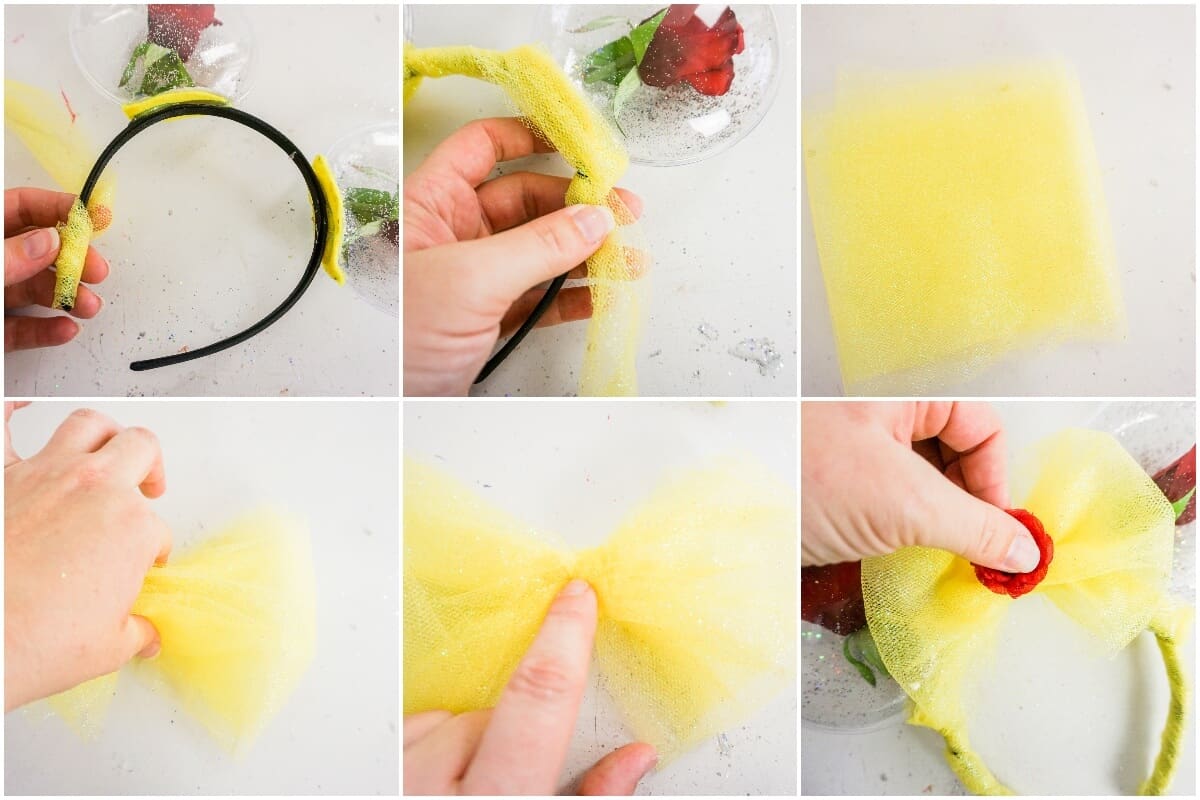
- Wrap the yellow tulle ribbon around the headband, adding hot glue as necessary to hold it in place. Be sure to place the tulle in such a way as to hide the bottom of the ears.
- Cut a 4-inch long, thin (¼-inch wide) strip of yellow felt.
- With about 18-24 -inches of yellow tulle ribbon, fold it to a width of approximately 5-inches from side to side.
- Pinch this folded tulle ribbon in the center and wrap the thin length of yellow felt around the center, hot gluing it in place.
- Trim the end of the faux rose to make the rose as flat on the back as possible.
- Affix the rose in place on the center of the bow, on top of the felt.

Notes
For more fun no-sew Mickey ears for Disney, visit Ruffles and Rain Boots!
Creativity, Delivered
Would you like inspiration delivered right to you each week? Sign up for the once-weekly Ruffles and Rain Boots newsletter and you’ll get that and more! Get access to the exclusive libraries full of free SVGs, hand lettering practice, and so much more.
More No-Sew Mickey Ears for Disney You Might Like
- Ultimate List of DIY No-Sew Mickey and Minnie Ears for Disney – If you need some ideas for making your own Mickey ears for Disney, look no further. Every character is represented–and some more than once.
- Ariel Mickey Ears – Hers’s another stunning DIY Disney Princess Mickey ears tutorial that just can’t be missed!
- The Best Snow White Mickey Ears – Reach back to the original Disney Princess and make (or buy) a stunning set of Snow White Mickey ears for your Disney Princess!
Please Save This to Pinterest
Your shares are how this site grows and I am sincerely grateful. Know a friend who’d like this? Please share it on Facebook or save it to your favorite DIY Mickey ears board on Pinterest.


Where do you get your clear oval fillable ornaments? Also, what size do you use? Im having a hard time finding any!
I got them on Amazon and in the craft stores during the holiday season. The sizes are about 4 inches wide.