
xTool P2 Review and Project Inspiration
If you want to be unlimited in your laser crafting while focusing on safety, innovation, and expansion, the xTool P2 CO2 laser might be the perfect match. I’ve been working with it for an entire month now and I’m excited to share what I think about it.
Want to see what this machine can do? Read through the highlights and scroll through some of the projects I’ve made below. Be sure to ask me any questions – it’s part of my business and will help you determine if it should be part of yours.

RELATED READING: xTool M1 Ultra – Great for Crafters or Is It a Dud?
xTool sent me the P2 to use and review, however, I was not compensated in order to remain objective. There are affiliate links within this article.
What You'll Find On This Page
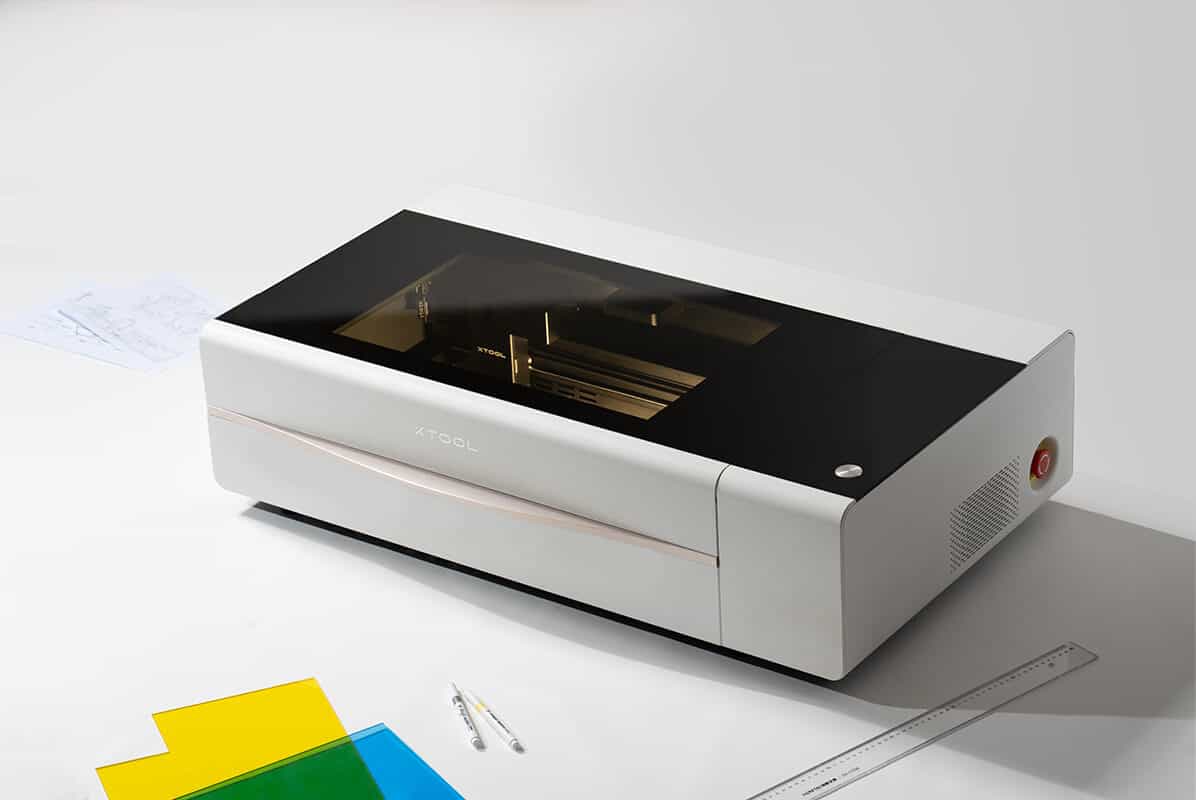
xTool P2 CO2 Desktop Laser
Here at Ruffles and Rain Boots, I’ve been on a bit of journey learning how to use lasers. It’s been a fun, challenging experience and I can’t wait to share this next chapter.
The company sent me their desktop laser, the xTool P2 CO2 laser. And this is a very, very different laser than my others because it’s powered by a 55 watt carbon dioxide laser instead of a diode. I’ll spare you the details, but basically, the CO2 in uninhibited like the diodes.
In this article, I’m going to share which crafter or business is best suited for this laser and a few need to know points. Throughout, I’ll also share projects made so far.
Overall Review of the xTool P2: This machine is powerful and perfect for those who want unlimited acrylic crafting or those who want to run a business which focuses on a variety laser crafts. The P2 is robust in its expansion capabilities and is one of the best-priced tools on the market.
This is a beefy read with headings to help you navigate and a table of contents for quick navigation. If you can’t read it right now, save or share this article to make it easy to find when you have the time.

xTool P2 Review and Projects Video
If you’re a visual guy or gal and prefer things in video form, watch the xTool P2 Review and Project Inspiration video on YouTube.
While you’re there, subscribe. We have a lot of fun and I share full tutorials, with machine settings, software steps and tips, and steps for finishing full projects.

Safety Focus: The P2 Is a Fully Enclosed Laser
Because I’m crafting around others, my focus is on safety. The P2’s design means that no additional protective eyewear is needed; the safety glass and enclosed design means all eyes are protected from harmful beams.
xTool provides a free laser safety course introduction which you access directly from the software or their website. There is also a plethora of information and even records you can keep on hand, detailed here in this training specifically for the P2 machine.
Additionally, the emergency stop button and fire detection means we can breathe easier putting these in our craft rooms. If you want one more layer of safety, the optional fire suppression kit is available and it takes some anxiety away.
Finally, the air assist is incorporated within the unit. Why did I put this under safety? There are no additional cords to manage and that’s always a win in my book.

RELATED READING: New to lasers? Consider the xTool M1 Ultra, a Crafter’s Laser
Performance Facts About the xTool P2 Laser
- This unit has TWO 16 megapixel cameras: one fisheye for the entire bed view and another on the laser module for a close, detailed view.
- xTool’s P2 has an auto focus – this means you can opt out of measuring with that silly little ruler some lasers require.
- There are no acrylic color limitations! You can cut clear and any other color.
- The laser module can travel 600 millimeters per second. That’s fast, but more importantly, the accuracy traveling that fast is amazing.
- That accuracy is achieved across a significantly sized work area; the bed of the P2 can handle single items or batch processing.
- Innovation is key with this unit and it comes with the curve processing feature, allowing us to engrave along the curved edges of bowls, platters, guitars. etc.
- Expansion opportunities make this one of the most versatile desktop lasers to grow with you. Some upgrades include rotary units, risers, conveyor systems, and honeycomb panels (more on these below).
Is the xTool P2 Easy to Set Up? P2 Assembly Instructions
Friends, I’m a crafty gal not an engineer and I was able to do all of the set up myself. xTool makes it easy by including a step by step booklet AND a full video detailing the process.
One thing to note: the unit is nearly 100 pounds on its own. You’ll need to enlist a spouse, a friend, or hire a tasker to move this into the area where you’ll be setting it up.
You will need to unscrew connections (easily identified by stickers), add in distilled water with an antifreeze (included in the box), and check the mirror alignment before you get started. Again, all of this is detailed in their easy to follow guide.
Who Is the xTool P2 Made For?
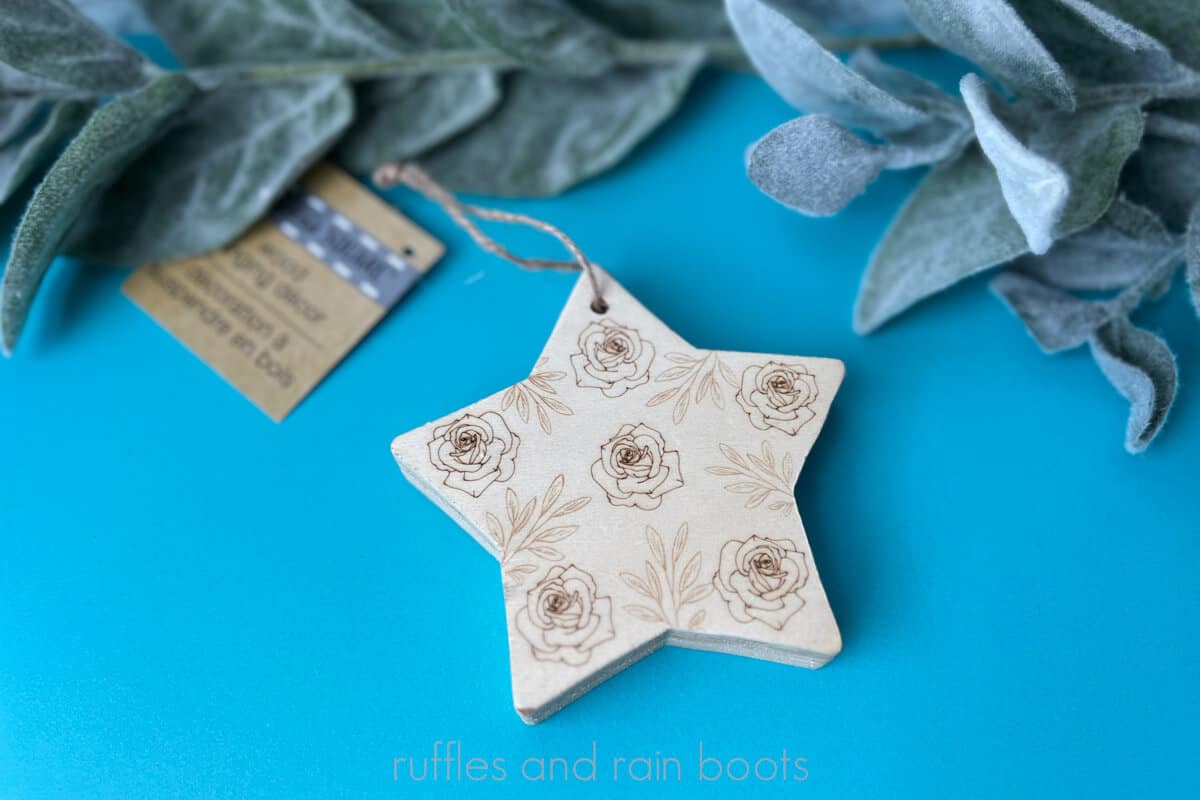
The xTool P2 is designed for anyone who wants to be unlimited in their crafting and business offerings. From clear acrylic to Delrin, from plywood to hardwood, and from slate to literal rocks from your garden, this thing can handle it.
Additionally, this type of laser can cut the OH SO POPULAR mirror acrylic like this You Are Magic Acrylic Sign DIY and this sweet sentiment-filled engraved and laser cut mirror acrylic butterfly magnet.
If you’re a creator who wants to remain unlimited in your tinkering or a small business looking to expand product lines, this is the laser for you.
There are three processing functions: score, engrave, and cut. Read here for a list all of the materials the xTool P2 CO2 laser can cut and engrave, but so far here is what I’ve worked on in under a month and I’m just getting started:
- basswood plywood
- cherry plywood
- walnut plywood
- clear acrylic
- colored acrylic
- mirror acrylic
- transparent acrylic
- textured acrylic
- specialty acrylics (pearls, glitter, confetti)
- stainless steel engraving (with marking spray)
- 3mm felt for quality crafts
- pre-made charcuterie, cutting boards, and bamboo flatware
- watch bands
- dollar store items
xTool P2 Specs to Note
I am not going to list out all of the measurements, specs, and stuff you can literally read elsewhere. Here are things I believe are important having used it nearly every day for 32 days:
- It has a generously sized bed (working area: 23.6 x 12.1 inches).
- You can connect via Wi-Fi or a USB (mobile, tablet, or computer).
- The accurate close detail view camera is one is use most (on the laser module).
- Without the riser, you can engrave items 2.7 inches tall. With the riser, 8.4 inches.
- Precision, even with this hefty laser, is .01mm. Look at this thin detail!
How to Vent the xTool P2 Laser
I’m often asked about my set up because my studio is now in my home. A few questions I often get:
- Does it stink up your room or house?
- Do I need to vent it outside or send it through a purifier?
- Will I need a different exhaust set up?
To answer all of them, no, yes, and yes. You can see my entire set up shown in the video linked above.
I will always recommend getting an inline fan because I do not believe the built-in fan is powerful enough when working with either wood or acrylic when cutting or engraving. I also added a room purifier which focuses on particles and fumes.

Software Needed for the P2 CO2 Laser
The software to run the P2 is called XCS – xTool Creative Space. The best part is that they don’t gate keep it! You can download xTool Studio for free and start working in it before getting a laser.
If you’re new to design, don’t worry – there are shapes, characters, and more already loaded in the software. Additionally, you can bring in any SVG, PNG, DXF, BMP (bitmap), JPG / JPEG, and WEBP file shared by designers like me.
You do NOT need a paid or subscription-based program to run this laser. XCS is free and there is no paid subscription required.
Stay tuned for an in-depth look at this software here and on the YouTube channel. They’re in BETA testing for XCS 2.0 right now and I’m tinkering daily to bring you some details soon.
Expansions and Additions to Consider
The below are optional add-ons for the xTool P2. I’ll share which ones I have and what they help users accomplish, along with my two cents about each. Please use the comments section below or connect on social media to ask any questions about each of these.
Materials
The laser will come with some materials, including clear acrylic, basswood plywood, and cardboard. This is enough to get you started, but honestly, you’re going to burn through it fairly quickly.
I recommend picking up the materials bundle for the P2 – be sure to get a mix of wood and acrylic. Slate is a very fun material for engraving practice, as are pre-made cutting boards made from bamboo, acacia, and mango wood. All are pretty inexpensive items to learn on.
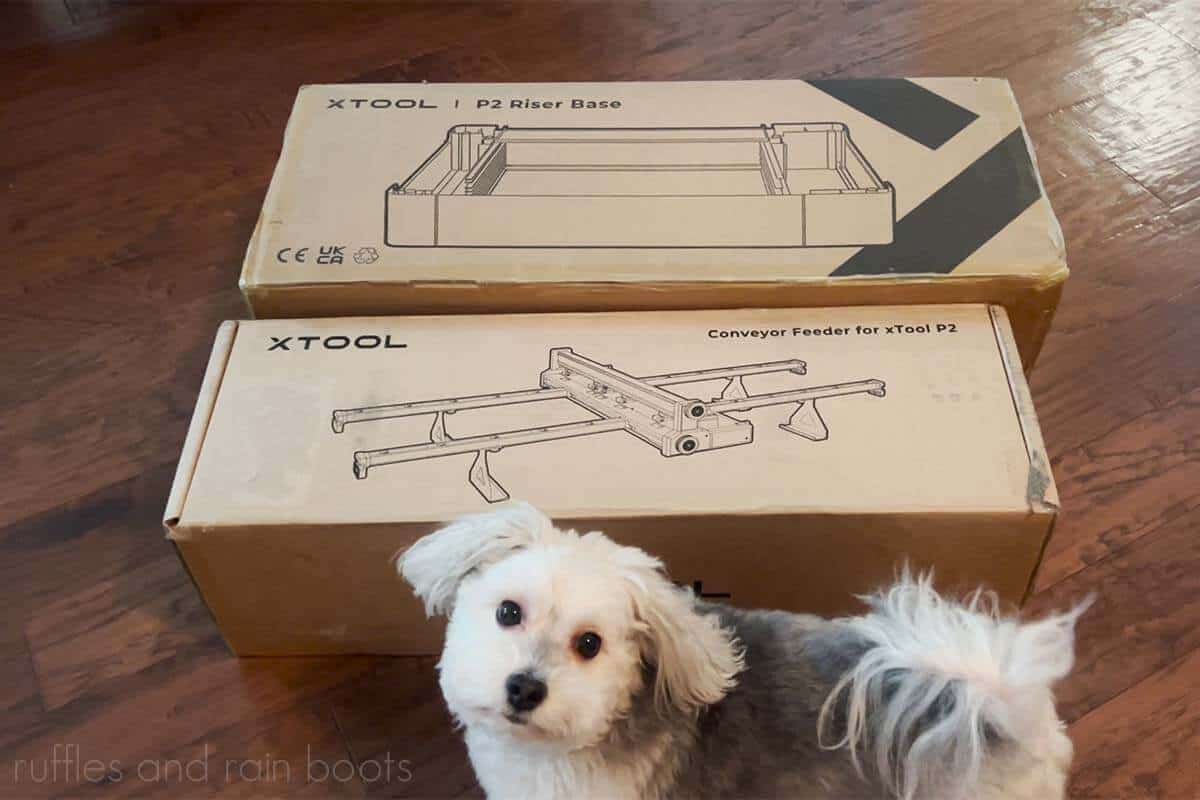
xTool P2 Riser Base
Now that I’ve gotten some experience with lasers, I will always, always, always recommend a riser base. The additional height will offer so many new ways and means in which to use the laser.

I just got this delivered for the P2 and will share the set up and projects soon. Make sure you are subscribed to the YouTube channel to see that – it just arrived today!
Conveyor System
The P2’s conveyor system literally just landed on my doorstep and I cannot wait to play with it! I’ve never done large projects and, with a little luck and a lot of practice, I’ll be sharing my first project soon.
Rotary Pro
If you want to work with tumblers, glasses, rings, or other devices which need to be rotated, you need this. I have the Rotary Pro 3 and just picked up different cords to use it with my xTool M1, xTool S1, F2, and now the P2 (it works with the P2S and even the P3, along with the F1 Ultra and F2 Ultra).
Honeycomb Panel
If I have one problem with the unit, it’s with this accessory. As shared in my xTool P2 review on YouTube, it feels as if this addition is an afterthought. I’m working on ways to ensure more accuracy with it, so stay tuned.
RELATED READING: How to Make Best-Selling DIY Laser Cut Sun Catchers
The P2 Is an Investment
If you’ve gotten this far, you can understand why this machine is the pinnacle in the xTool line up. The xTool P2 laser will run you $4,300 to start but the good news is, they have a payment plan if you’d like to pay it off with your laser earnings.
This unit can keep up with your pace. If you’re looking for laser crafts to make and sell in your small business, know that the bed size, speed, and versatility will be a good investment.
Before you balk at the price, know that there are much more expensive CO2 lasers on the market that aren’t as expandable, nor as innovative as this piece of machinery. I don’t recommend items on this site often, but this is a business I stand behind over many, many other laser manufacturers.
Unlike professional tool reviewers, this machine is a part of my business. I urge you to ask me questions regarding this xTool P2 CO2 laser, the set up, the working costs, and anything else you might be wondering.
Please Share or Save This xTool P2 Review
Have you joined the Laser Group on Facebook yet? It’s a welcoming, friendly, and open space to get ideas, ask questions, and learn from our peers.
If you found this helpful, please save or share this laser cutter and engraver review and inspiration of xTool crafts to make and sell. Your shares are how this site grows and I am sincerely grateful.

Meet the Creator
Hi there, I’m Sarah Nenni-Daher. I’m a crafty gal and always have at least 14 projects going at once. I am a crafter, designer, DIYer, and pattern maker. I share my creations here and in the Ruffles and Rain Boots® Shop.
Here at Ruffles and Rain Boots®, you’ll find DIY gnomes, crafts, gifts, cupcakes, laser crafts, and so much more. I love sharing video tutorials over on YouTube and chatting with other crafters in my Facebook groups. We’d love to have you!