
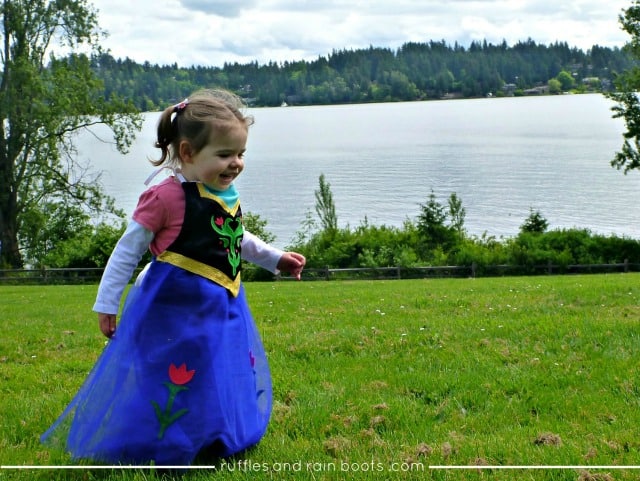
FROZEN-Inspired Princess Anna Dress Up Apron
This very popular Princess Anna Dress Up apron costume is perfect for any FROZEN fan. We’ve made many dress up costumes and share our free patterns and proven beginner sewing tutorials to walk you through it step-by-step.

UPDATE: Thank you for looking at our popular FROZEN inspired Princess Anna Dress Up Costume, now featured by Parents Magazine! These FROZEN princess dresses are quite the hit.
Since you’re here now and we totally want you to come back when we post awesome new dress up tutorials, we invite you to sign up for our once-weekly email newsletter. One of the best parts is that all of our newsletter friends gain access to a super-secret, members-only section of Ruffles and Rain Boots! Take your creativity to the next level and sign up for our newsletter.
You might also be interested in the Princess / Queen Elsa dress up apron tutorial I created.
What You'll Find On This Page
Beginner Tutorial: Princess Anna Dress Up Apron
I’m a beginner with sewing, so when I say “easy,” think “anyone who can push the sewing machine’s foot pedal down” kind of easy. Let’s get started on one of our FROZEN princess dresses.
Don’t have time to read this right now? Pin it so you can find it later!
Supplies List for the Princess Anna Dress Up Costume
For reference: my daughter is 2.5 years old and is wearing 2T and 3T clothes. The apron hangs down past her knees and we tie it up at the neck to bring it up on her chest. The tulle skirt grazes the floor.
The measurement I’ve given for the skirt piece (blue satin), is long enough to be just shy of her ankles and is wide enough to loop around to form a skirt. Do a quick measurement of your child’s waist and height from their waist.
Update: it’s been 4 years and this still fits and is played with so much! The apron hits just at mid-shin.
Supplies (my costs were just at $20):
- 1 child’s sized apron on which to easily build the Princess Anna costume
- 10 yards shiny tulle in cobalt
- 1/2 yard blue satin
- 1/4 or 1/3 yard black crush velvet – NOTE: You can use either, see “bodice” section below to decide how you’d like to do it. I had just enough to cut the pattern on the fold, so it must have been 1/3 yard.
- 1 yard 7/8 inch gold metallic braid ribbon
- 1/2 yard 7/16 inch gold metallic braid ribbon
- craft felt (green and a color for the flowers)
- princess apron patterns (free!)
RELATED READING: See All the Halloween Crafts and Food on Ruffles and Rain Boots!
Cut the Fabric
I have provided this free Anna costume printable for the bodice pattern that I made (sized for a 12″ x 19″ child’s apron). If your apron is a different size, you can whip up your own pattern like I did: lay some paper out on the floor and trace around the apron. It was a highly scientific and oh-so-exact kind of process, let me tell ya.
Note: the pattern should take up the entire length of an 8.5 inch by 11-inch paper. Enlarge your image on your printer if your settings aren’t producing this, but the pattern should be edge to edge (left edge is the fold, the right edge should have the side point of the bodice).
DO NOT JUST PRINT AND CUT – you need to make sure that the pattern extends from the left to the right of the entire page. If yours doesn’t, adjust on your copier / printer or trace your apron.
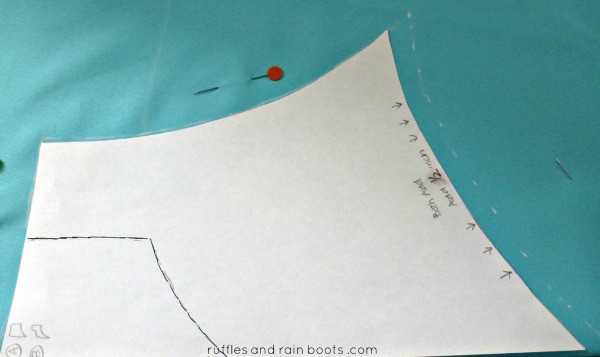
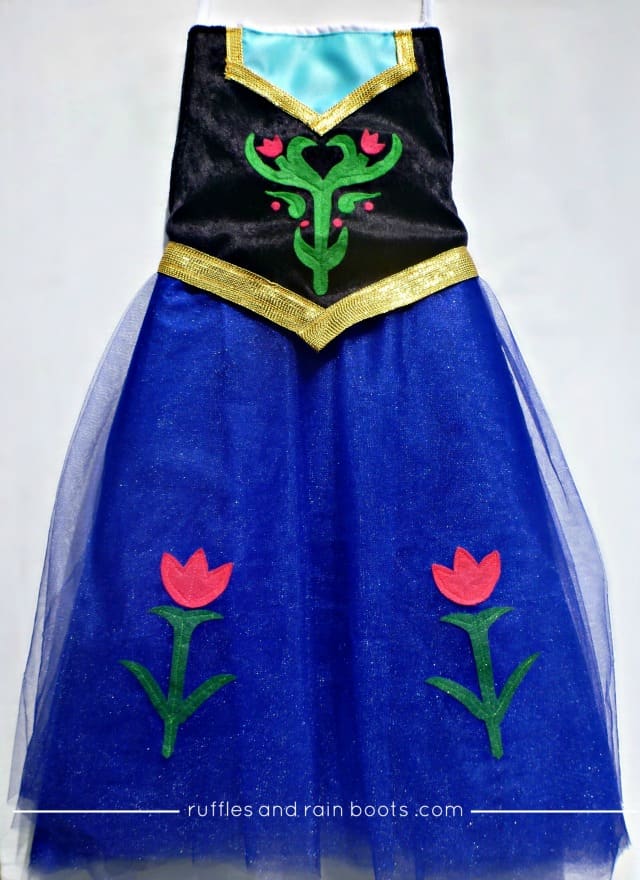
Cut the larger bodice pattern from the blue satin first (iron it first). Then cut the inside portion of the pattern out and use it to cut the velvet. *See Note below. As the pattern instructs, be sure to add the half inch at the bottom of both pieces. Pin the pieces together (satin facing up, velvet facing up – I topstitched this entire project; no turning ‘cuz I’m lazy).
Cut the skirt piece (iron if you want; you can’t see it). I used a rectangle, sized at 25 inches wide by 16 inches long for my daughter. This piece covers the white canvas when the tulle is attached so no white shows through, extends about 6 inches on either side of the apron ties, and also extends a nice, non-scratchy layer past the bottom of the apron.
Cut the tulle. I wanted the dress to be long but not drag-the-floor-long like the Elsa dress I made. I measured from her waist to just above her ankles and I needed 18″ strips of tulle.
I then carefully cut two (folded over) pieces of tulle for the top layers that I would be gathering into pleats. They measured ~about~ 50 inches long. Skip to the “Pleat the Tulle” section under the “Sew the Skirt” heading to see how to do it and then cut based on the size of your skirt piece. We’re going to call these, “special layers.” Even though all tulle is special…
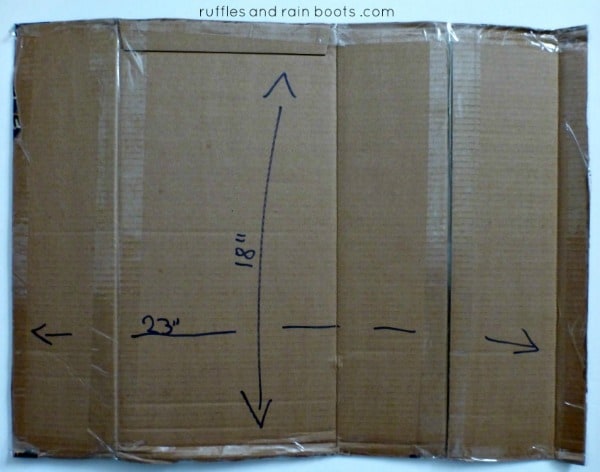
For the rest (and by far the majority of the tulle), I used the cardboard method.
Using a piece of cardboard cut to 18″ one way and 23″ inches the other (the width of my skirt piece after I double-hemmed it), I first cut the width (23″) and then cut the length (18″). I was able to get three 18″ pieces from the full width of the tulle, so I had a lot of sheets to work with. The length of the tulle will depend on the height of your child.
Sew the Princess Anna Dress Up Apron Bodice
Never having worked with velvet before, I went slow and I sewed up the sides first, using a 1/2 inch seam. I then sewed along the edge of the velvet (the sweetheart neckline and straps), using about 1/8 inch seam allowance. This is going to be covered by the smaller ribbon, so I didn’t care that it wasn’t pretty.
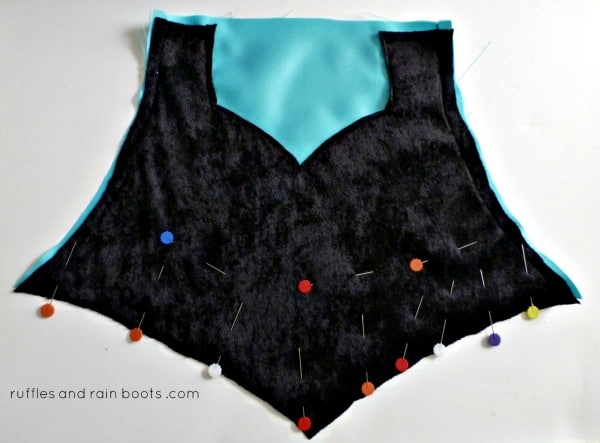
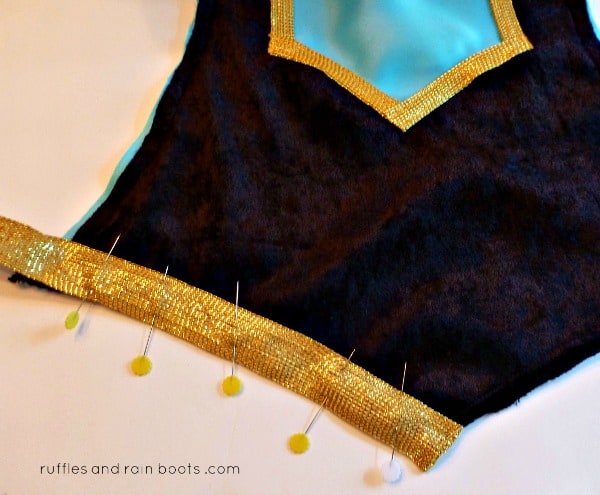
I pinned the Princess Anna costume bodice pieces together at the bottom (to avoid shifting) and then attached the ribbon to the bodice. I started with cutting pieces of ribbon for each of the ‘arms’ and then cut each piece for the sweetheart neckline, making sure to cut the overlapping piece of ribbon to line up with the first part I cut on the neckline.
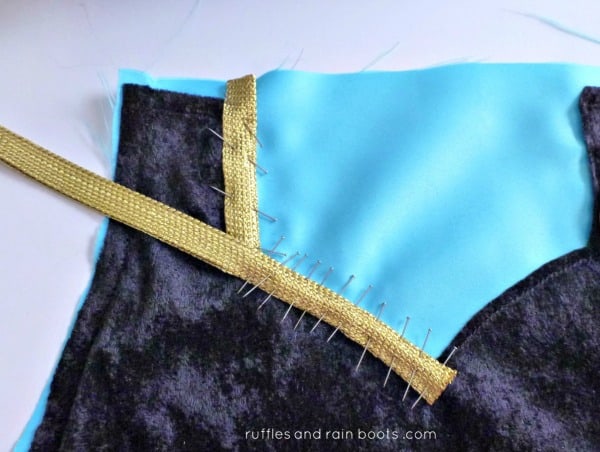
After making sure the ends wouldn’t fray, I stitched two rows of straight stitch on either side of the ribbon to secure it.
Once the ribbons were secured at the top of the bodice, I did the same thing for the bottom of our Princess Anna dress up costume. First, I stitched the blue satin and velvet together and then attached the ribbons, one side at a time. I cut each side of the “V,” making sure to use enough ribbon to overlap the edge and fold it under.
Okay, so this next part is totally optional and if I had to do it over again, being a lazy crafter, I’d probably just use green fabric paint.
I came up with a simple-enough free template for Princess Anna’s dress and traced it (with chalk) onto a piece of green felt. I found that when working with very small pieces of felt, it’s best just to shade the felt with chalk around the stencil instead of trying to trace it. And, it’s much faster.
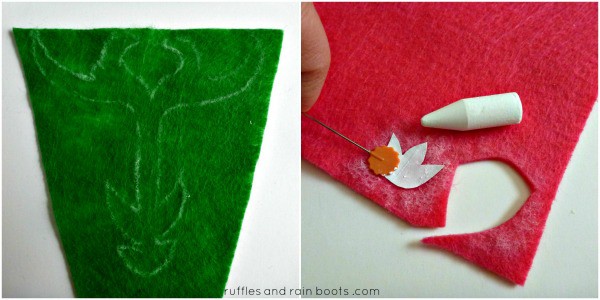
I cut it out and glued it and let it sit for about 30-minutes while I worked on the next steps. I glued it first because I thought that the felt would move around a lot on the velvet.
After the glue was dry, I stitched it “lazy crafter style,” which means that I just stitched straight down the middle. For those of you with embroidery or applique skills (or machines), embroider your little crafty hearts out. 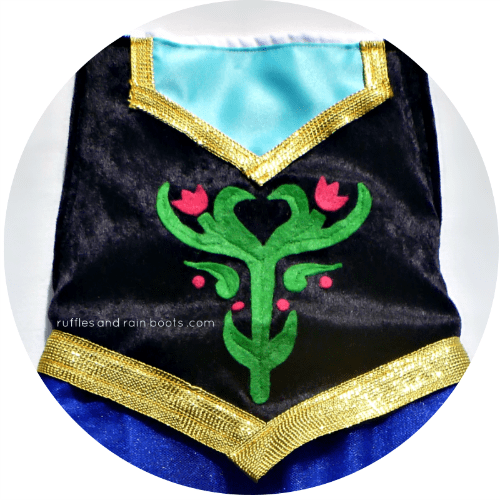
Sew the Skirt for Your Princess Anna Dress Up Costume
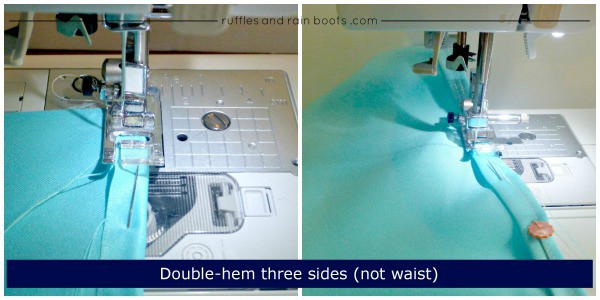
I hemmed the skirt piece, doubled it over and hemmed again. Satin frays, so don’t skip this.
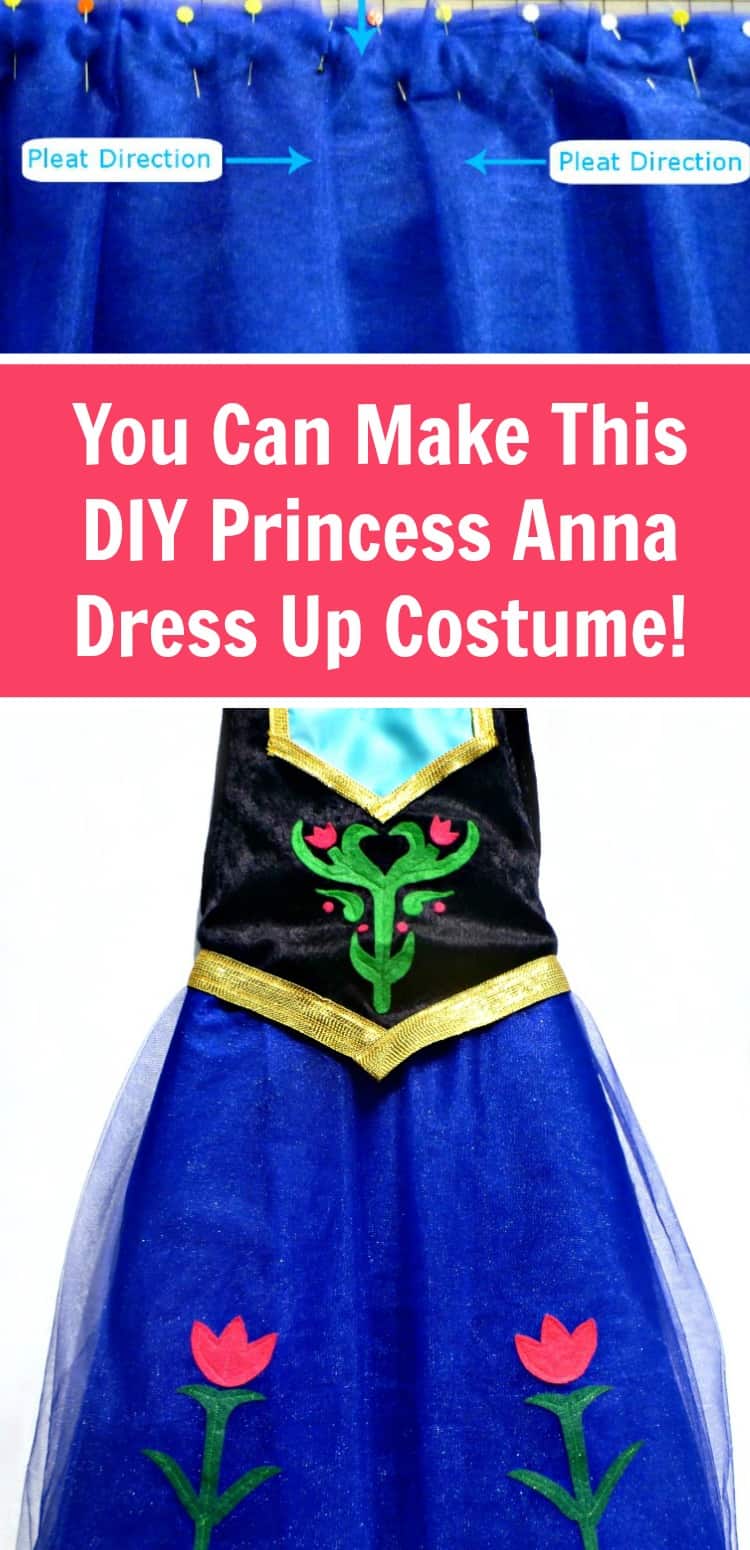
Pleat The Tulle
After I hemmed the skirt, I placed the majority of the tulle onto the skirt piece. Making sure I lined it up as best I could, I secured it with pins.
The top “special layers” were next and those I used to add visual appeal to the skirt front.
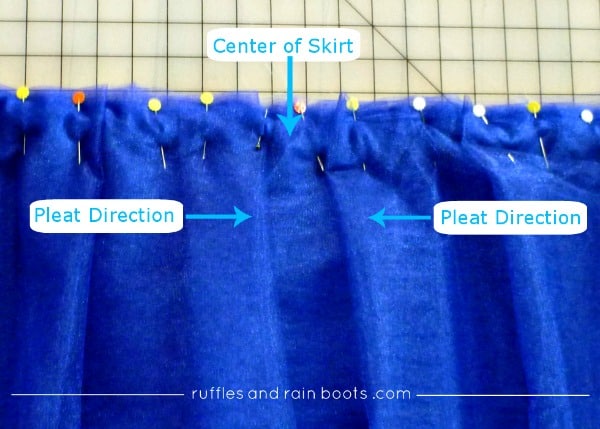
Once you’ve pinned your oh-so-many-layers-of-tulle, sew those to the satin piece so that they are really on there. I used a straight stitch and a dashed-zig-zag stitch to catch as many little sections of the tulle as I could.
I made a pleat 2 inches wide every two inches, starting from the center and working my way to the edges.
The photo on the left of the picture below is before I sewed the skirt piece to the apron. You can see that I made sure the tulle wasn’t going anywhere!
The photo at the right in the picture below is indicating the skirt piece (and therefore the tulle) should extend onto the apron strings so that when you tie it, it gives the appearance of a skirt. Mine extended just shy of 6 inches on either side, so Elise has quite a bit of growing room.
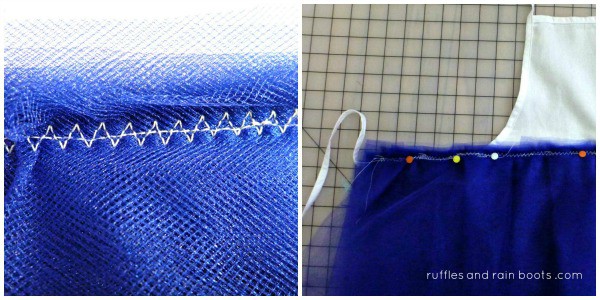
Stitch the skirt piece to the apron, using whatever you feel is best to make sure it never comes off. Ever.
Assemble and Finish The Princess Anna Dress
I wanted the tulle’s stitching covered by the bodice, and measured my daughter to find out where the waist would be (hers was 7 and 1/8″ from the top edge of the apron). I then lined up the center of the apron with the center of the bodice (the point) and first pinned the points where the ribbon trim at the bottom of the bodice met the apron.
Once the bodice is centered and the bottom points pinned, wrap the edges of the bodice piece around the edges of the apron; just pull it around the edge of the apron and pin it. My daughter doesn’t like scratchy fabrics near her neck, so I folded down the top of the bodice (maybe a 1/2 inch) and used the already-finished apron as the top.
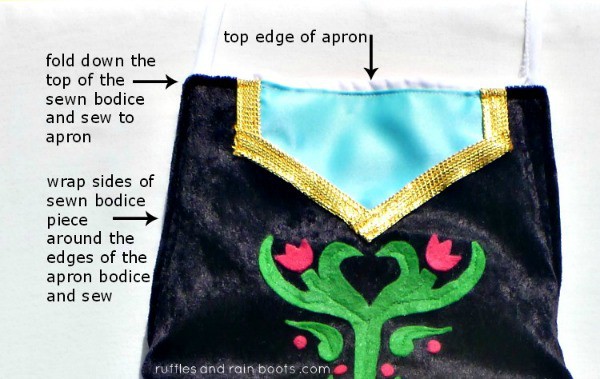
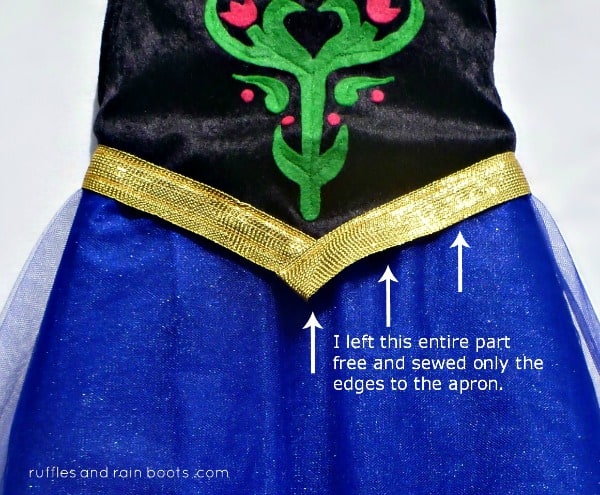
I left the bottom of the bodice (and the bottom point of the “V”) free because I thought it would help to allow freer movement. Psst: you’re almost done with your Princess Anna dress up…
The longest part of sewing the bodice was switching between the different colors of threads (black for velvet, yellow for gold ribbon, and white for blue satin.
The last little bit for this Princess Anna dress up apron is the flower detail on the bottom of the dress [template included in the template detail for the bodice here]. No need to glue it, just pin and sew them on. Again, I stitched straight through the center of the felt to secure the stem and outlined the flower.
You’re done! Put on the Frozen 2 Disc Deluxe Edition Soundtrack![]() or the Frozen movie, grab your wine, and sing and dance right along with Anna and the kiddos.
or the Frozen movie, grab your wine, and sing and dance right along with Anna and the kiddos.
This very popular Princess Anna Dress Up apron costume is perfect for any FROZEN fan.FROZEN-Inspired Princess Anna Dress Up Apron

Materials
Instructions

My daughter will surely love this dress. I will try to make this as soon as possible. Thank you so much for sharing!
Thought uoud enjoy seeing the Elsa and Anna apron costumes I made for my granddaughters for our trip to Disneyworld. How do i share pics?
I would LOVE to see them, Julie.
If you have Instagram or Twitter, you can share them there and tag me (@RufflesandRain). If you don’t, just go ahead and email them to me at Sarah @ ruffles and rain boots .com
This is SO amazing! Yet another reason for me to learn to sew, haha. My 2-year-old (Elise!) is obsessed and I’m hoping I can bribe my sewing mother to make this for her for Christmas!
Bribe away! :) Our little Elise and all of her friends have been enjoying these dress up aprons for more than a year, so I know your Elise would love it!
What amazing tutorials! I’m off to whip these up for my niece’s Christmas gift. I wanted to post on the Elsa tutorial but couldn’t find the comments button. I think I’m going to try adding the cape tulle to a white cropped (bolaro) sweater cardigan. You can catch them on sale around holidays for about $10 at Target. It’ll be an extra piece but shouldn’t be to difficult to add. We’ll see how it turns out!
Wow, kudos for making them both, Amanda! I’m sure your niece will be grateful – as am I for the tip on the cape! What a clever, clever idea, Amanda. Thanks for sharing it here
Thank you so much for this idea and directions. I teach prek and wanted to have some more dress up for my children. I needed something easy to put on and off since I have 14 children in my class. I made 2 of each but changed it a little. I put elastic instead of a tie for both the neck and waist. This proved pretty easy and the children could put them on and off by themselves. I also ran out of purchased aprons so I made my own from some leftover fabric. This also worked quite well. Thanks again for this idea. The children loved their Elsa and Anna outfits!
Patty, I’m so happy you were able to build on this idea. And using the elastic instead of a tie? What a smart addition! Thank you for sharing that with us. If you want to share pictures, I’d love to see them.
May I say that you sound like a teacher who goes above and beyond, and for that I just want to say, thank you. Those kids are very lucky to have you.
This is wonderful! What a cute idea for a dress up costume!
Thank you so much Kassandra – I love that you started a beautiful blog with your daughter. That right there had me a bit choked up.
Thank you for the kind words, Cajun. She does loves her dress up outfits and because they’re so easy to make, I’ll make for her anytime she asks. I love that we’re getting to build a stock of them but will be glad when we get to do something other than Frozen – there’s just so much of a soundtrack this mama can take. :)
Thanks for commenting and for coming through from SITS today!
Pinned! Thank you for this awesome tutorial!
What a great idea to make as an apron!! I still need to purchase a sewing machine – this might be a project idea when I finally get there! Frozen is a huge love in my house….my daughter knew every word to every song even before we purchased the movie. Bless her :)
Isn’t that the way it is, Mesina? The only reason we actually let her watch FROZEN was because all of the kids at the gym were singing it and she memorized, “Let It Go.” :)
You should find a sewing machine and get started – I can’t believe how much we’re able to create (even though we don’t know what we’re doing, exactly)! haha
Thank you for stopping by!
I love this. You are so creative. I have a question: Why do you need the purchased apron? It seems like it would work without it – just add ribbons for tying on. I’m just curious.
Leona – Great question and one that was asked but didn’t make the transfer from my old blogging platform.
The main reasons I chose the apron were because it was easy, sturdy and seemed to make the apron look better. When I build one with the fabric using the satin, it doesn’t handle the weight of the tulle very well and the whole look of what I am aiming for is “off” – the top seems to be dragged down. The heavy duty canvas seems to do a much better job at keeping a solid structure.
Additionally, just using the fabric as the backing will allow for more wear-and-tear. The heavy canvas of the apron allows for rubbing against buttons, zippers, princess purses (maybe in my house only?) and there is no wear on the costume.
As for suggestions for alternatives, one could use a drop cloth or duck cloth (maybe even a home decor fabric) and build the back, adding ties at the waist and neck to help with keeping the structure and the durability. Thanks for bringing this up – I need to update all the comments still from the old blogging platform!
Enjoyed reading your tutorial on making the Anna dress. Would love to know how to make the caplet that goes with it!
Pennye, I know there are a few tutorials out there that use fleece (very cost effective). I found a pretty easy one (made for $10) and put it on my Pinterest FROZEN board for you. There’s one out there that I can’t find right now that is just the caplet portion, and I think it would be perfect for dress up if a Velcro closure was used. I’ll keep searching and put everything on my board. You can find my Disney FROZEN board here: http://ow.ly/BbeDI