
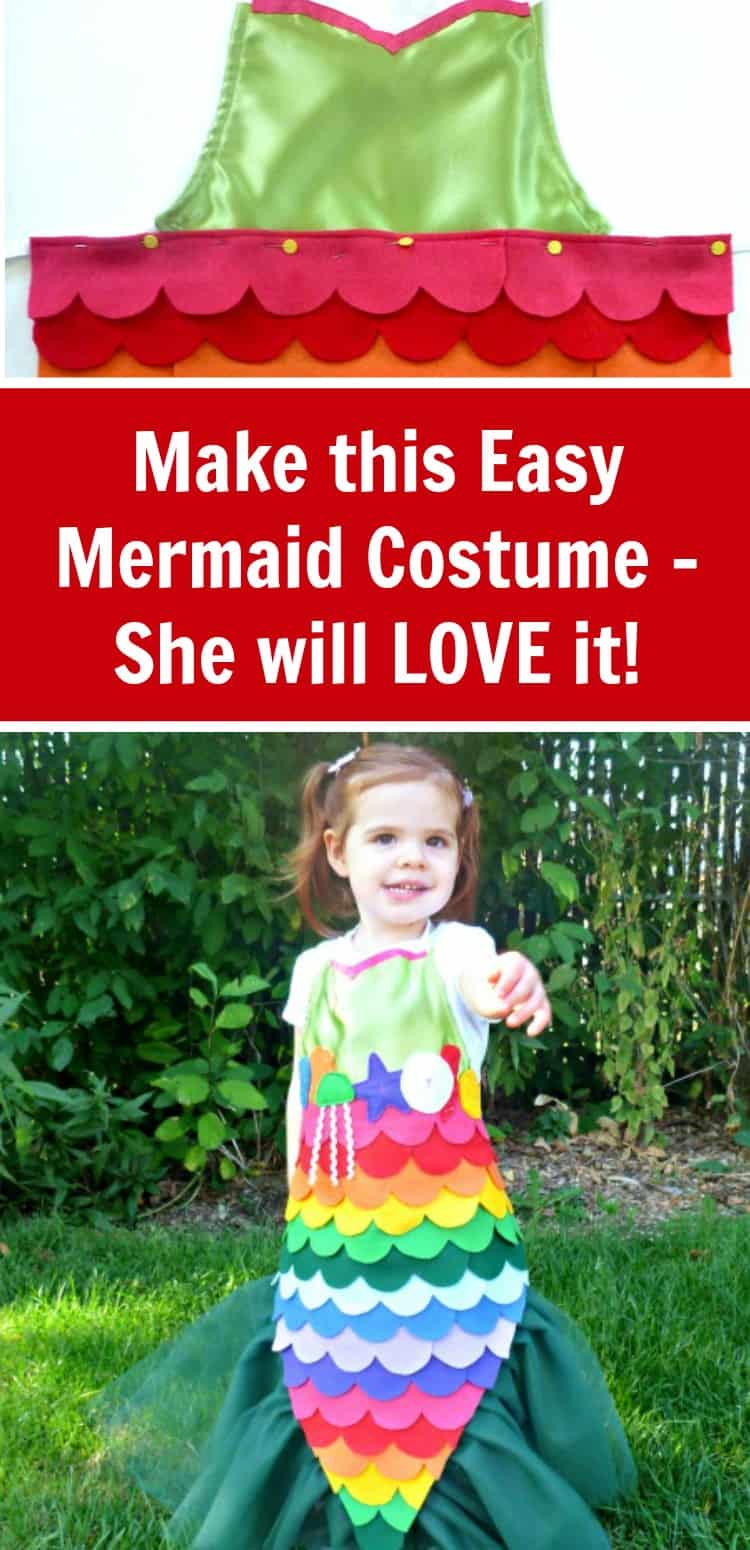
DIY Mermaid Costume With No Sew Option
You can make this DIY Mermaid Costume (it has a no-sew option, too)! We’ve made many dress up costumes and share our free patterns and proven beginner sewing tutorials to walk you through it step-by-step.

What You'll Find On This Page
Little Mermaid Costume
This mermaid costume gives our daughter’s dress up box quite a punch of color and texture and would be perfect for Halloween due to its quick assembly and low cost of materials. Click on “Read More” to join the mermaid mayhem here at Ruffles and Rain Boots AND get a bit of a surprise Halloween treat!
Read through the tutorial below to see how easy this mermaid costume really is!
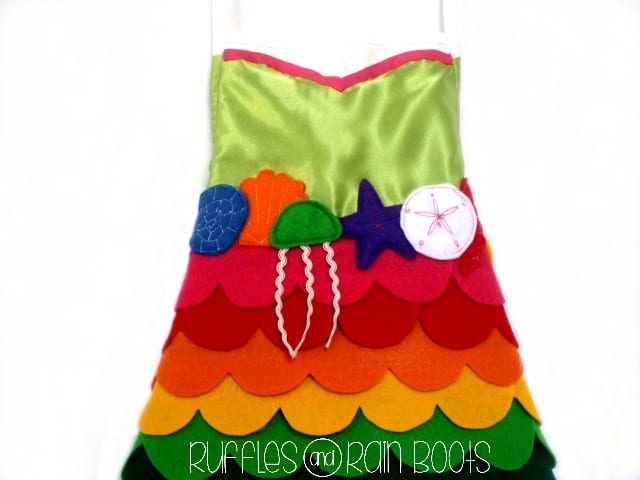
After Elise’s declaration of her desire to be a ‘rainbow mermaid,’ I did a bit of brainstorming and sketching. This dress up apron costume came together quickly with most everything being on hand in my craft cabinet. Due to the low price of craft felt, this is a VERY inexpensive Halloween mermaid costume or dress up outfit that can be put together for less than $20. Additionally, you can be sure to get any color(s) of the rainbow without having to wait for a spectacular sale on specialty fabrics.
This project takes less than 3 hours to complete but is easily broken up. You could fit in cutting the felt before your kiddos wake up, the tulle while they are napping (as if), and the rest after the little joys are in bed. Once you’ve secured a bottle glass of wine, the sewing could also be broken up easily.
After a few inquiries, I am adding this note to all of my dress up apron costume designs: if you want to use this design and make these aprons to sell, please contact me for a license to do so.
RELATED READING: See All the Halloween Crafts and Food on Ruffles and Rain Boots!
Supplies for Mermaid Costume
This entire project comes in about the same price as our other DIY dress up and costumes. The rainbow mermaid costume we made was about $20.
- 12 x 19″ child’s apron from JoAnn’s.
- 1/3 yard of light green satin – I only used this because I had it on hand from working on Elise’s Tinkerbell apron – use any satin or none (this apron would look great with the traditional seashell bra top as well).
- 3/4 yard of by-the-yard 3/8″ ribbon trim
- 5 yards of matte tulle in hunter green
- 1/2 yard of dark green felt by-the-yard. Or, instead of the rainbow colors listed next, you could get 3/4 of a yard and use all dark green for a more ‘traditional’ mermaid costume. For Disney’s Princess Ariel, from The Little Mermaid, you would need to purchase only dark green, a small amount of light green for the top scallops, and purple for the seashell bra top.
- craft felt in your choice of colors –
- sewing notions**
- Mermaid Costume Templates are here
**Note: You could accomplish nearly everything with a hot glue gun! If I didn’t have access to a sewing machine, I would sew the tulle together with some hand-stitching, ruffle it, and then attach it to the felt via hot glue. If you’re doing the no-sew mermaid costume, reinforce the tulle with quite a few hand stitches as well.
Instructions
Mermaid Tail Instructions
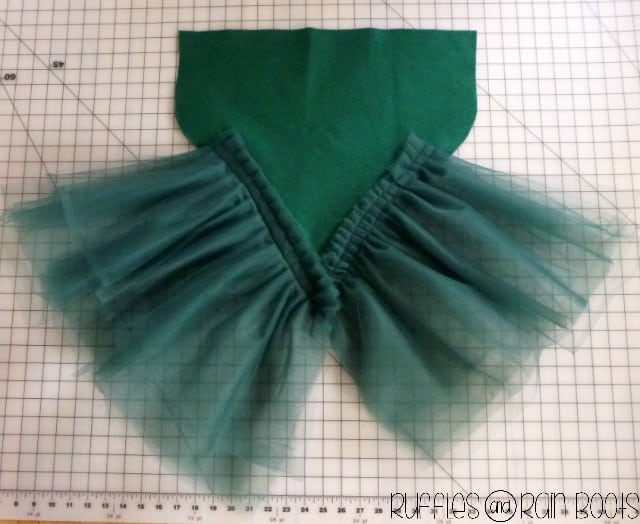
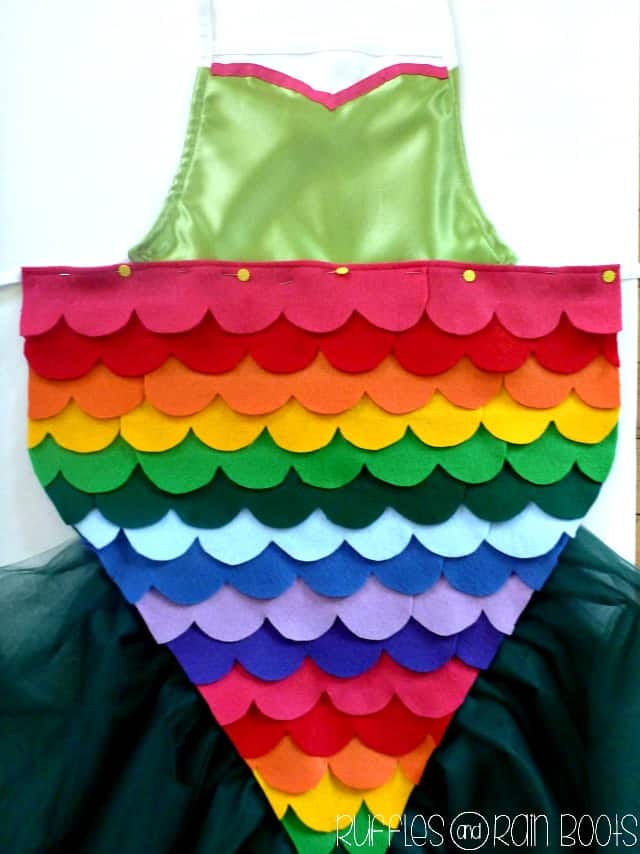
Step 1: Cut the large piece of felt for the mermaid’s tail. You will use this piece to determine how many strips you will need of each color. I measured my daughter’s waist to the floor and cut out a piece of felt 18 inches by 18 inches. For reference, she is 2.5 years old. When measuring your child, you will want to make sure you are measuring the waist because you want the mermaid’s tail to wrap around to the back. It will extend to the waist strings of the apron. I then traced where the bottom of the apron would be so I knew to cut it longer there. I folded it in half, eyeballed the shape and drew it on the felt.
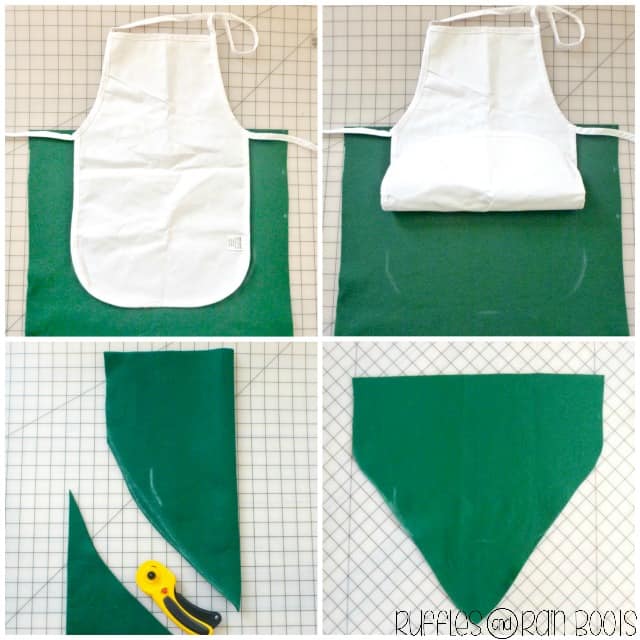
The placing of the tail should look something like this from the back. Notice how the entire bottom of the apron is covered by the felt and how the felt extends onto the apron strings.

Step 2: Cut the felt scallops strips. I cut all of the felt scalloped strips in 45 minutes – but I was also making dinner and rocking out to Jack FM, so it might take you less time than that. A note: some of the felt sheets allowed me to get 4 strips and some only 3 – you’ll have to adjust for this because of the variations in craft felt sheets. Using the template and some white chalk, I traced the scallops onto the felt and then cut each out with sharp scissors
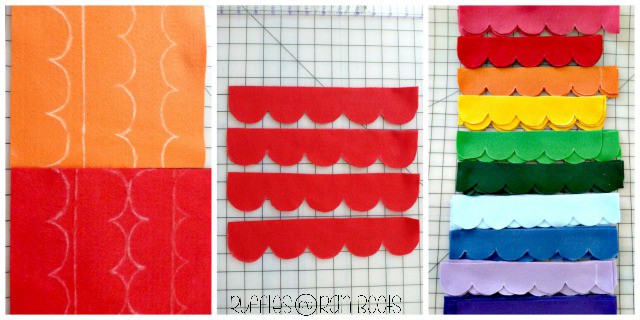
Step 3: In order to determine how many scallops strips I needed, I began stacking them on the mermaid tailpiece – unattached and uncut. Depending on the height of your child, you may need to use more than 10 felt sheets. Once I knew I had the correct number of felt scallops, I put them aside and focused on the tulle.

Step 4: I cut all 5 yards of the tulle into 42-inch by 20-inch sheets. I then folded the tulle over (making them 42 x 10), double-layered. Taking half of them, I lined up their top edges and ran a hand-stitched basting stitch to make sure they didn’t move. Are you excited that this mermaid costume is coming together?

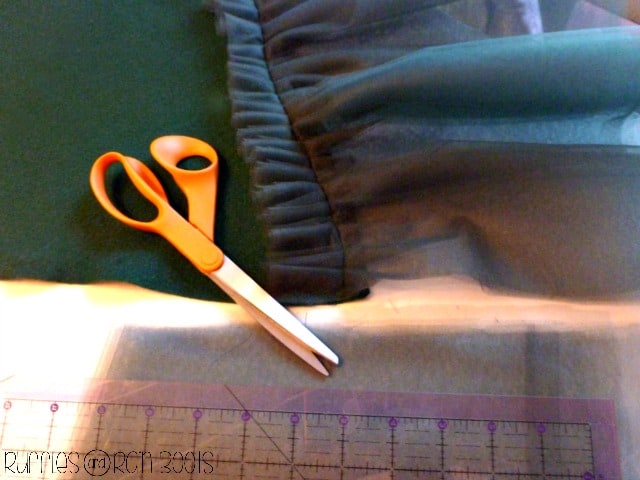
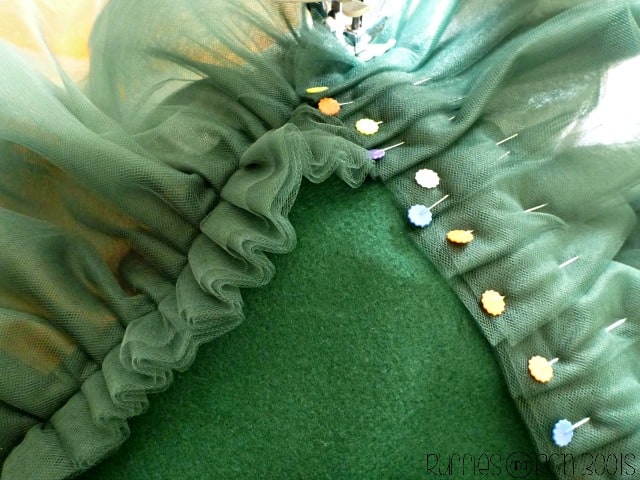
Then, I pinned it to the felt along the sides of the mermaid’s tail felt piece, making 1/2 inch (or so) pleats, about 2.5 inches from the edge. The tulle extended from the bottom point of the mermaid’s tail to about 8.5 inches from the top of the tail. Your positioning from the top will depend on the height of your child.

Using coordinating thread, I sewed that sucker with so much reinforcing that Hercules couldn’t pull it off. I have a tendency to over-sew things I know my daughter will use a lot. The point? Just get that tulle on there so it doesn’t come off. Once you have it on there, go ahead and cut off any excess (keep the tulle in alignment with the tail).
Repeat for the other side.
Don’t worry if they don’t match up perfectly – I had to cut some off the bottom to get them even and an appropriate length for my daughter. Tulle is ridiculously forgiving so you can clean it up later if your cuts weren’t perfect. Mine were – ahem – not. Sorry about the quality of the photo – I was shaking with laughter!
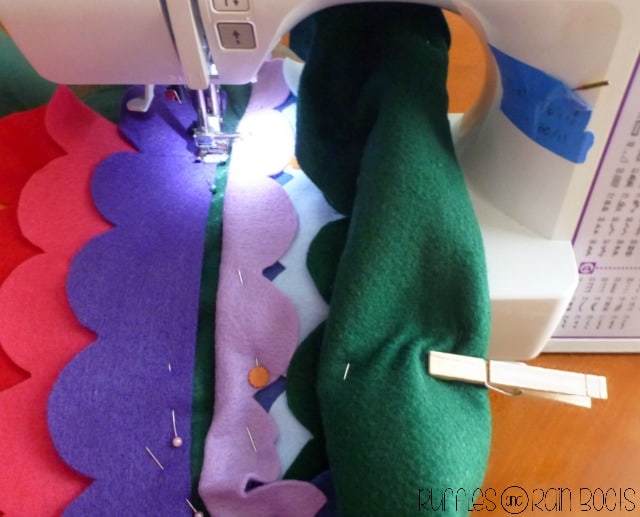
Step 5: Now, the next bit of awesomeness is going to seem a bit like herding cats, but stay with me as it is not difficult, just difficult to explain. Pin the scalloped felt pieces to your mermaid tail the way you want them to look once completed. This is the time to trim down the felt scallops and position the pieces when you need two of them to complete a row. I found it helpful to turn the entire piece over to cut the scallops down to match the tail. You want the pinned pieces exactly as you want the finished mermaid tail.
I overlapped a bit of the felt scallop so that it wouldn’t have a big, gaping dark green spot visible between the colored strips. I know, I’m completely neurotic, but if I didn’t overlap it, the dark green felt would show through when she was belting out song-and-dance numbers. And we couldn’t have that in a fabulous mermaid costume, now could we?

Step 6: Once you have all pieces where you want them, start sewing them on. I would pin up the scallop above the one I was sewing to keep it out of the way and it worked fine. There was no way I was going to keep pinning and unpinning everything which is probably the way you’re supposed to do it. Supposed to shmuposed to. My way worked and it was relatively painless.
Note: I used one color of thread because there was zero way I was going to keep swapping out thread colors or try to coordinate sewing all strips of one color at a time. I am not that lucky that it would work out perfectly and then I’d be cursing while wielding a seam ripper and a bottle of wine. Other than the wine, that’s just not good for anyone.
Once you’ve sewn all except the top row, swap out some color-coordinating thread for that last bit of felt and sew it on. Stand back and celebrate – you just finished a mermaid tail!
Bodice Instructions
If you do not want the bodice, but want the traditional seashell bra top, see my instructions included in the mermaid purse tutorial. Once the shells are done, secure the shells to the apron and skip to step 1 under the Assembly sub header.
Step 1: Cut out the bodice template and roll hem one side of the bodice to provide a clean edge with which to wrap around the apron (fold over twice to prevent fraying). You will then want to fold the bottom corner into a point and roll hem the bottom edge on the same side. Repeat on the other side.
Note: the pattern should take up the entire length of an 8.5 inch by 11 inch paper. Enlarge your image on your printer if your settings aren’t producing this, but the pattern should be edge to edge (left edge is the fold, right edge should have the side point of the bodice).

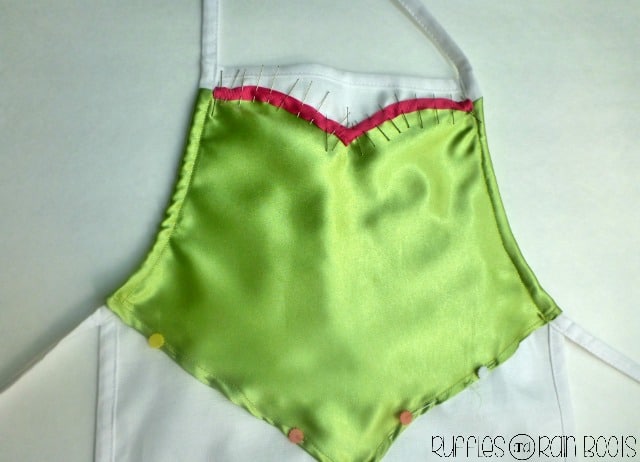
Step 2: Iron the bodice piece. Fold down the ‘straps’ of the bodice and wrap the edges of the bodice around the edges of the apron. Pin in place after making sure the centers of the bodice and the apron are aligned. Pin the bottom of the bodice. Sew the sides to the apron by wrapping the edges of the satin bodice around the apron’s sides. I left the bottom free to allow movement.

Step 3: Add the ribbon trim. I know of no way other than to pin-the-ever-lovin’-goodness out of the ribbon and sew it into place. I use a lot of pins when I do this because well, I’m not too great at this sewing thing yet. Remember when I said even a beginner could make this mermaid costume? Yep, that’s me!
Assembly
You have a decision to make here. You can have the bodice lie on top of the mermaid tail or under it. I chose under it because I wanted to add some ocean friends for my daughter, but you could put the bodice on top of the mermaid’s tail (like our FROZEN Inspired Princess Anna dress up costume tutorial).
Step 1: I sewed the mermaid’s tail to the apron over the bodice, making sure to center the mermaid’s tail with the center of the apron and bodice. Note that the sides of the mermaid tail should overlap onto the apron’s strings because you want it to wrap around the child’s waist a little.
Step 2: Trim the bottom of the tulle to make it even (or to finish sizing it to your child). And now, you’re done with the apron! I made her an accessory: see it here at our mermaid purse tutorial.
You can make this DIY Mermaid Costume (it has a no-sew option, too)! Get all the pictures and a TON more tips on Ruffles and Rain Boots.DIY Mermaid Costume With No Sew Option

Materials
Tools
Instructions
Notes

Thank you for sharing time with us today. If you’re looking for more dress up options, consider our other dress up costume tutorials.
If you liked this, please consider sharing it with your friends and followers. Before you go, please subscribe to our newsletter (via the box in the sidebar) so you don’t miss any of the fun we’re having here at Ruffles and Rain Boots!

How sweet! I have fallen in love with it!!! I’m an avid DIYer and always try to be busy with some new projects. Was searching for a unique idea to start. The Mermaid Costume made me stop and crazy to make it asap for my loving daughter! In a hurry to start. Wish me good luck, Sarah! :)
Oh I’m so glad we could connect this way, Malisha. My daughter still wears this dress up apron (she’s now almost 7). It’s one of our absolute favorites.
Thank for this wonderful pattern! My mom and I made this for my three year old, who asked to dress as Ariel for Halloween. I use green, blue, and turquoise felt for the scales and sprayed silver fabric shimmer in some pieces to give more depth to the colors. My mom used light purple satin, purple ribbon trim, and purple felt shells that she added batting to for the top. For the fun we used four similar colors of tulle. We added a long red wigs and necklace to the costume and packed it for our Halloween out of town. My daughter loved it and she even won a costume contest. What a great idea you’ve come up with!
Katie – wow, you both took it to another level! I’m so glad you were able to use this as a starting point.
I’m @rufflesandrain on Instagram if you have any pictures. Great job and I’m sure they love their new mermaid dress up aprons.
Oh my goodness this is AWESOME!! I made a new sew mermaid costume for my daughter last year, I think it is one of my favorite DIY costumes to this day. :)
Pinning this to the MMBH board :) Thanks for sharing!!!
XOXO
Thank you so much for the kind words. Our little one still enjoys dressing up in this! Thanks for the pin!!
Oh, that is so cute!
This is absolutely adorable! My daughter would love this!
What little girl wouldn’t love dressing up like a mermaid?! You have so many other cute tutorials too. Please come share your blog posts over at the Home Matters Linky Party! We’d love to have you for a visit. The Door is OPEN. http://lifewithlorelai.com/2015/02/26/home-matters-linky-party-26/ :)
~Lorelai
Life With Lorelai
Thanks Sarah, for a really unique and colorful costume! I scrambled to make it the other night so that my preschooler would have a costume to wear for her school’s Halloween event. I tried to go the “no sew” route with Aleene’s Permanent Fabric Glue but that didn’t go over too well and the felt just wouldn’t stick….so I brushed up my sewing machine skills (lacking, to say the least) and somehow cobbled it all together. The result isn’t nearly as cute-looking as yours but thankfully my preschooler didn’t care!
Oh, Ponyo I’m so sorry the glue didn’t work for you (Aleene’s is the only glue that will work for the felt I use), but maybe hot glue next time? I know when I want something to have serious staying power, I use hot glue.
I’m so, so glad you were able to whip out that sewing machine and get your little one ready for her Halloween event at school, though. I’d love to see pictures if you’d like to share. Congrats on making a costume for Halloween!
So cute! Your little girl is very lucky! Love All these idea’s!
Oh my gosh, Sarah! This is the cutest mermaid costume.. my daughter is going to flip! Thanks for the tutorial. It’s so bright and beautiful.. I’ve gotta try this now. :)
Thanks so much, Becky. I hope you have a fun time making it – our little one is sure enjoying hers. :) Today however, she’s back to being Elsa – we went to Trader Joe’s as Elsa today. Her twirls and toddler rendition of, “Let it Go!” were quite the hit!
SERIOUSLY CANNOT GET OVER HOW CUTE THIS IS!!!!! OMG. Great job!!!!
Gorgeous, and you are so clever to use an apron that way! I love it!
Thanks so much, Kelly. It’s definitely not an original idea to use the apron instead of a dress, but I’m thankful I found it. Thanks for stopping by!
This is completely adorable!
I love the amazing list of DIY costumes, that’s all we do around here! We haven’t decided what we are doing yet, so we will be looking through these for ideas!
Oh my goodness, this is GORGEOUS! Well done my friend….
I love all the colours in it. So beautiful.
Thanks for sharing.
xoxo