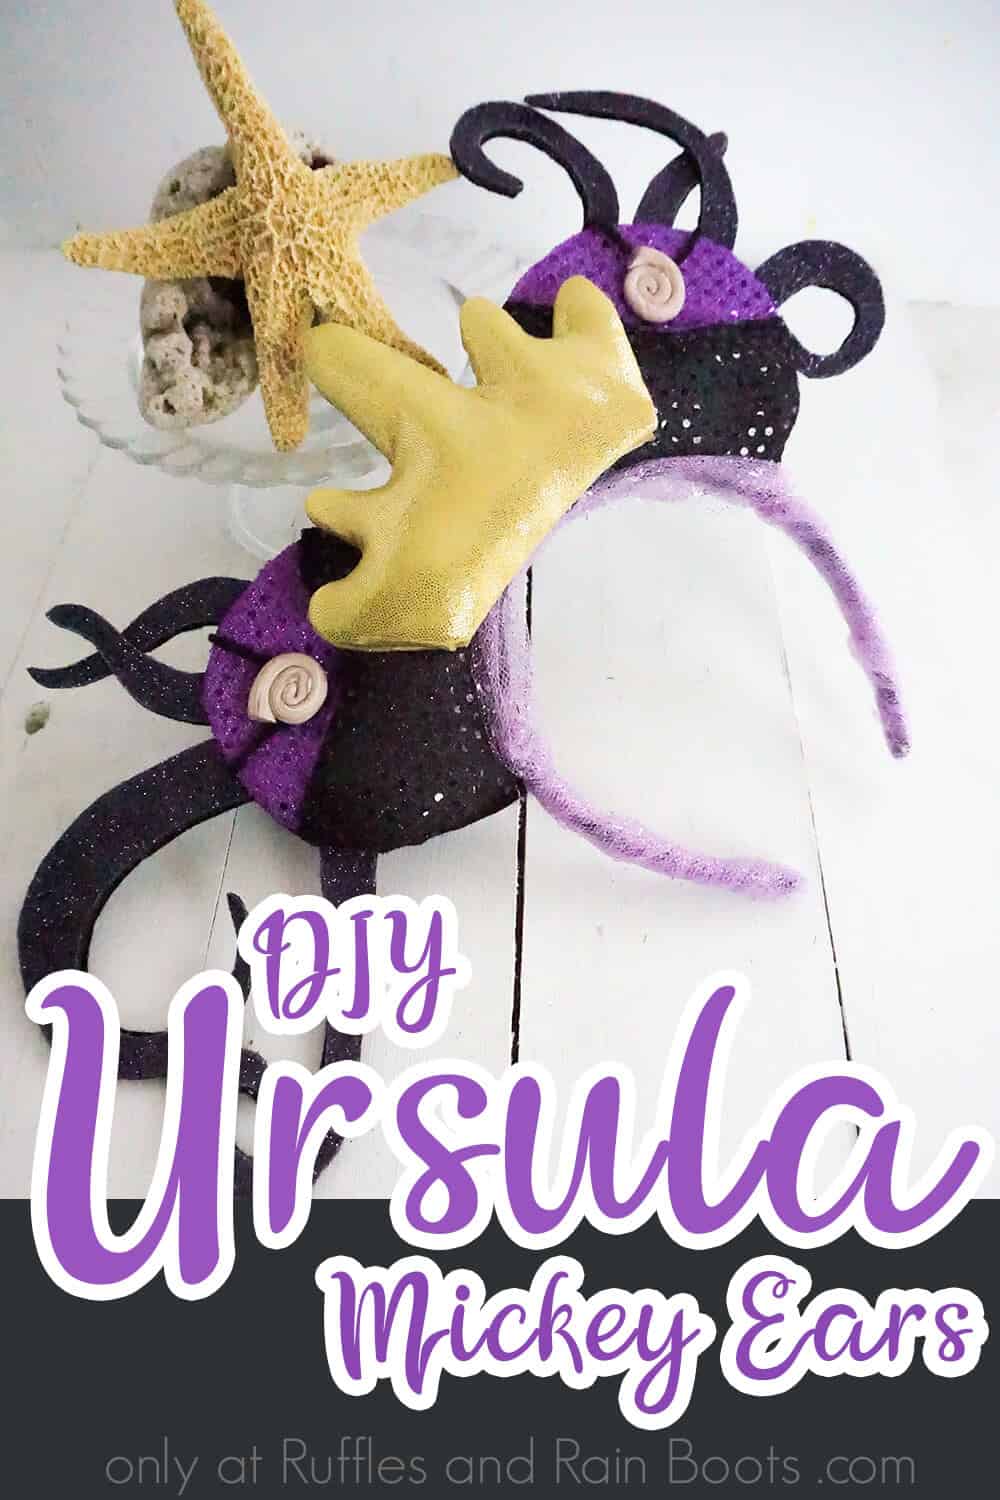
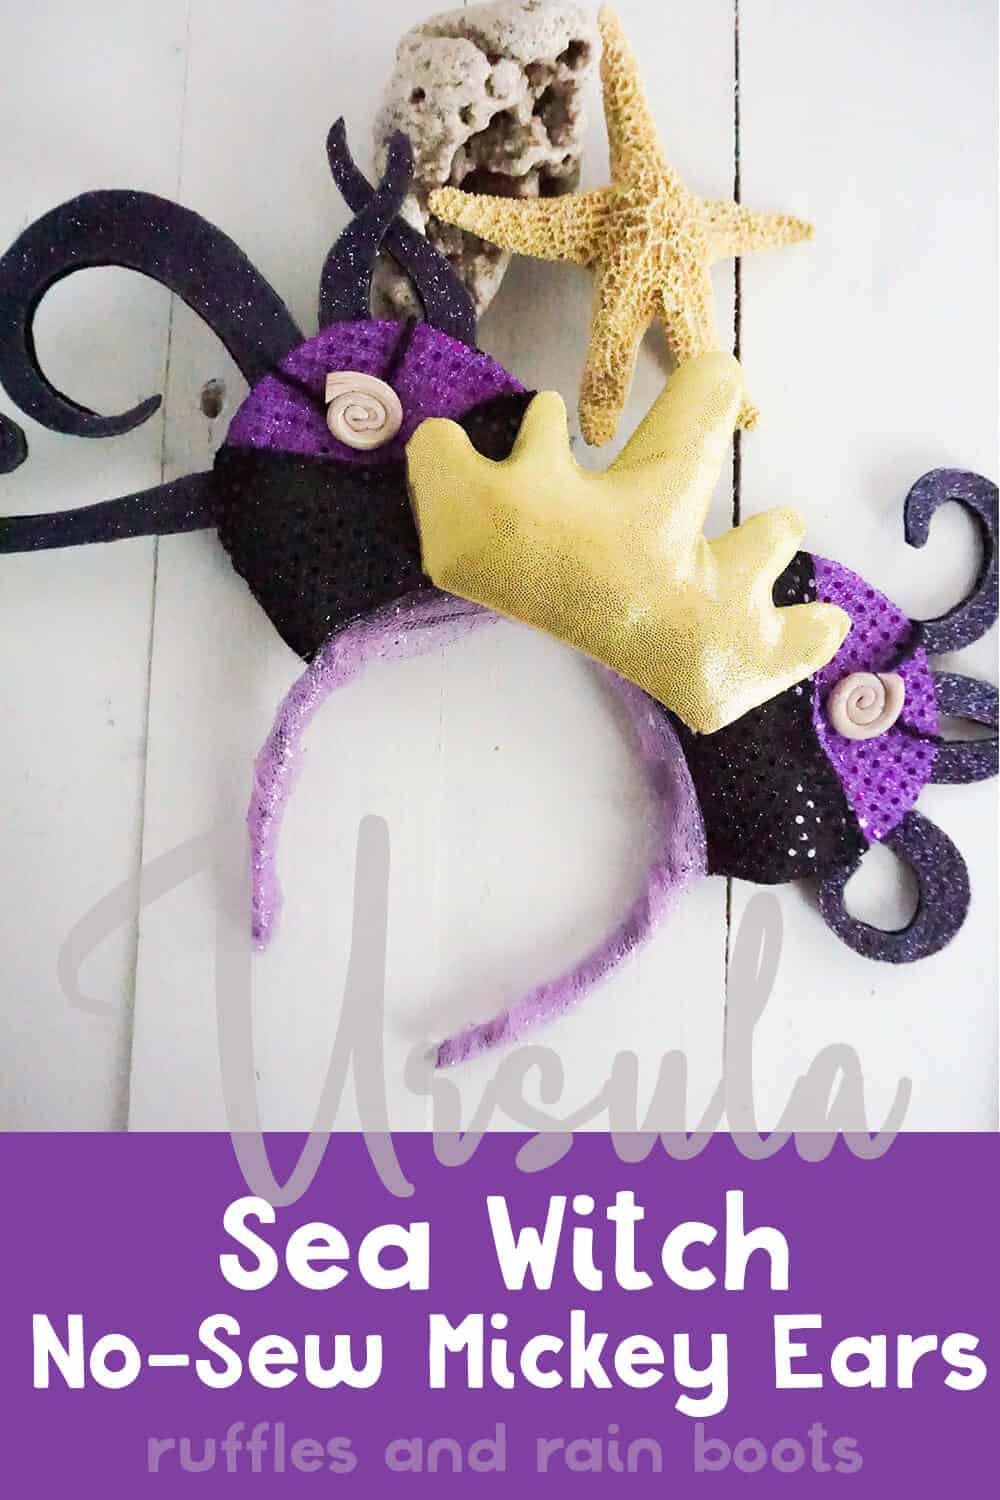
These Little Mermaid Ursula Mickey Ears are Wickedly Delightful and Fun
If you’re into The Little Mermaid AT ALL, you’ll love these beautiful Ursula Mickey ears. They’re super simple, no-sew DIY Ursula Mickey ears for Disney, and they’re wickedly fun, too!

Ursula Mickey Ears
Here at Ruffles and Rain Boots, we are nothing if not enamored of the Disney villains that make our favorite heroes look so great. I mean, if there wasn’t a villain, who in the world would the hero triumph over?! It’s simple–the villains are the linchpin to the best stories.
RELATED READING: VILLAIN MICKEY EARS THAT ROCK!
And one of the MOST AWESOME Disney villains is, of course, the Sea Witch Ursula. She’s bad, she’s mean, and she’ll not only steal your guy and marry him on a boat in front of you, but she’ll steal your voice while she’s at it. Kind of boss, if you ask me.
That’s why, when we were planning our Disney vacation, I decided I definitely needed Ursula Mickey ears, with all the tentacles. And the results? Wicked fun. Let’s get started.
No Time to Make This Now? Pin it for Later
You’re busy, I get it. Pin this to your favorite DIY Mickey ears board on Pinterest and it’ll be here for when you’re ready.
Tips to Make DIY Ursula Mickey Ears for Disney
- Click here to get the free printable pattern for all the bits and pieces that go into these amazing villain Mickey ears.
- Don’t cheat on the glitter. I found that even buying a fun glitter foam sheet was, sadly, not enough glitter. Ursula loved glitter (I’m sure). So, feel free to add that glitter to your DIY Ursula Mickey ears for Disney.
- You can use foam board or cardboard for the interior of the ears. I chose cardboard because I’ve been receiving an alarming number of cardboard boxes lately and I’d like to reuse as much as I can. Also, I’m less concerned about my Ursula Mickey ears getting wet than I am about having to go to the store for more foam board when there’s perfectly good cardboard sitting right there. It’s called “being efficient” I tell myself. LOL!
- If you can find remnants of the sequin fabric, do it–you really don’t need very much for these DIY Ursula Mickey ears for Disney. Just a little bit is going to get your sea witch’s bodice and chest done. So, look for those scraps!

How Do I Make these Ursula Mickey Ears?
I’m so glad you asked. Below is our written tutorial. If you’re making a DIY villain Mickey ears playlist on YouTube, here is our Ursula Mickey ears video tutorial.
Ursula Mickey Ears

If you're into The Little Mermaid AT ALL, you'll love these beautiful Ursula Mickey ears. They're super simple, no-sew DIY Ursula Mickey ears for Disney, and they're wickedly fun, too!
Materials
- 2 Cardboard or Foam Core Board Circles 4-inches in Diameter
- 1 Black Headband
- Black Craft Felt
- ¼ yd Black Sequin Fabric
- ¼ yd Purple Sequin Fabric
- ¼ yd Gold Lame Fabric
- Small Square of Cardboard
- Gold Glitter Foam Sheet
- Black Glitter Foam Sheet
- Black Glitter (optional)
- Small Amount of Polyfill
- Glow in the Dark Purple Paint
- Polymer Clay in ivory, gray, and brown (scraps okay)
- Free Printable Template
Tools
- Hot Glue Gun & Glue
- Scissors
- Exacto Knife (optional)
- Paintbrush (optional)
- Click Pen
- Wax Paper
- Oven
- Baking Sheet
- School Glue (optional)
Instructions
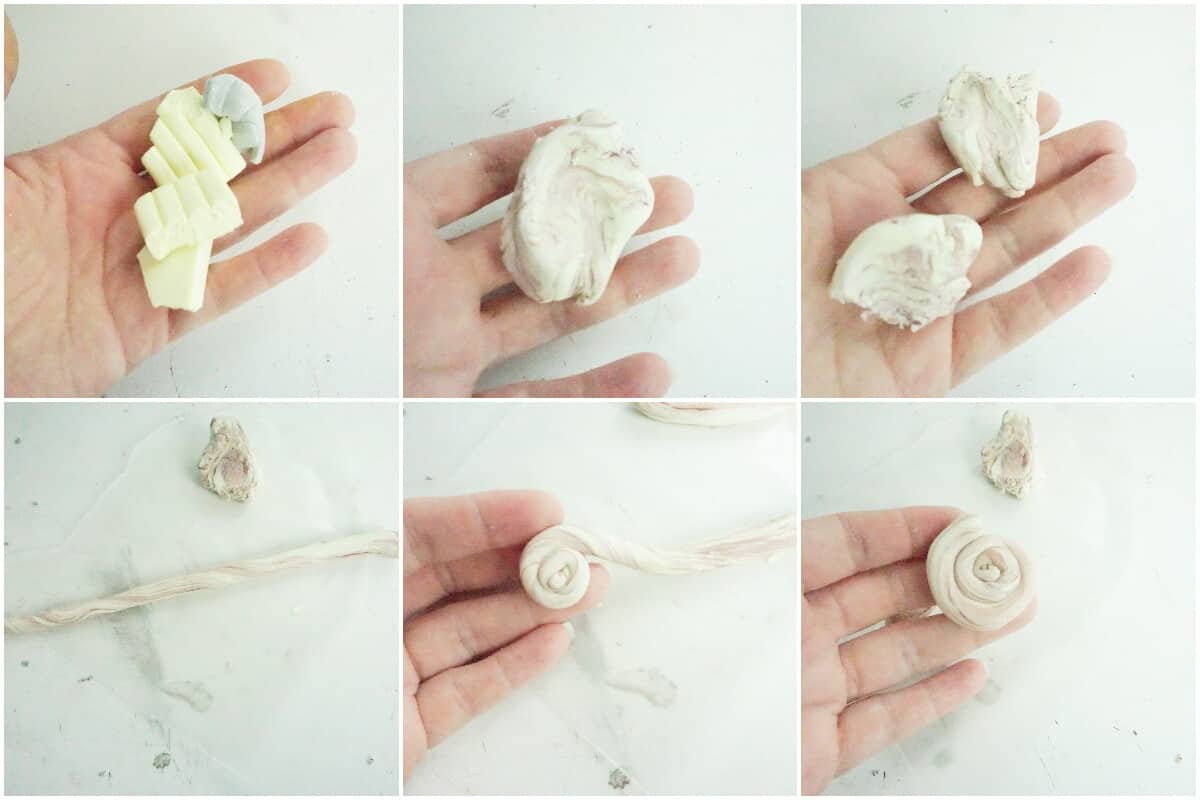
- Start by making your magic necklaces by preheating the oven according to the instructions on your polymer clay package.
- Mix 1 dime-sized portion of ivory polymer clay with 1/2 quarter-sized portion of grey polymer clay until the color is consistent throughout.
- Mix 1 dime-sized portion of brown clay into this off-white clay until the clay is evenly mottled brown and off-white throughout.
- Break into two equal-sized portions.
- Roll each portion of mottled cream-and-brown clay into a thin cylinder with one narrow end and lay it on your wax paper.
- Beginning at the narrower end, roll each cylinder into a flat spiral.
- Cut the end when the spiral is about the diameter of a quarter, leaving that end blunt and wide.
- Place on the wax paper on the baking sheet and bake per the directions on your polymer clay package.
- Allow to cool completely before handling.

- This step is optional, but I did not like the amount of glitter on my glitter foam sheet. There was clearly not enough sparkle for the evil witch. So, I coated the black glitter foam sheet in school glue with a paintbrush, then poured a liberal coating of black glitter over the entire foam sheet. I spread the glitter out as best I could and then shook off the excess into the trash can. Allow glue and glitter to dry completely. Set aside.
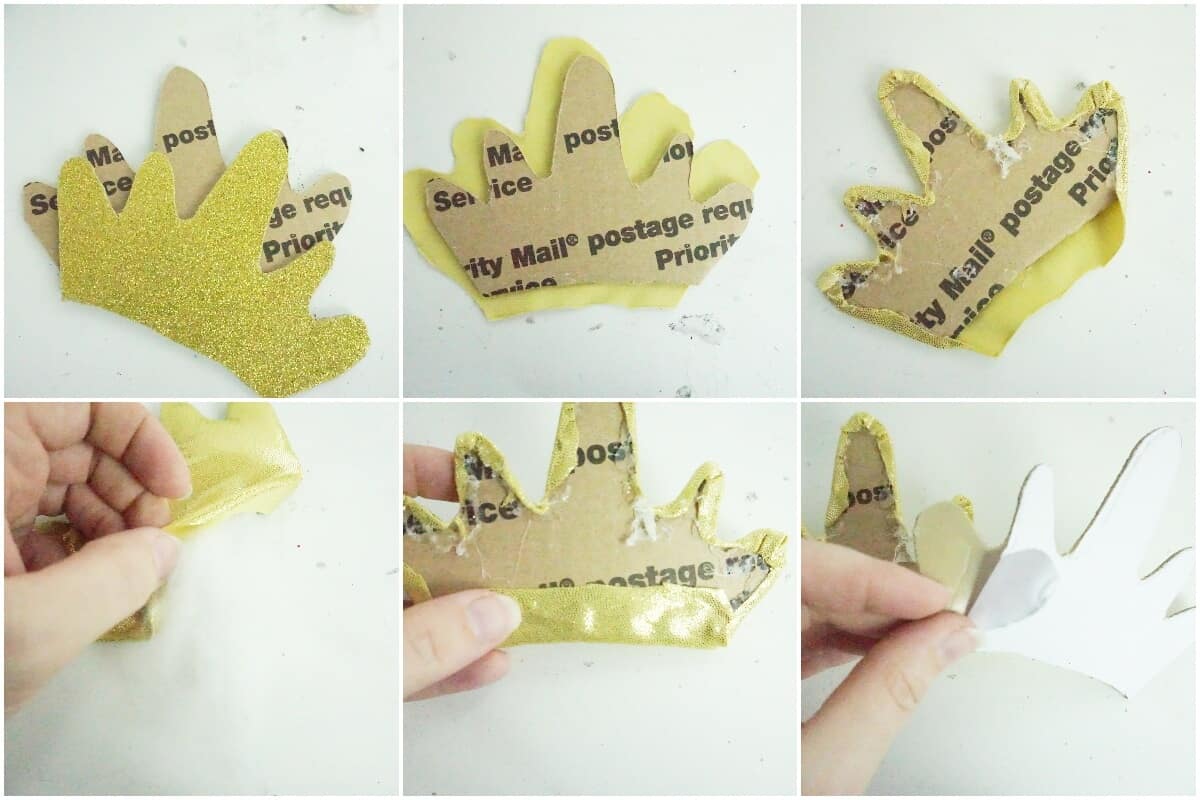
- To make the crown, cut out the crown template around the solid line from the printable template.
- Place the crown template on the back of the gold lame fabric, trace the shape and cut out. Set aside.
- Cut around the dotted line of the printable crown template.
- Place this smaller crown shape template on your cardboard, trace and cut out. Set aside.
- Place the smaller crown shape template on the back of your gold foam sheet, trace and cut out. Set aside.
- Lay the cardboard crown shape on the back of the gold lame fabric crown cut out.
- Affix the gold lame fabric to the cardboard crown by wrapping the extra around to the back and glueing the edge down on the upper part of the crown only, leaving the bottom of the fabric open and leaving excess fabric on the front of the crown. Do not pull the fabric tight.
- Work a small amount of polyfill into the space between the extra fabric and the cardboard, smoothing it out. Ursula doesn’t like lumps in her crown, so get it nice. You don’t want her turning you into one of those weird sea urchin things.
- Finish affixing the fabric to the cardboard crown cutout by wrapping the bottom of the loose fabric around to the back and hot glueing it in place. While doing this, you may now pull the fabric tight--though not super tight. You just want the fabric to be taut, not smashing the polyfill flat.
- Remove the backing off the gold glitter foam sheet crown cutout.
- Add hot glue to the back of the gold glitter foam sheet and then firmly affix to the back of the gold lame-covered cardboard crown, taking care to tack down the edges with hot glue. Set crown aside.
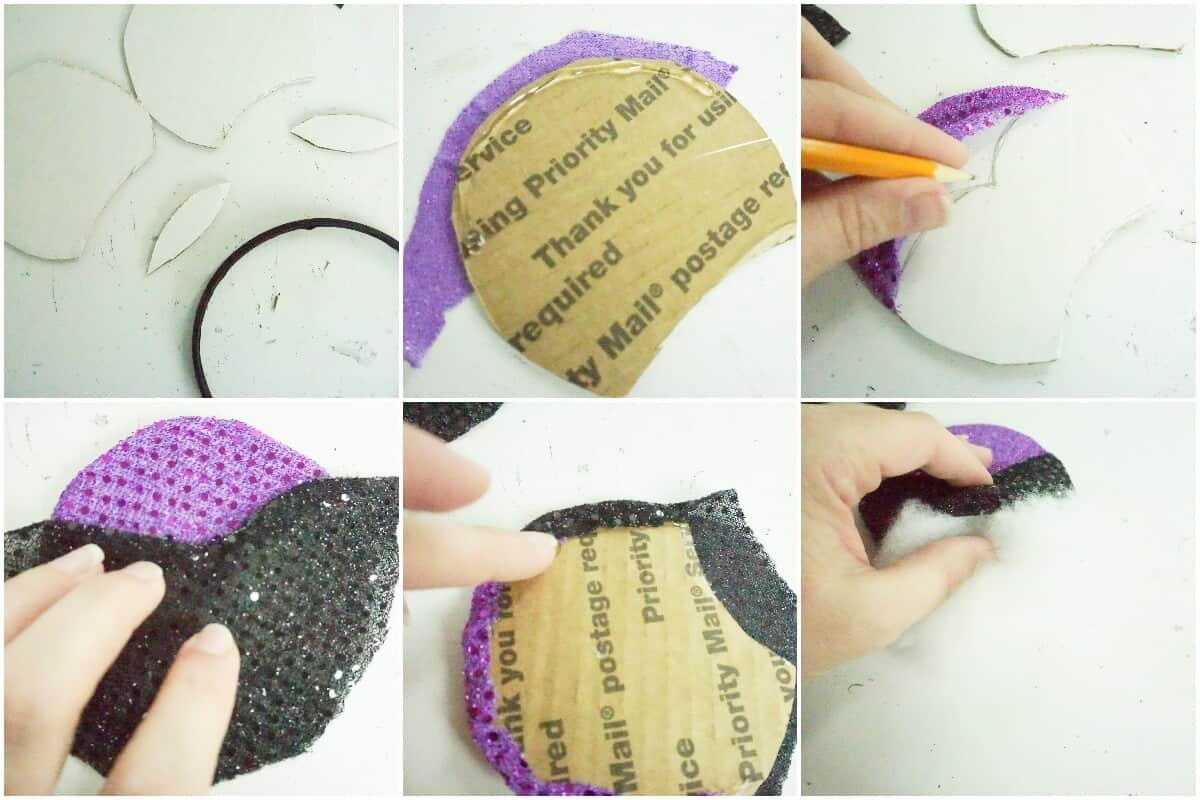
- Lay headband over cardboard circles and sketch where you want the ears to sit on the headband.
- Cut out area of ears that is unnecessary.
- Cut out printable template pieces.
- Trace the shape of the dress bodice top onto the back of the black sequin fabric with a white pencil, twice; and cut out.
- Trace the shape of the sea witch’s chest on the back of the purple sequin fabric, twice; and cut out.
- Lay the cardboard ear shapes face down onto the back of the purple sequin fabric, with the purple fabric at the top of the ear shape.
- Affix the purple sequin fabric to the cardboard by wrapping the extra around to the back and glueing the edge down on the upper part of the ear only, leaving the bottom of the fabric open and leaving excess fabric on the front of the ear--do not pull the fabric tight.
- Repeat with the second ear.
- Turn the ears face-up and place a bead of hot glue UNDER the purple fabric, about ½ to 1 -inch higher than the edge of the purple sequin fabric, then press the purple sequin fabric down into this hot glue gently and allow to cool. This creates a “stop” for the stuffing which will be the transition from cleavage to chest when the ears are stuffed.
- Place a bead of hot glue on TOP of the purple sequin fabric, along the bottom edge of the fabric, in the shape of what you want the top of the dress bodice to look like.
- Immediately lay the edge of the black sequin fabric cut out on this line of hot glue with the fabric upside down (laying on top of the purple sequin fabric) and face-down.
- Allow hot glue to dry completely while you complete with the second ear.
- Flip black sequin fabric down. It should be sequins-up with a proper bodice shape that’s “hemmed” and look like a dress now over a purple chest.
- Affix the black sequin fabric to the cardboard by wrapping the extra around to the back and glueing the edge down on the upper part of the ear only, leaving the bottom of the fabric open and leaving excess fabric on the front of the ear--do not pull the fabric tight.
- Repeat with the second ear.
- Work a small amount of polyfill into the space between the extra fabric and the cardboard, smoothing it out. Ursula doesn’t like lumps in her dress.
- Finish affixing the fabric to the cardboard cutouts by wrapping the bottom of the loose fabric around to the back and hot glueing it in place. While doing this, you may now pull the fabric tight--though not super tight. You just want the fabric to be taut, not smashing the polyfill flat. Do not smoosh the Sea Witch’s chest flat. She will not like that. Set the ears aside for now.
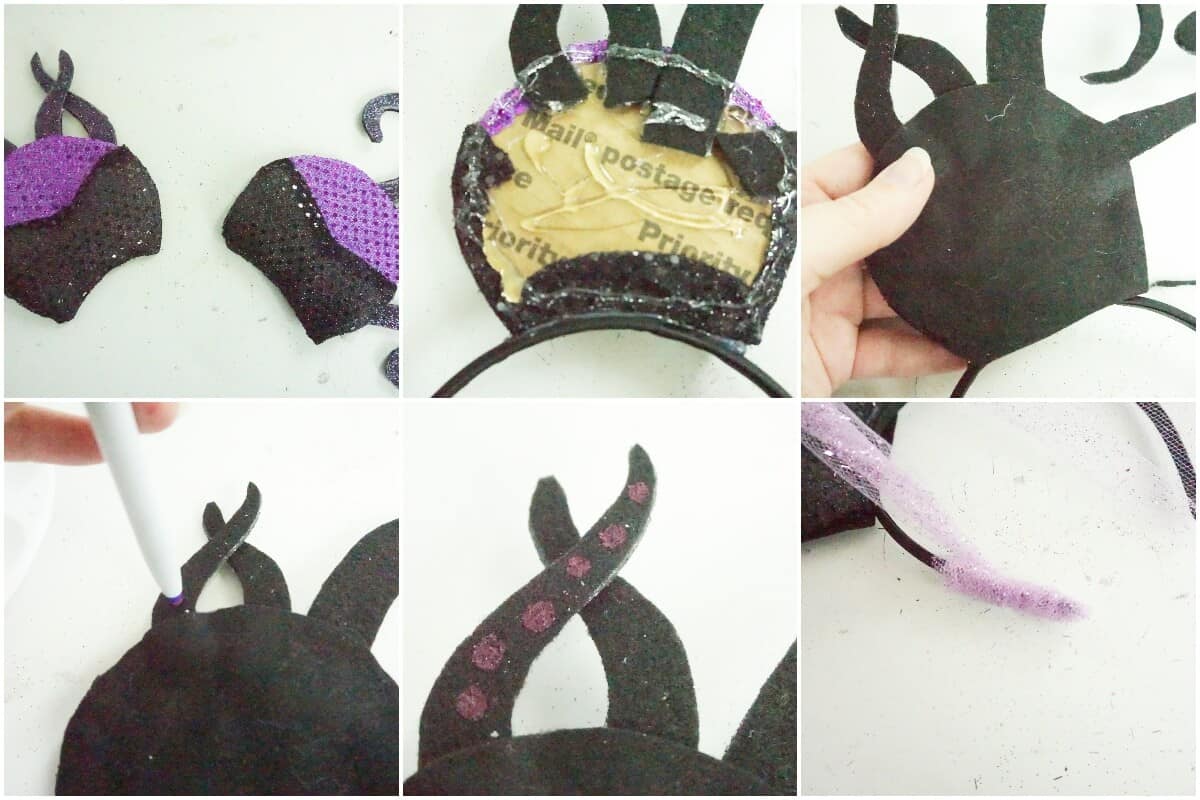
- Place ears on black felt craft sheet, trace general shape and cut out. Set aside
- Cut out the tentacles from the printable template.
- Place tentacle cutouts on the black glitter foam sheet, trace and cut out.
- Remove backing from tentacles and hot glue the back onto the black craft felt sheet.
- Cut out black craft felt tentacles in the exact shape of the foam tentacles.
- Lay out your ears and headband, then tuck the tentacles underneath the ears and finalize their locations.
- Pick ears up, add hot glue to the location on the tentacles where they will overlap with the ear, then immediately place the ear back on top. Allow hot glue to dry completely.
- Cut 4 of the world’s thinnest slivers of black craft felt about 3-inches long.
- Tack these slivers of black craft felt to the sea witch’s chest on the ears in a ‘V’ shape that overlaps the top of the ears to form a necklace.
- Hot glue each black felt ear cutout onto the back of the corresponding ear. Be sure to glue around the edges to make them look clean. You can also trim at this time, to make sure they look nice and tight along the edges.
- Hot glue the two ears in place on the headband, taking care to hold them firmly until the hot glue is completely cooled.
- Using the pen, tip the unclicked tip into the purple glow-in-the-dark paint and depress firmly into the felt on the back side of the tentacles to make glow-in-the-dark suckers.
- Allow paint to dry fully.
- Cut out a thin, maybe ¼-inch wide strip of purple tulle, long enough to wrap from one end of the headband to the other with some excess.
- Hot glue this as you wrap it around the headband, taking care to hot glue it in front of the place where the ears and headband meet, to hide the hot glue. Ursula does not like her hot glue to show.
- Hot glue the polymer clay magic shell necklace pieces to the chest where the point meets at the ‘V’ of the black felt slivers.
- Enjoy!
Notes
For more fun DIY Villain Mickey ears, visit RufflesandRainBoots.com
More DIY Villain Mickey Ears You Might Like
- Floral Maleficent Mickey Ears – What a wicked fairy she is–and with good reason! Makes me love her all the more.
- Loki Mickey Ears with Adjustable Horns – He is probably the least hated villain of all time, because, although he’s totally a jerk, he’s still family. And he’s our jerk.
- Easy Foam Maleficent Ears – If you’re looking for another villain and an easy, unique set of ears, these are it!
- Ultimate List of Wickedly Cool Villain Mickey Ears – You want baddies, well, we’ve got tons.
Please Save This to Pinterest
Your shares are how this site grows and I am sincerely grateful. Know a friend who’d like this? Please share it on Facebook or save it to your favorite DIY Mickey ears board on Pinterest.