
Holiday Glitter Pillow – How to Paint a Pillowcase
This simple DIY holiday glitter pillow is done in just minutes and makes a great update to any Christmas decor. It also makes a great gift.
Use any pre-made pillow case to add a bit of glitz and glamour to your holiday decor. Read below for the easy Christmas DIY pillow.
What You'll Find On This Page
Easy Holiday Decor: Glitter Pillow
Do you get together with your girl friends and drink – I mean craft? If you’re looking for an alternative to a gingerbread house decorating party, consider this quick craft that will be ready to go by the time you call your cab.
Most of the crafts I do are multistage ones because I’m often fitting them in between hugs from adorable little ones, dinner prep, and play dates. I often have to plan out craft tasks in 15-minute increments to stay organized and get them done.
If you’re subscribed to the weekly newsletter, you saw this one coming. If you’re not subscribed, go ahead and get that taken care of with the handy link here. The newsletter only comes once per week – I don’t like cluttered inboxes.
If you sew, you can make up a quick envelope or zipper-top pillowcase (home decor 100% cotton works well). Or, if you’re like me and love an inexpensive shortcut, go ahead and pick up some pre-made ones at the craft store for about $5 each. They are in the needlework and embroidery section of the craft store, next to the pre-made dinner napkins, baby bibs, and flour sack towels.
RELATED READING: Holiday Glitter Ornaments (the Easy Way)
Supplies
Everything is available in a craft store or Amazon (partner links included for your convenience). If you’re setting up a crafting party, this is a very cost-effective little project for everyone and let’s just face it: gingerbread houses are fun, but glitter is fun and fabulous!
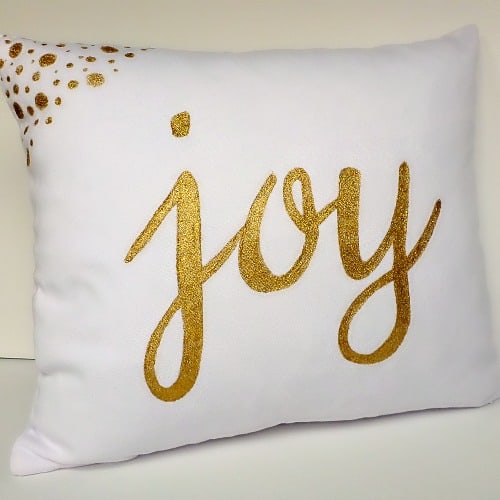
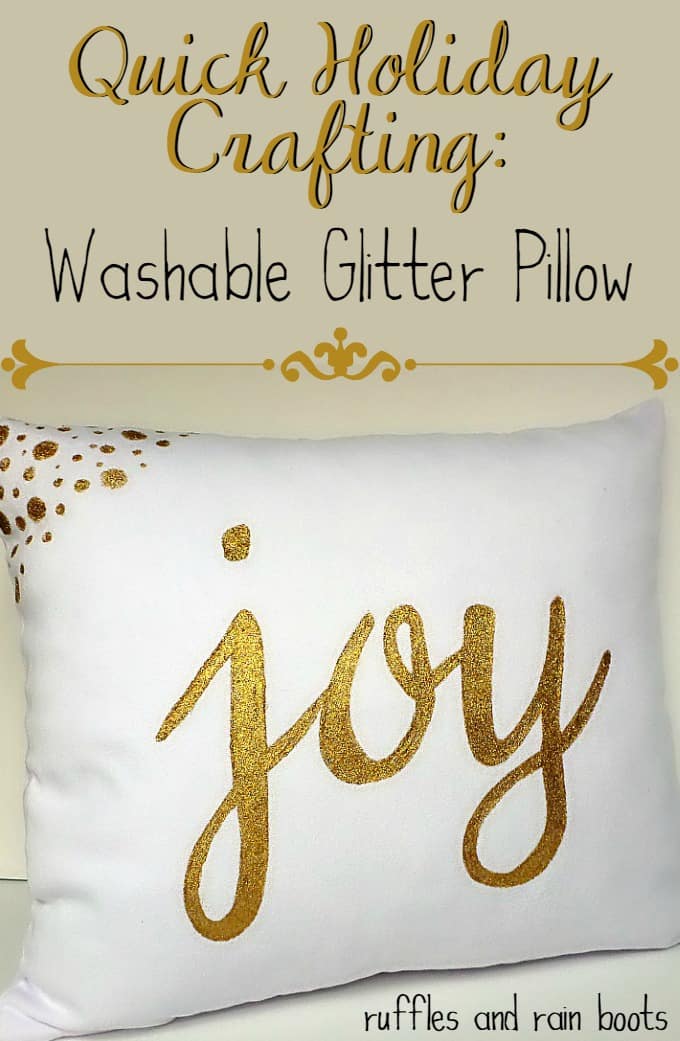
Pillow Cover – I used a pre-made 16 inches x 16 inches zipper-top pillow case purchased from JoAnn’s.
Gold Glitter Fabric Paint and/or Silver Glitter Fabric Paint (on Amazon)
Paint Brushes – I used two, including a very small one for the thinner sections and for cleaning up the outlines.
RELATED READING: Easy Pillows You Can Make with a Cricut Machine
How to Make a DIY Pillow for Christmas
Open Microsoft Word and choose a font and size that works with your pillowcase (mine are below). If you aren’t addicted to downloading fonts yet, let me get you hooked: it is awesome and easy. Think easy peasy, lemon squeezy kind of easy, y’all. Download font, double-click and wham-O – it’s on your computer and can be used in your computer’s programs and online editing programs like PicMonkey.
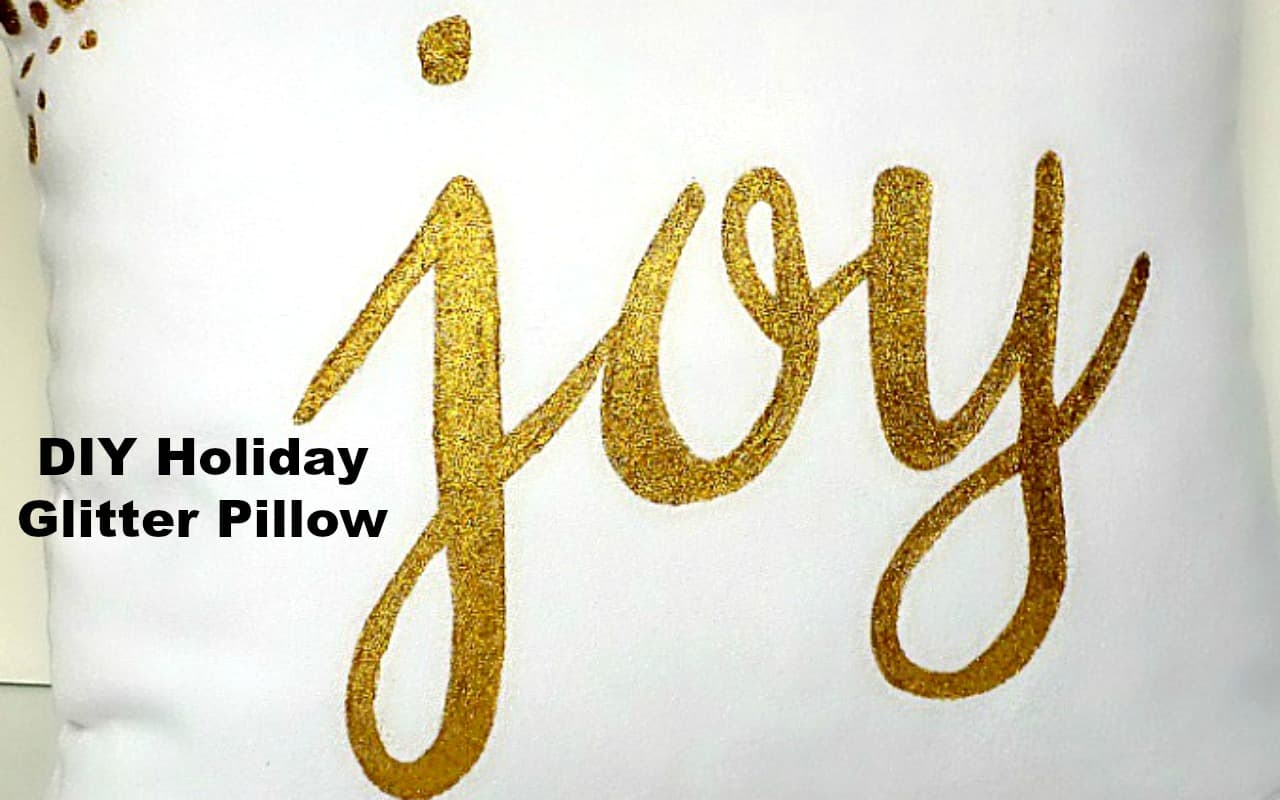
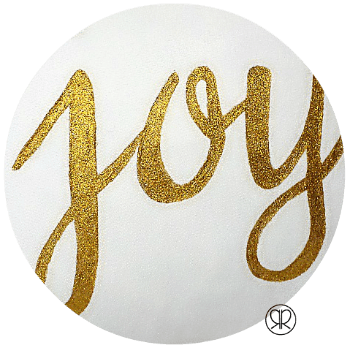
For this “joy” pillow, I used DJB Dear St. Nick Font at size 355 in Word to get the size I wanted for my 16-inch square throw pillow case. If you have a cutting machine (like a Cricut or Silhouette), you can cut a stencil.
Get Ready for Some Ridiculously Easy Crafting
Trace around each of your cut out letters very lightly with a sharp pencil. I used a mechanical pencil so it would have a very fine point.

Open the pillowcase and insert a piece of cardboard or wax paper between the front and back to protect from any paint bleed through. I like to use clips to make sure it doesn’t move, but you can choose to live dangerously.
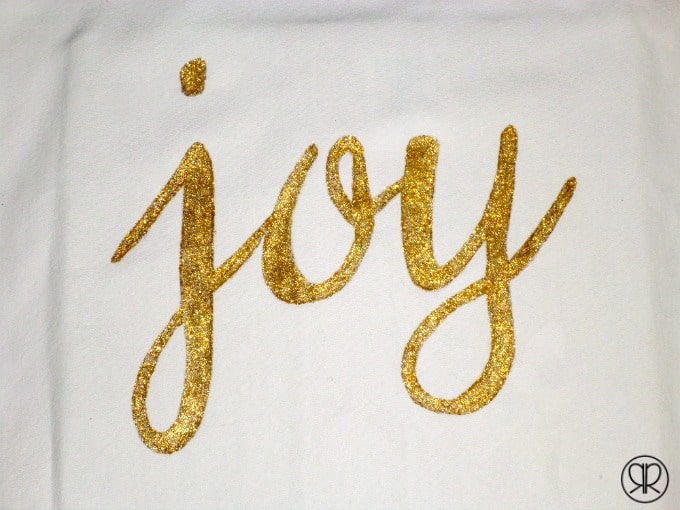
Paint. I made sure to go over the outline a little bit so that you couldn’t see it through the glitter. The picture below is after I’d done the first coat and you can still see it.

I used two coats on everything and then went back and touched up any spot that looked less-than-glitterific. Glitterific, ya’ll. Glitterific.
Seriously easy. And seriously sparkly. I let it dry overnight and am now planning to decorate the back with a “joyeux Noel” or a “merry” in the silver glitter paint.
Glitter Pillow
This simple DIY holiday glitter pillow is done in just minutes and makes a great update to any Christmas decor. It also makes a great gift!
Materials
- Pillow cover. I used a pre-made 16 inches x 16 inches zipper-top pillow case purchased from JoAnn’s.
- Tulip Fashion Glitter Shimmer Fabric Paints Gold and/or Silver
- Paint Brushes. I used two sizes (a smaller brush for the thinner sections and outlines).
- Font / Print-out
Tools
- Pencil
- Font / Printer / Paper
Instructions
- Trace around each of your cut out letters very lightly with a sharp pencil. I used a mechanical pencil so it would have a very fine point.
- Open the pillowcase and insert a piece of cardboard or wax paper between the front and back to protect from any paint bleed through. I like to use clips to make sure it doesn’t move, but you can choose to live dangerously.
- Paint. I made sure to go over the outline a little bit so that you couldn’t see it through the glitter. The picture below is after I’d done the first coat and you can still see it.
- I used two coats on everything and then went back and touched up any spot that looked less-than-glitterific.
Please Share This
Your shares are how this site grows and I am sincerely grateful. Please share this on Facebook or save it to a holiday crafts pin board.

I love this pillow! It has such a easy, calming vibe to it. I think that making gifts yourself is very meaningful…I am new to your blog and can’t wait to check out more of your gift ideas!
This is beautiful! I love the sparkle and gold.
What a great way to decorate a pillow! Thanks so much for linking up to the #homematters linky party! We hope to see you again this coming Friday!
Wow, this is so cute and so easy! I love this pillow. :) Thanks for sharing an excellent tutorial at the #HomeMatters Linky Party.
~Lorelai
Life With Loreai
This is so pretty, Sarah. And definitely glitterific!! :) Pinning and sharing. Thanks for linking up with us at Your Turn To Shine!
Sarah, you had me with the glitter….how adorable! I’d love for you to link up to Project Pin it. Have a super Sunday!
Hugs,
Denyse
This is adorable! Fifteen minute craft increments are right down my alley!
I really like your font selection.
Thanks, Jen. It’s sad, but I actually get more done when I know I only have 15 minutes to work on something. Time crunches bring out my productivity, it seems.
Love it! Could definitely make a great, simple gift. Thanks for sharing on the Weekend Re-Treat! If you get a chance, I’d love it if you stopped by my blog. Have a great weekend!
Courtney, Thanks for dropping by. I just shared your wonderfully festive holiday bark on Twitter and Pinterest. So colorful and fun!
I seriously love this pillow. I love that you hand painted your word and those fun polka dots at the top. Great job and beeeeautiful pillow! Thanks for sharing! PINNED!
LOVE this, Sarah! It’s so pretty! I’m loving the gold glitter. AND washable – even better! :) Pinned!
How pretty!!
I love me some gold glitter. This pillow is fab!
Stopping by from The Weekend re-Treat link party. Love gold and glitter. Put them together and it’s heaven!
Very cute! And I love that it’s washable!
Thanks so much, Lauren. I love the washable aspect, too. With kids and pets, the option is a wonderful one at the least.
Hi, Sarah! I LOVE this project! Printing the words and tracing is such a great idea. I have been wanting to make some holiday pillows so I may need to find a JoAnn’s and get those pillow covers to give it a try! If you have time, we’d love for you to share this at On Display Thursday, too! http://www.averageinspired.com/2014/12/display-thursday-link-party-no-22.html
Will share at the party, Bre – thanks for the invite and for the kind words.
I love the look of this pillow for Christmas. It looks like something you’d find at Pottery Barn or somewhere like that.
I haven’t used glitter fabric paint in years, but as a kid, my grandma and I used to work on craft projects like this using glitter paint. You’ve brought back some happy memories for me!
Thanks, Jamie. I must say that glitter fabric paint has come a long way in the years since I used it last, as well. Now, it’s so smooth and easy to get a clean, consistent design – color me quite impressed with this stuff. :)
Thanks for stopping by today!
What a great idea!! I’m really starting to love gold and this pillow looks so cute! Pinning
Thank you so much, Sydney. I am just getting into gold myself and little (and temporary) additions like this are the perfect segue. Thanks for stopping by today.
Sarah, I love this pillow! and I’m all about the quick and easy crafts. Found you on Your Turn to Shine.
We love it, too, Rebekah – uick and easy crafts are the best! Thanks for stopping by from the party.
Ooh la la I’m in love! I want one now! :D Great job Sarah!
Thanks, Heather. Easy projects make me happy and this one fit the bill. I wish I’d done something different on the top corner because it just looks a little “off,” but there’s always next year.