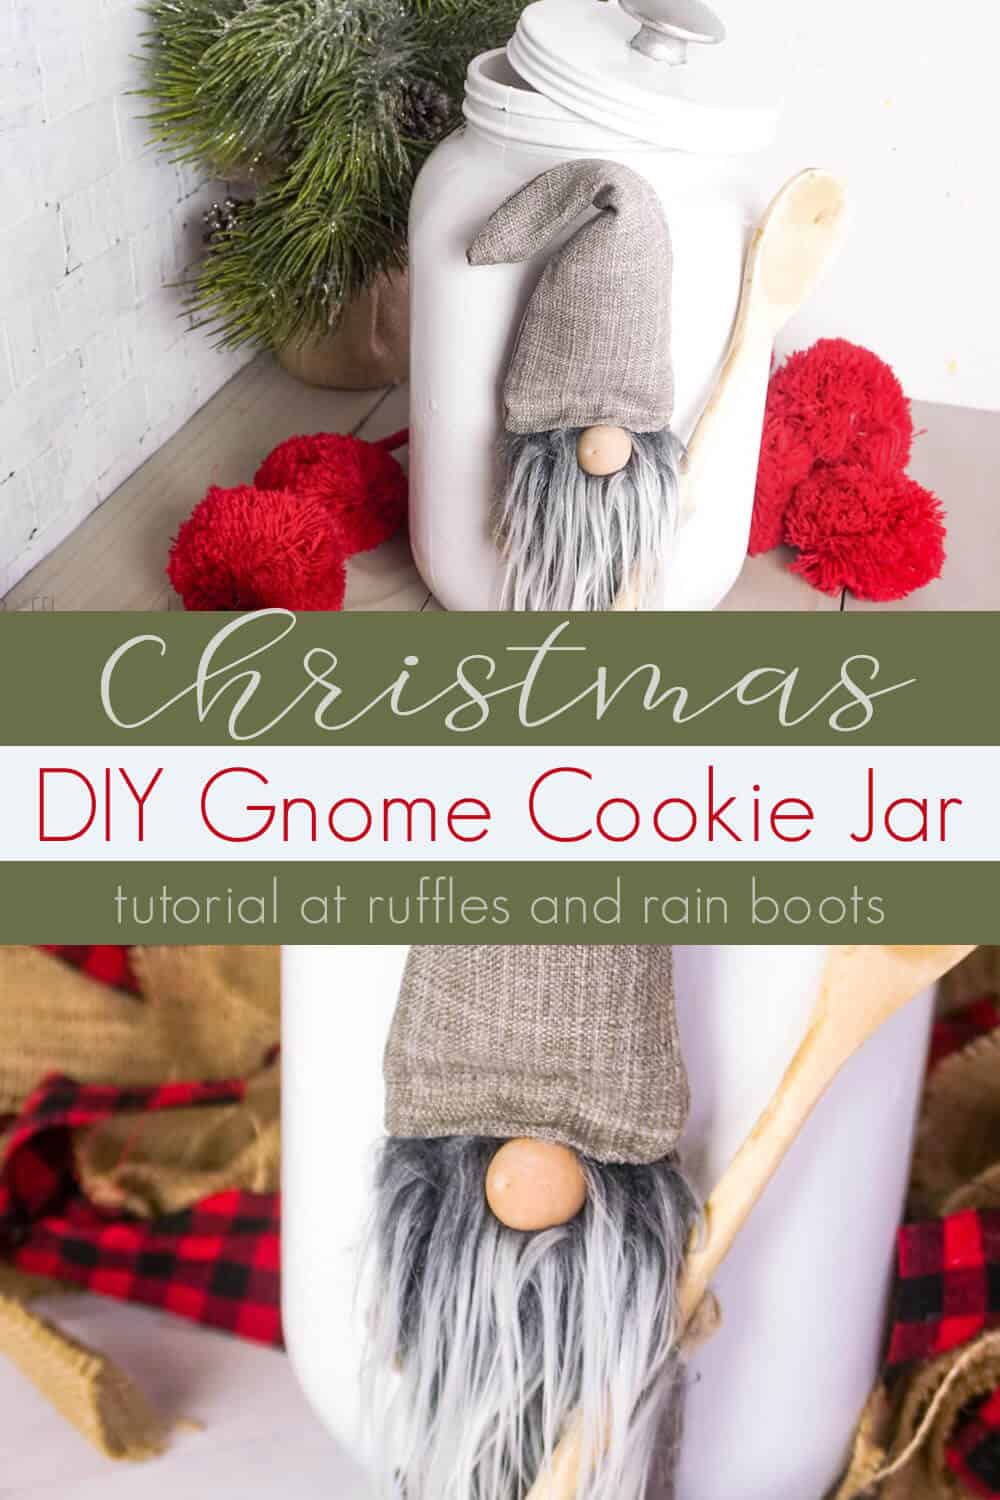
Make this Gnome Cookie Jar for Fun Farmhouse Decor
This gnome cookie jar is so easy–and it’s such a perfect Christmas gnome project, it’s the best fun farmhouse decor. A little Christmas gift to myself, if you know what I mean?!
Gnome Cookie Jar
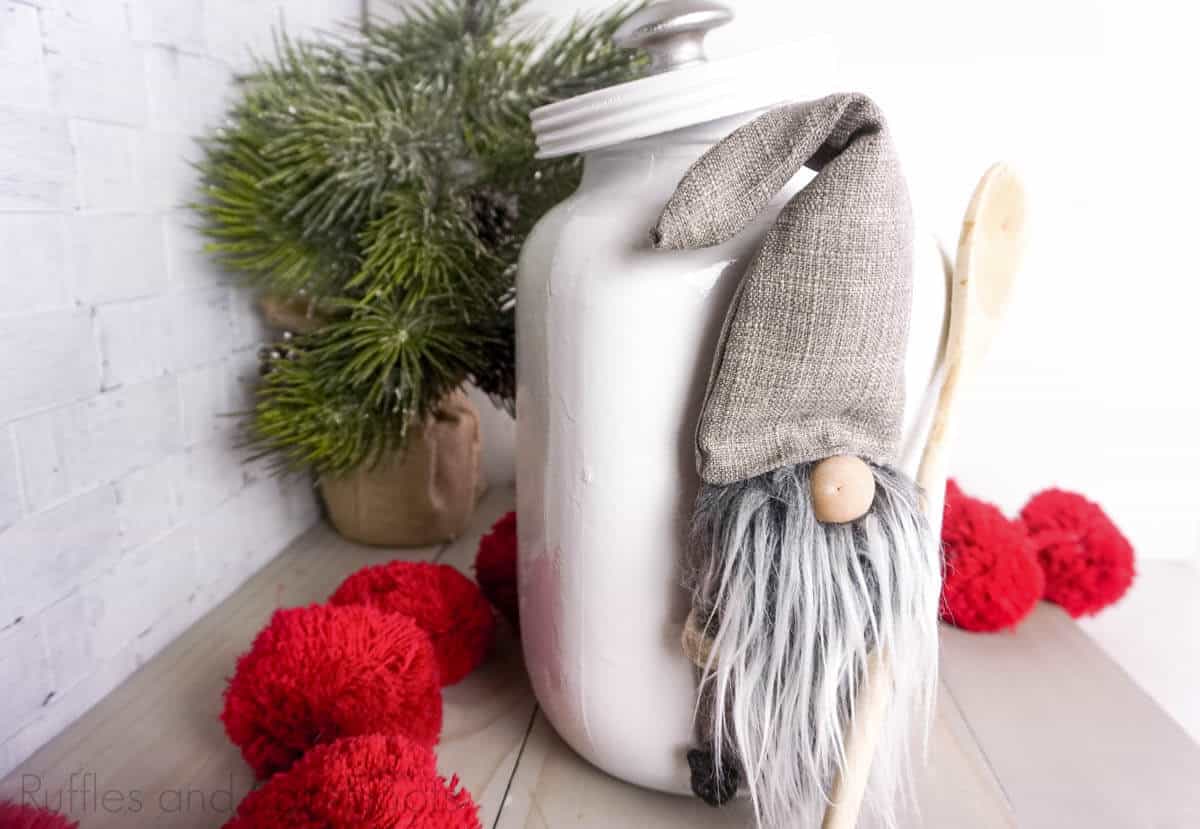
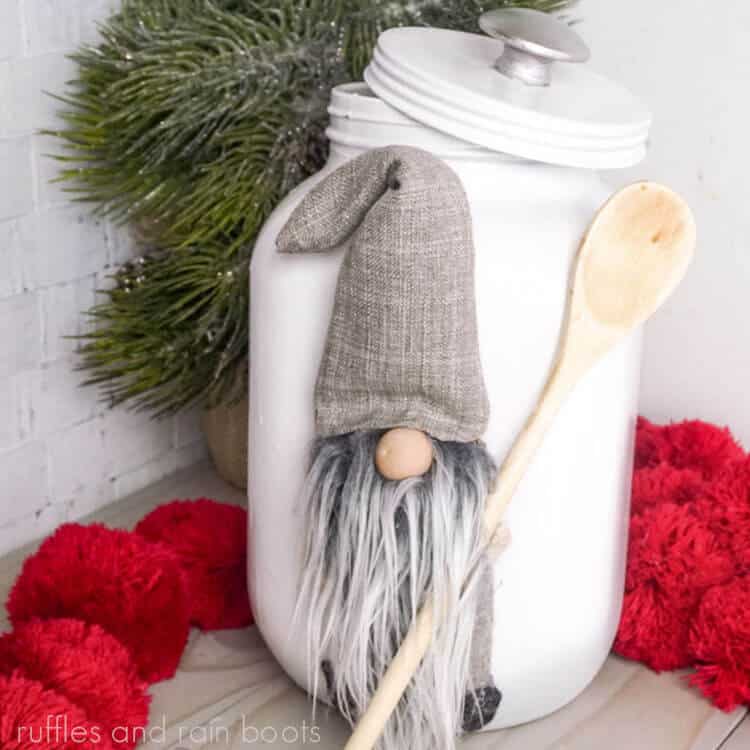
Here at Ruffles and Rain Boots, we may or may not (mostly may) have a little obsession with gnomes. And cookies. Yes, I will admit it. I love cookies. A lot. So, when I saw this wildly fun jar at the thrift store, I couldn’t help but pick it up and make this awesome gnome cookie jar.
RELATED READING: EASY DIY CHRISTMAS GNOME
Such a fun upcyle project, I had this Christmas gnome made in just a few minutes (minus the time I had to let the paint dry–sigh, time slowing me down. LOL! If you’re ready to make a fun gnome cookie jar for your farmhouse kitchen, let’s get started.
Get Secret Gnomes, Tips, & Freebies Delivered!
What is the best pattern to use when you don’t want to sew? Do you know the secrets to a properly-proportioned gnome? Do you know where to get the best-priced fur?
Get all of this (and exclusive content just for you) delivered right to your inbox with the gnome-making series, free of charge. Sign up to get the once-weekly newsletter (and a jaw-dropping special offer)!

No Time to Make This Now? Pin it for Later
You’re busy, I get it. Pin this to your favorite (use keywords) board on Pinterest and it’ll be here for when you’re ready.

Tips to Make Christmas Gnome Craft
- You don’t have to use your favorite wooden spoon for this adorable cookie jar gnome. Seriously, I picked up the wooden spoon, the little wooden knob to put on the cookie jar lid, and the jar at the thrift store. That way my favorite spoon can be free to be used still! LOL!
- Click here to get the free printable gnome cookie jar pattern. You’re going to need it if you plan to make this easy Christmas gnome.
- Because this adorable Christmas gnome craft is spray painted, I don’t plan to put my cookies in the jar without protection. Sure, you might not die right away, but I personally just don’t want my cookies smelling like paint. So, I decided to put my cookies in a baggie. I know, defeats the purpose, but whatever. At least there’s not a bag of cookies on the counter.
How Do I Make this Gnome Cookie Jar?
I’m so glad you asked. Below is our written tutorial.
Gnome Cookie Jar

This gnome cookie jar is so easy--and it's such a perfect Christmas gnome project, it's the best fun farmhouse decor. A little Christmas gift to myself, if you know what I mean?!
Materials
- Thrift Store score: Large Jar with Lid
- White Spray Paint, enamel
- Wooden Knob
- Silver craft paint
- Printable pattern template
- Mongolian fur
- Polymer Clay Nose
- Small amount of cardboard
- Grey fabric
- Scraps of beige and black craft felt
- 6-8 inches of floral wire
- Polyfill
- Wooden spoon
Tools
- Hot glue gun and hot glue
- Exacto knife
- Scissors
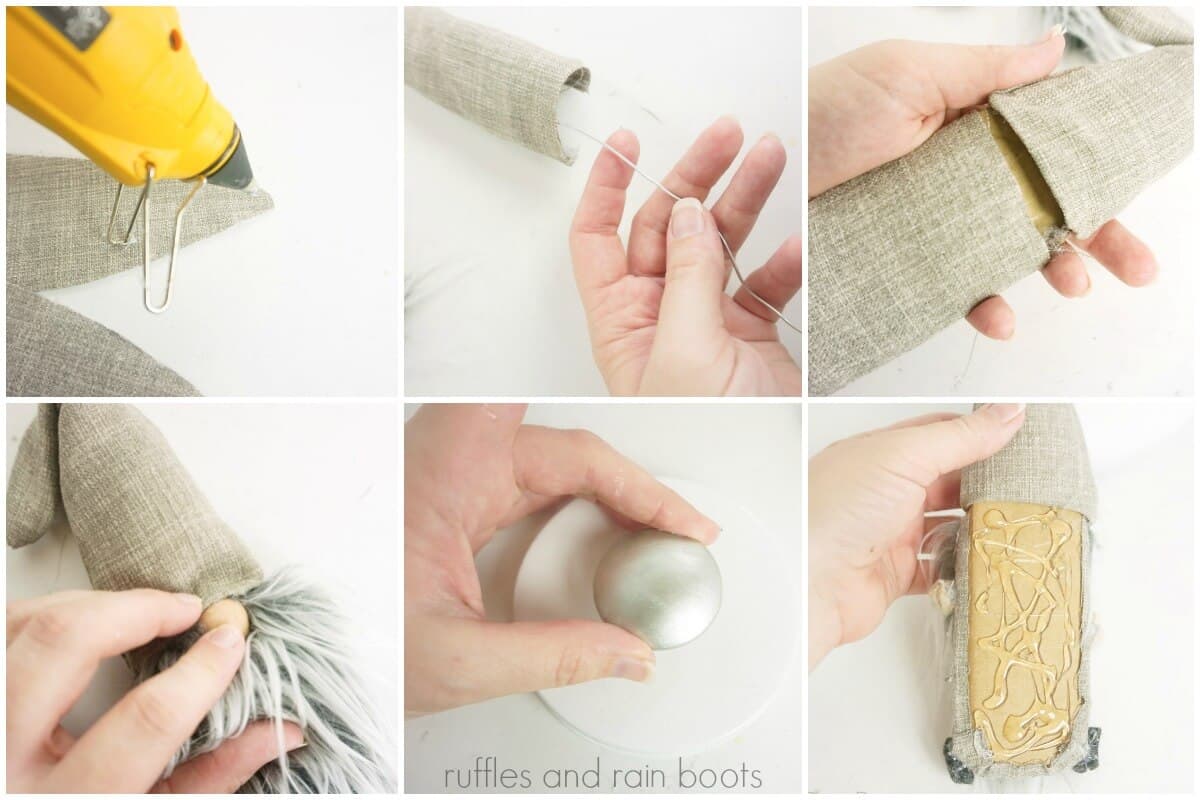
Instructions
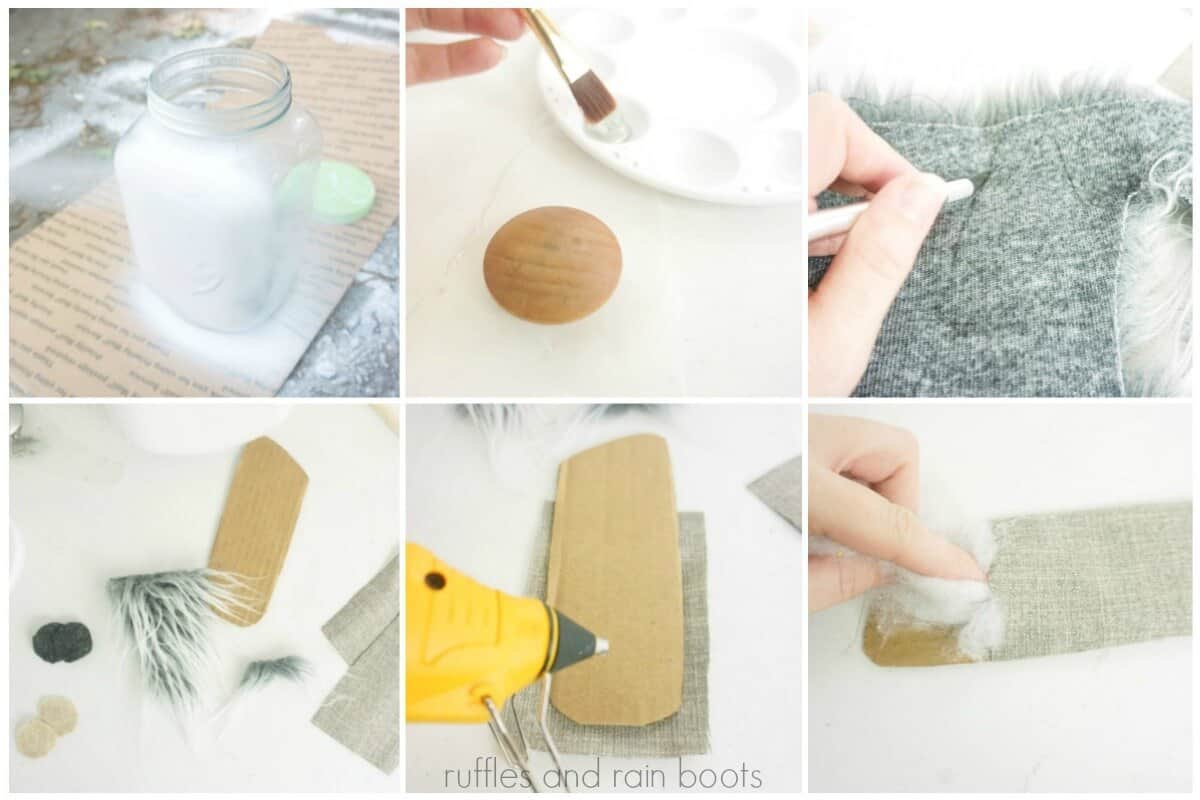
- Clean large jar thoroughly and remove anything that might get in the way, for example, mine had stickers and a spigot, so I unscrewed the spigot and sealed the hole with hot glue and removed the stickers.
- Spray paint the large jar and lid.
- Allow to dry completely.
- Paint wooden knob with silver craft paint.
- Allow to dry completely.
- Cut out the printable pattern template for the gnome.
- Trace the oddly shaped rectangle onto the cardboard and cut out one shape.
- Trace the hat template onto the grey fabric and cut out two hat shapes.
- Trace the non-oddly-shaped rectangle template onto the grey fabric and cut out one rectangle shape for the body.
- Trace the small circle template onto the beige craft felt and cut out two shapes for hands.
- Trace the small circle template onto black or charcoal craft felt and cut out 2 shapes for boots.
- Trace the beard and tiny rectangle (mustache) on the mongolian fur and cut out the fabric only by cutting on the backside of the fur with an exacto knife.
- Place the body rectangle under the piece of cardboard and fold the edges of the fabric over the cardboard and hot glue in place, DO NOT PULL THE FABRIC TIGHT--leave a bit of extra fabric loose on the front.
- Fill the body with polyfill.

- Hot glue or sew the hat by placing them on top of each other and affixing the edges. Turn this inside out, using a pencil to get the end out.
- Fill hat with polyfill about halfway, then work the floral wire up into the hat, working the polyfill around it.
- Finish filling the hat with polyfill and fold it over some.
- Hot glue the beard to the body, just below the top where you’d like to place the hat.
- Affix the mustache to the beard--comb it into a mustache by separating it into two and just finger-combing it over.
- Hot glue the nose onto the beard, just at and barely above the mustache.
- Hot glue the hat onto the body, pulling it down over the top of the cardboard (it’s ok if you have to fold the cardboard a little to get the hat inside) so that it wrinkles on the nose--even putting a dab of hot glue onto the nose to hold it there.
- Place a bead of hot glue around the edge of one of the hand cutouts and then fold the cutout in on itself to make a ball. Repeat with the other hand and the two boots.
- Affix the boots and hands to the body where you’d like them to be.
- Hot glue the painted wooden knob to the center of the lid.
- Affix the gnome to the front of the cookie jar at the bottom, so it looks like the gnome is standing in front of the jar.
- Hot glue the wooden spoon to one of the gnome’s hands. For added stability, I also placed a dab of hot glue on the corner of the jar and pushed the top of the wooden spoon there.
- Fill with cookies and enjoy!
Notes
For more fun Christmas gnome tutorials, visit Ruffles and Rain Boots
More Christmas Gnome Ideas You Might Like
- Christmas Gnome Ornaments – Seriously one of the easiest DIY gnome tutorials that you will find. And the results are a stunning ornament you’ll be proud is on your tree!
- The Best Gnome Tutorials You Can Find – You won’t find a more comprehensive set of fun gnome tutorials for all sorts of holidays, seasons, and just for fun!
- Easy DIY Christmas Gnome – If you’re looking for a fun gnome that doesn’t have a cookie jar attached to his butt, check out this super easy DIY!
Please Save This to Pinterest
Your shares are how this site grows and I am sincerely grateful. Know a friend who’d like this? Please share it on Facebook or save it to your favorite farmhouse crafts board on Pinterest.