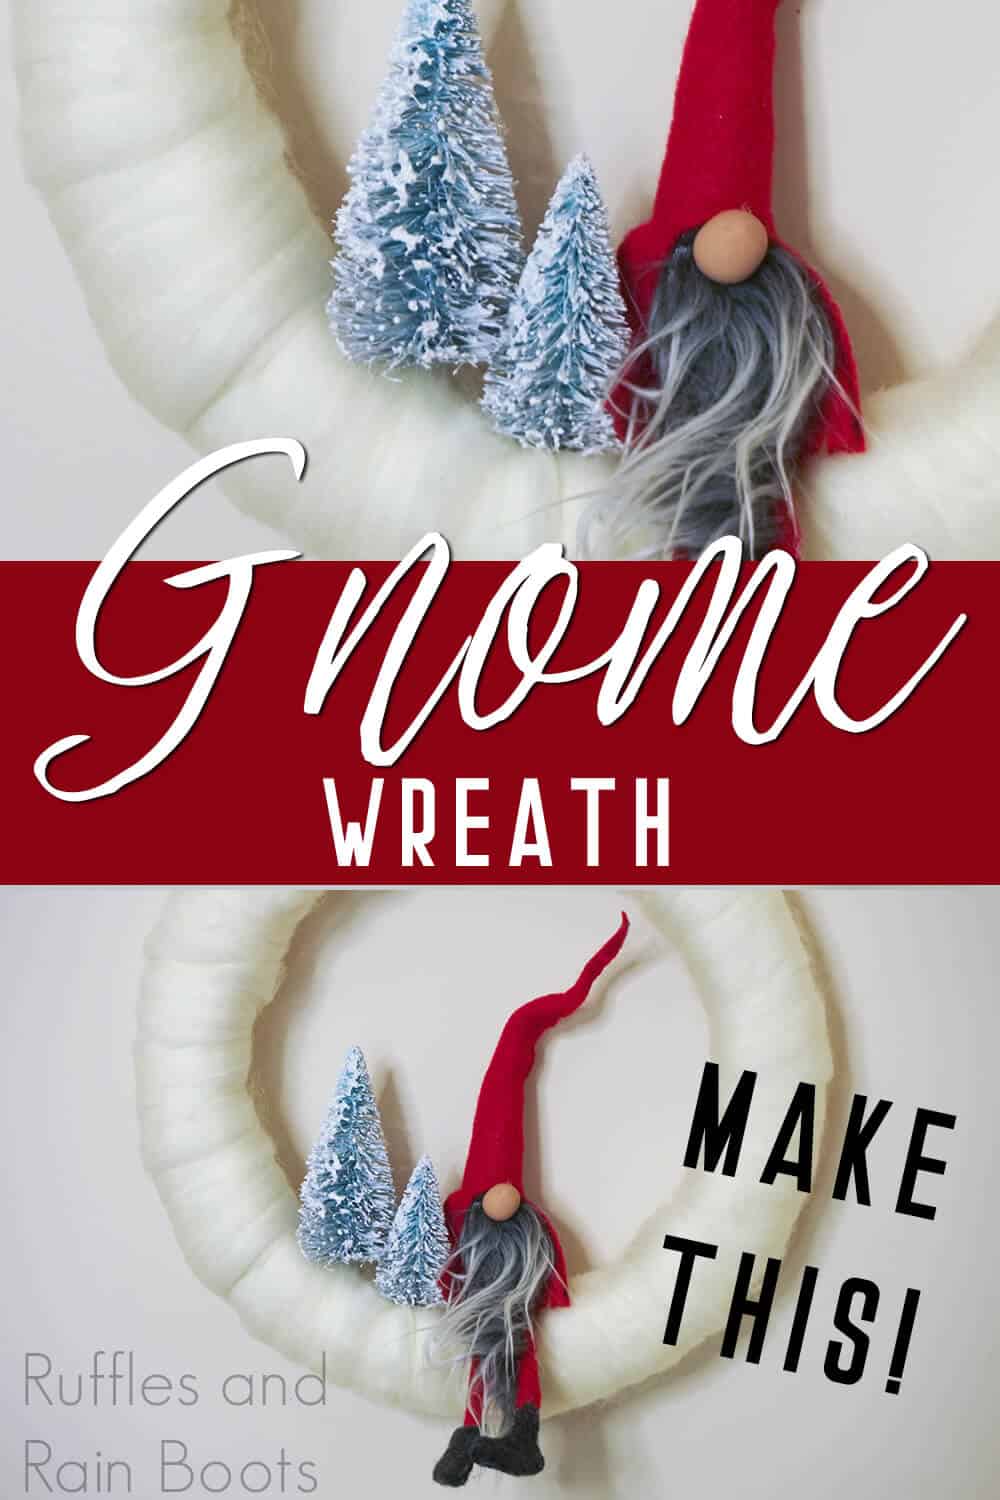
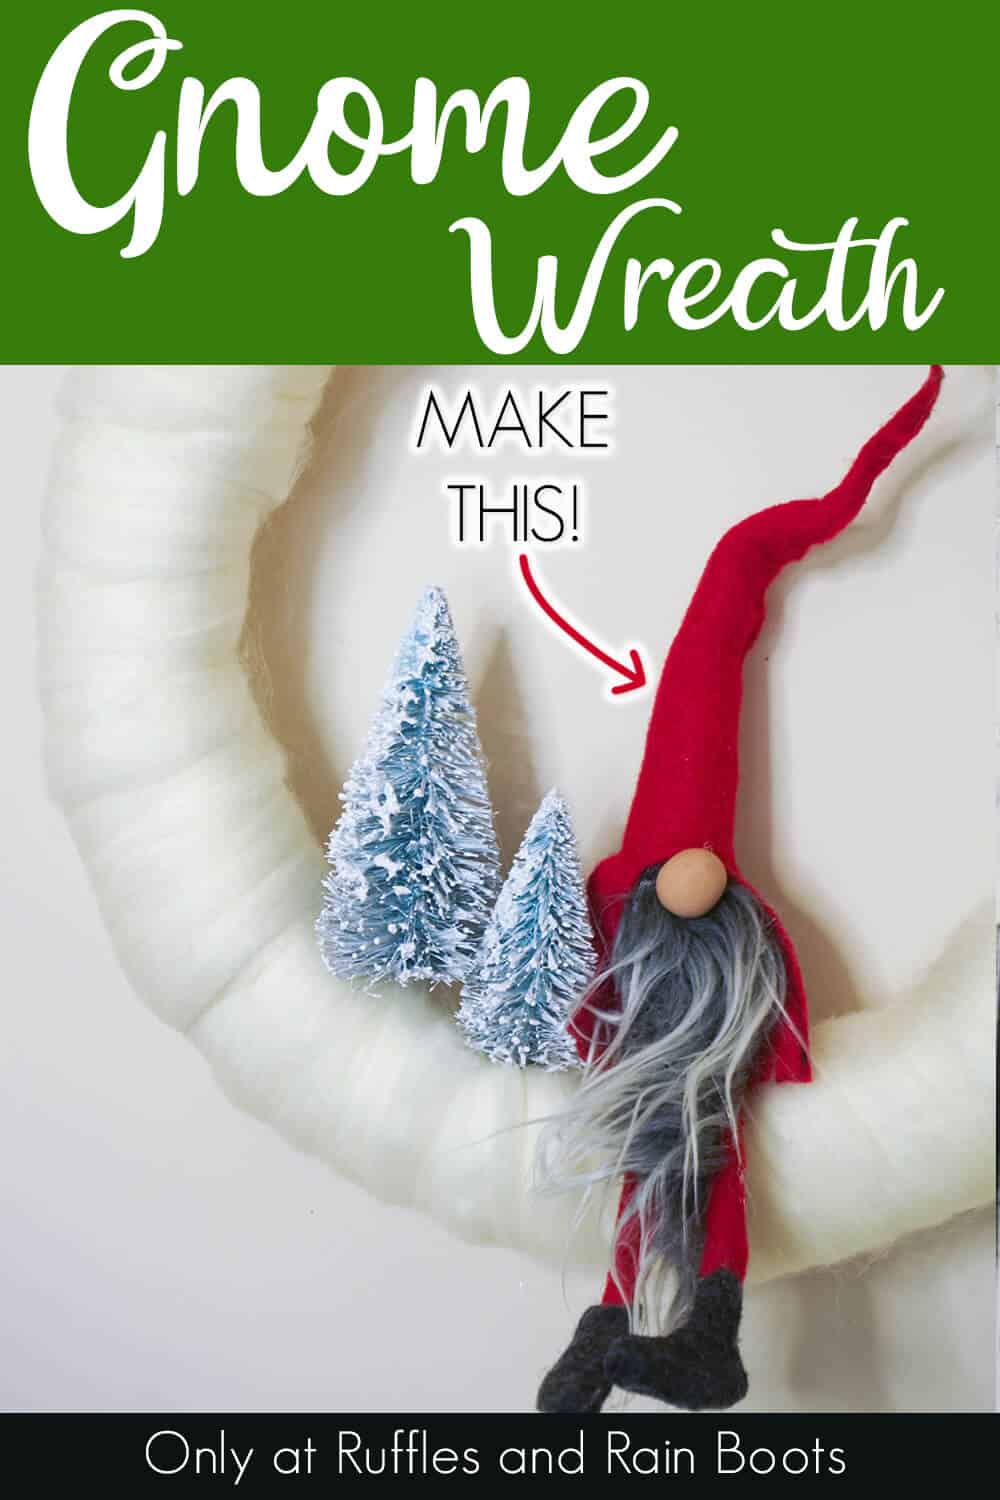
This Gorgeous Christmas Gnome Wreath is So Easy and Fun!
When I made this Christmas gnome wreath, I didn’t realize how much in love with it I would be. I almost want to leave this gnome Christmas wreath up on the door year round!

What You'll Find On This Page
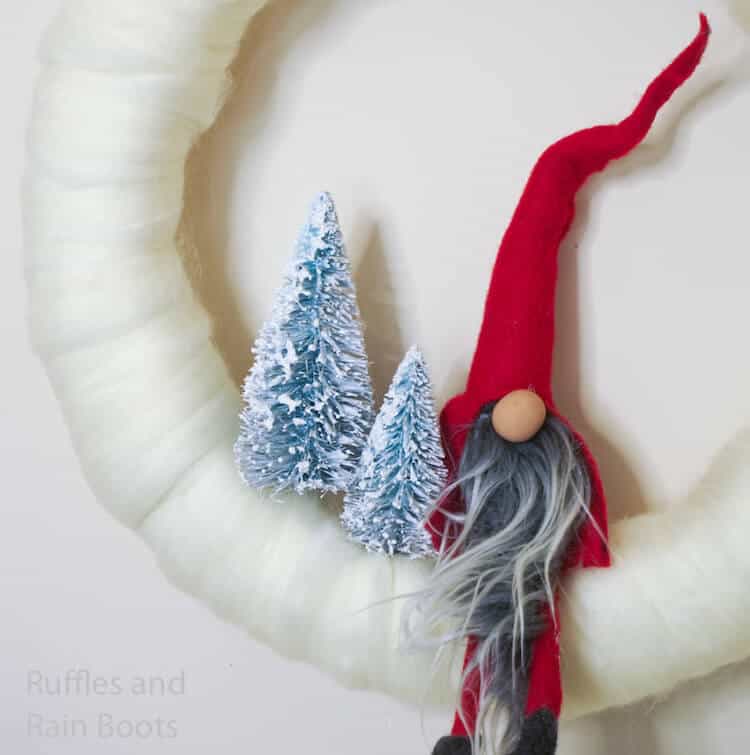
Christmas Gnome Wreath
Here at Ruffles and Rain Boots, we have a thing for gnomes (in case you didn’t know that already). If there’s a gnome idea, I’m going to have it and it will be made. So much fun. I literally want gnomes from the top of my house to the bottom. And having this Christmas gnome wreath on the door to greet me during the holiday season? Perfection.
RELATED READING: WOODEN GNOME ORNAMENTS
Plus, this gnome Christmas wreath is so easy to make, I feel like I need to make two more, just because. But, I only have one door…so, maybe these need to become window wreaths…hmmm. If you’re ready to make a fun gnome Christmas wreath (or two), let’s get started.
Get Secret Gnomes, Tips, & Freebies Delivered!
What is the best pattern to use when you don’t want to sew? Do you know the secrets to a properly-proportioned gnome? Do you know where to get the best-priced fur?
Get all of this (and exclusive content just for you) delivered right to your inbox with the gnome-making series, free of charge. Sign up to get the once-weekly newsletter (and a jaw-dropping special offer)!

DIY Christmas Gnome Tutorials
If you’re looking for the best DIY Christmas gnome tutorials, you have come to the right place. Check out all of my favorite tomte tutorials for the holidays!
No Time to Make This Now? Pin it for Later
You’re busy, I get it. Pin this to your favorite Christmas crafts board on Pinterest and it’ll be here for when you’re ready.
Tips to Make Gnome Christmas Wreath
- Click here to get the free printable pattern for this Christmas tomte. He’s so tiny and so fun, you absolutely need the pattern to get him juuuust right.
- When you are wrapping the yarn, be sure to overlap it a little. You don’t want your foam to peek through. But if you do have a little peek through, just tug the yarn over and cover it. If it won’t stay, add a dab of hot glue to keep it in place.
- If you use a regular craft hot glue gun, you’re great. But if you are using the super hot industrial grade ones, you’ll need to be gentle with your foam wreath form, because the hot glue will be so hot, it will melt the foam.
How Do I Make this Christmas Gnome Wreath?
I’m so glad you asked. Below is our written tutorial.
Christmas Gnome Wreath

When I made this Christmas gnome wreath, I didn't realize how much in love with it I would be. I almost want to leave this gnome Christmas wreath up on the door year round!
Materials
- 1 skein Ivory or White Super-Chunky yarn
- 2 Bottlebrush Christmas trees
- 1 foam wreath form
- White Spray Paint, optional
- Printable pattern template
- Mongolian fur
- Polymer Clay Nose
- Scraps of red and black craft felt
- 6-8 inches of floral wire
- Polyfill
- ¼ cup Rice
Tools
- Hot glue gun and hot glue
- Exacto knife
- Scissors
Instructions
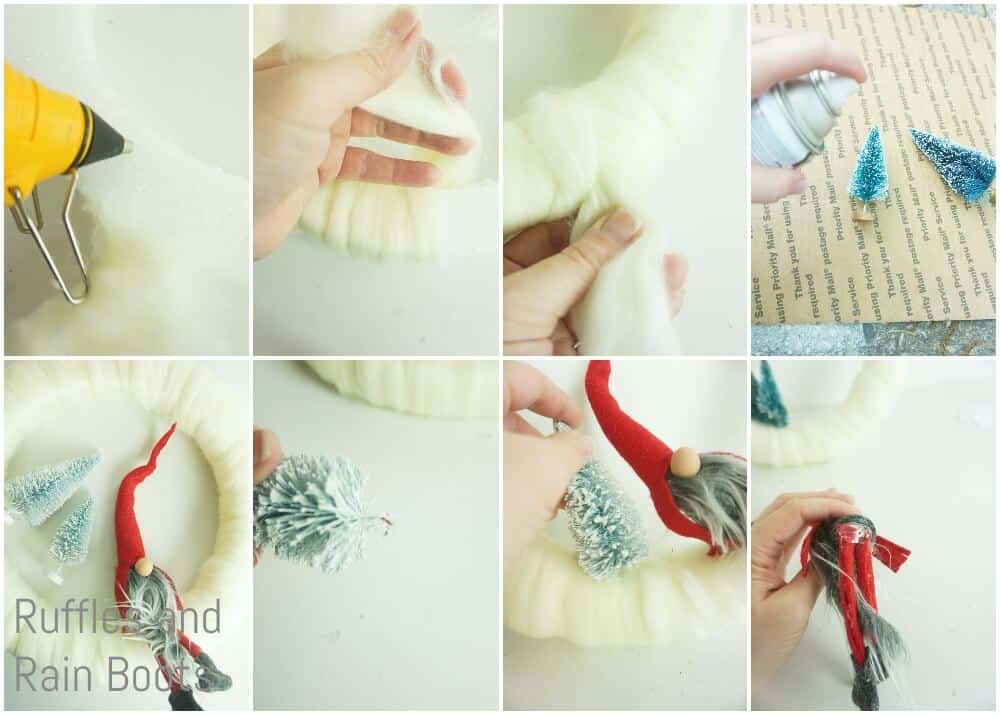
- Prior to making your wreath, decide if you want green Christmas trees or white. If you want white Christmas trees, spray paint them white and allow them to dry completely before doing anything else. Or leave it until the end and make the decision when you’re about to hang the wreath. Either way is fine.
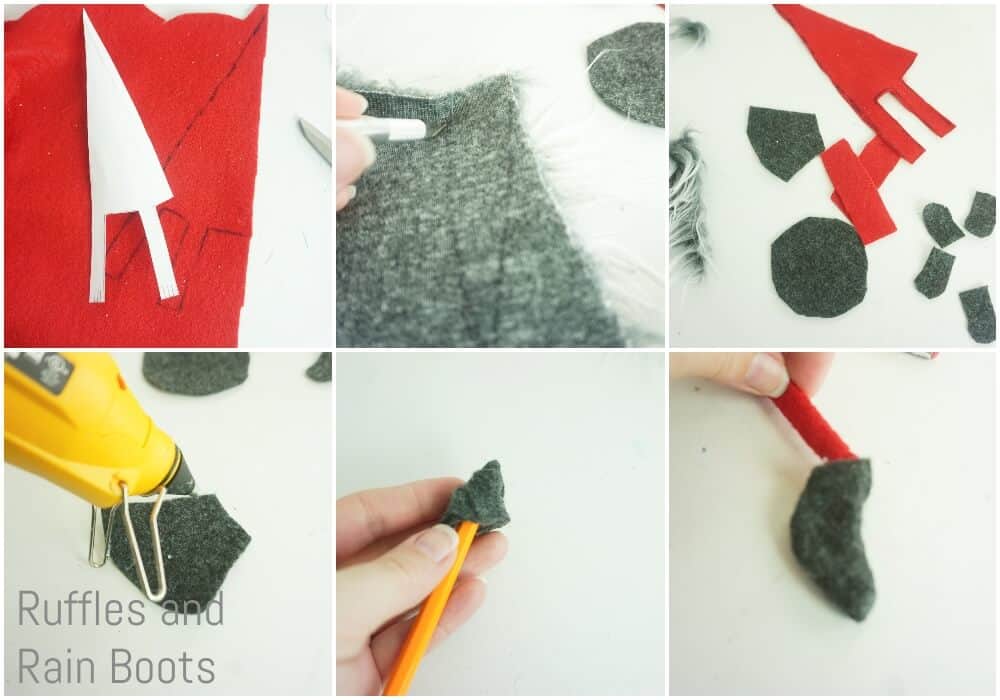
- Cut out the printable pattern template for the gnome.
- Trace the hat template onto the red craft felt and cut out one hat shape.
- Trace the leg template onto the red craft felt and cut out two leg shapes.
- Trace the boot template onto black or charcoal craft felt and cut out 4 boots.
- Trace the body template onto black or charcoal craft felt and cut out 1 body.
- Trace the circle base for the body onto black or charcoal craft felt and cut out one circle.
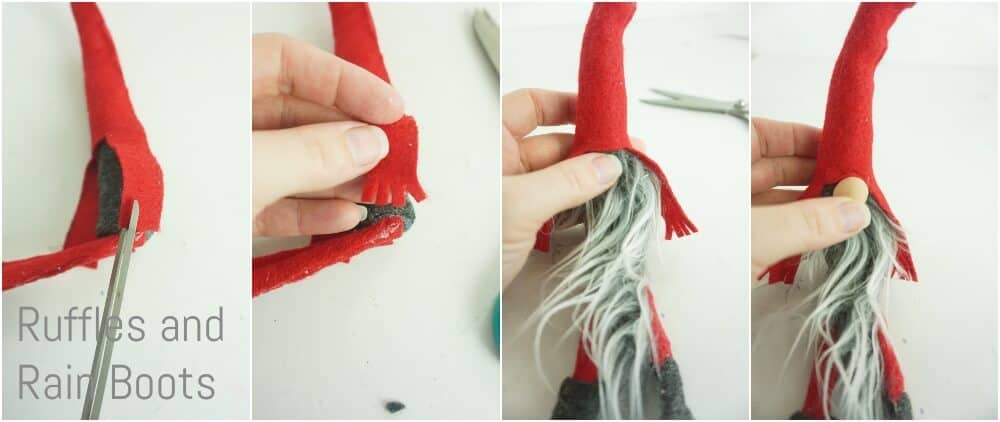
- Trace the beard and tiny rectangle (mustache) on the mongolian fur and cut out the fabric only by cutting on the backside of the fur with an exacto knife.
- Hot glue the hat by rolling it into a cylinder with a point. The hat is too slender to turn inside out, so do not use a traditional hem, just roll it into a cylinder.

- Sew or hot glue the body into a cone, then affix the base onto the body. Turn this inside out.
- Fill the body with rice.
- Fill hat with polyfill about halfway, then work the floral wire up into the hat, rolling the polyfill around it.
- Finish filling the hat with polyfill.
- Hot glue the beard to the body, just below the top where you’d like to place the hat.
- Affix the mustache to the beard--comb it into a mustache by separating it into two and just finger-combing it over.
- Hot glue the nose onto the beard, just at and barely above the mustache.
- Hot glue the hat onto the body, pulling it down so that it wrinkles on the nose--even putting a dab of hot glue onto the nose to hold it there.

- Sew or hot glue the legs by rolling them into cylinders. Because they are so slender, do not use a traditional hem, just roll them into a cylinder.
- Sew two of the boots together, leaving the top open, then repeat with the other boots. Turn each boot inside out, using a pencil to do so, if necessary.
- Glue the legs into the open top of the boots and trim the boots, as desired.
- Affix the legs to the body base where you’d like them to lay.
- Cut a long length of yarn about 1 arm’s length long (hold the yarn by one hand and stretch that arm away from your body, holding the other end of the yarn in your other hand by your heart).
- Hot glue one end of the yarn onto a spot on the foam wreath form.

- Snugly wrap the yarn around the form about 10 times.
- Hot glue the yarn in place.
- Repeat wrapping the yarn about 10 times, then glueing it in place until you run out of yarn or you reach the end of your wreath form.
- Repeat steps 2-6 until the entire form is wrapped in yarn.
- Position the gnome where you want them to sit on your wreath and hot glue in place.
- Position your Christmas trees where you want them to sit on your wreath and hot glue them in place.
- Hang on your favorite door or wall!
Notes
For more fun Christmas gnome tutorials, visit RufflesandRainboots.com
More CHristmas Gnome Ideas You Might Like
- Christmas Gnome Ornaments – Seriously one of the easiest DIY gnome tutorials that you will find. And the results are a stunning ornament you’ll be proud is on your tree!
- The Best Gnome Tutorials You Can Find – You won’t find a more comprehensive set of fun gnome tutorials for all sorts of holidays, seasons, and just for fun!
- Gnome Wine Bottle Cover – This fun gnome wine bottle cover is simple and fun, and it makes a great holiday gift!
Please Save This to Pinterest
Your shares are how this site grows and I am sincerely grateful. Know a friend who’d like this? Please share it on Facebook or save it to your favorite farmhouse crafts board on Pinterest.