
FROZEN-Inspired Princess Elsa Dress Up Apron Tutorial

What You'll Find On This Page
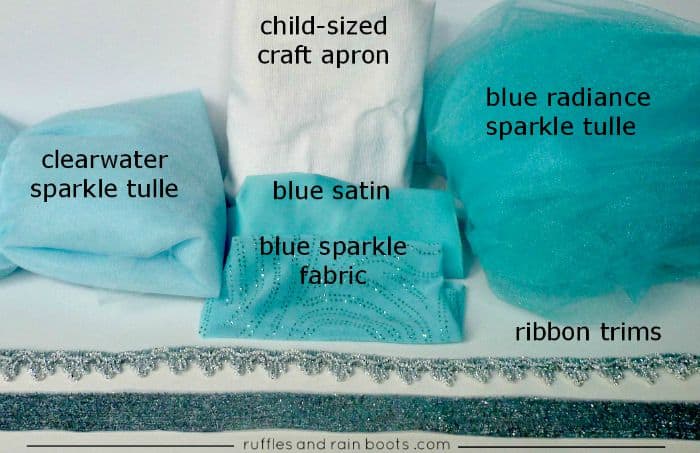
Supplies for the Queen Elsa Dress Up Apron Costume
A quick trip to the craft store, and you’ll be set to start. The total time it took to complete this project was about 3.5 hours, but that was including time to take pictures and notes in order to write up the tutorial. I would say plan on 3 hours.
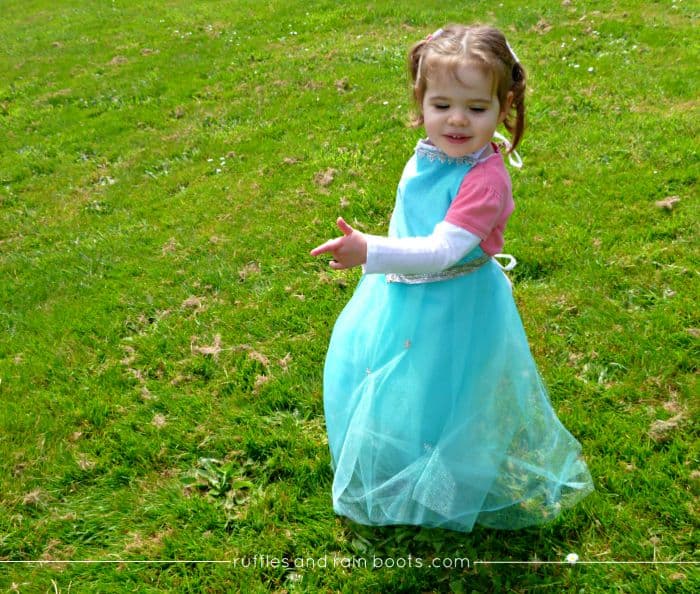
For reference: my daughter is 2.5 years old and is wearing 2T and 3T clothes. The apron hangs down past her knees and we tie it up at the neck to bring it up on her chest. The measurement I’ve given for the skirt piece (blue satin), is long enough to be just shy of her ankles and is wide enough to loop around to form a skirt, but not too wide to hinder the tie. You can do a quick measurement of your child’s waist to make sure it’s the best fit.
If you want to make both the FROZEN Queen Elsa costume and the Anna dress up apron, check out my Frozen Inspired Princess Anna Apron Tutorial and buy all of your materials at once to save yourself a trip. I used the same blue satin for both aprons.
Supplies List for Queen Elsa Dress Up Costume
- 1 child’s sized apron
- 5 yards blue radiance sparkle tulle
- 2 yards clear water sparkle tulle **see note below
- 1/2 yard blue satin
- 1/2 yard Casa Collection Glitter Matte Jersey in blue radiance
- 1/2 yard of 1 inch shimmer velvet ribbon
- 1/2 yard of 3/4 inch silver metallic braid ribbon
- Snowflake buttons left out of the photo
**In the supplies picture, I have two colors of tulle, but only used one on the dress.
Cut Fabric
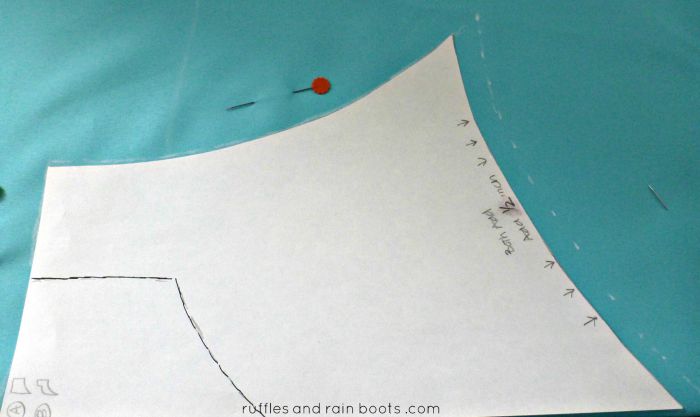
I have provided a free printable for the bodice pattern that I made (sized for a 12″x19″ child’s apron). Download the Queen Elsa Inspired Dress-Up Apron Bodice Pattern. If your apron is a different size, you can whip up your own pattern like I did: lay some paper out on the floor and trace around the apron.
It was a highly scientific and oh-so-exact kind of process, let me tell ya.
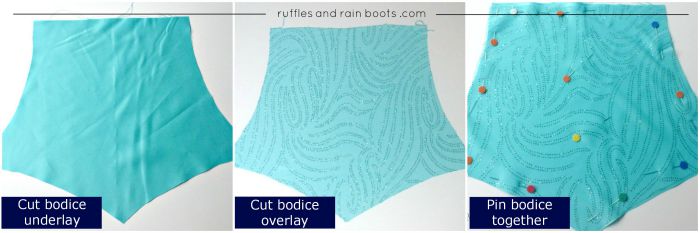
Cut the bodice pattern from both the blue satin and the blue glitter fabrics – be sure to add the half inch at the bottom of each. Pin the pieces together (satin facing up, glitter facing up – I top stitched this entire project; no turning). Having the blue satin backing helps to make the glitter fabric really stand out. The glitter fabric I used is sheer, so the white apron showed through if the satin wasn’t used.
Cut the skirt piece. I used a rectangle, sized at 25 inches wide by 16 inches long for my daughter. This piece covers the white canvas when the tulle is attached so no white shows through, extends about 6 inches on either side of the apron ties, and also extends a nice, non-scratchy layer past the bottom of the apron.
Sew the FROZEN Inspired Queen Elsa Dress Up Apron
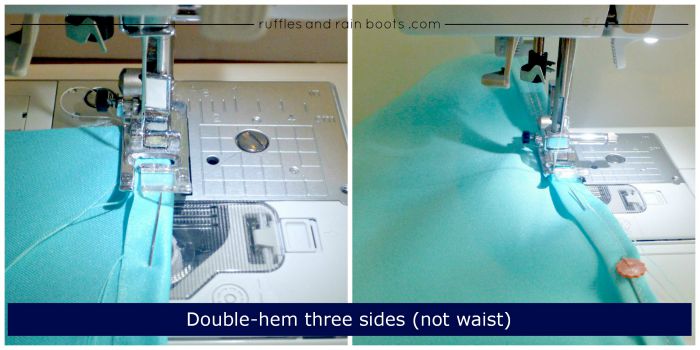
I had never worked with satin before and didn’t know it frayed like the dickens, so after I hemmed it, I doubled it over and hemmed again. Lesson learned!
I only did the double-hem-thing on three sides because the edge at the waist was going to be covered by mountains of tulle and the stitching was going to be reinforced. Prevent fraying with a double hem – this thing is going to be used a lot!
Sew up the bodice next, permanently attaching the glitter fabric to the satin. Put that aside and let’s give a shout out to some tulle. Some people don’t like working with tulle, but I love it. It’s just so fluffy!
And it’s so very forgiving if you’re a newbie at sewing, like me! It also makes a homemade DIY FROZEN Queen Elsa costume look like something luxurious and expensive!
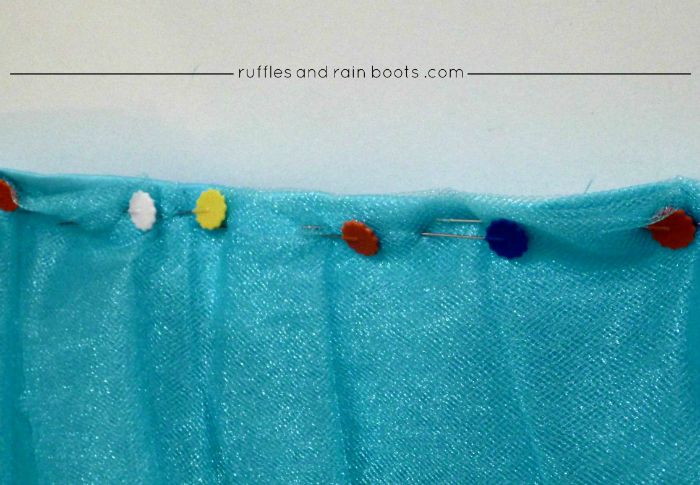
I used all of the tulle, but because I didn’t want Elsa’s skirt too fluffy (not as fluffy as the Princess Anna Dress Up Apron), I didn’t sew it to be very full. For the tulle, I cut three pieces that were the width of my skirt piece (25″ x 16″) and doubled over off the bolt, like it came from the store. So basically, you have 6 layers of tulle pinned like this to the satin, but only had to cut three.
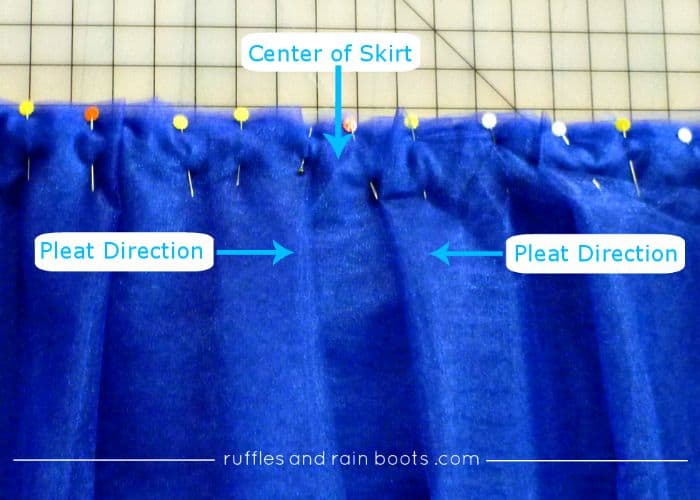
Pleat the Tulle
As the picture above shows (picture is from Anna’s costume), I then took the tulle (from the bolt) and without cutting it, made a pleat 2 inches wide every two inches, starting from the center and working my way to the edges. Just pull a few inches of tulle past the side of the skirt that isn’t on the same side as the tulle. You want one seamless piece to be pleated, and you want the pleats facing towards the center.
Once I got to the end of the satin piece, I cut the tulle and did another layer like the pleated one just completed, alternating the pleats between the ones in the previous layer.
I know it’s hard to see in the picture below, but under the top layer of pleats is another one. It doesn’t add much ‘fluff,’ but it definitely adds to the visual appeal of the dress, especially when you attach the bodice piece.
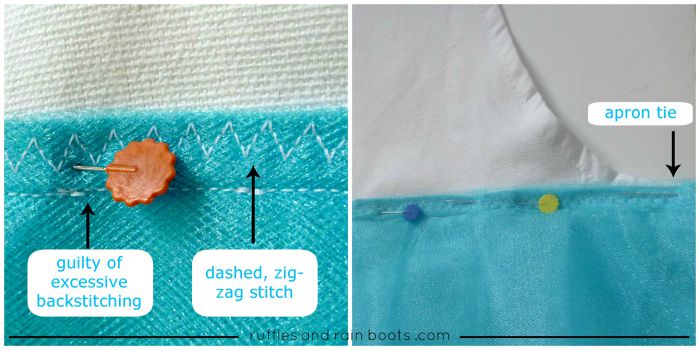
Once you’ve pinned your oh-so-many-layers-of-tulle, sew those to the satin piece so that they are really on there. I used a straight stitch and a dashed-zig-zag stitch to catch as many little sections of the tulle as I could. See the picture below. The photo on the left of the picture below is before I sewed the skirt piece to the apron. You can see that I made sure the tulle wasn’t going anywhere! And yes, I’m guilty of excessive back-stitching when designing items for my daughter – kids are rough on stuff and I knew this would see a lot of play.
The photo at the right in the picture below is indicating the skirt piece (and therefore the tulle) should extend onto the apron strings so that when you tie it, it gives the appearance of a skirt. Mine extended just shy of 6 inches on either side, so Elise has quite a bit of growing room in her FROZEN Queen Elsa costume.
Stitch the skirt piece to the apron, using whatever you feel is best to make sure it never comes off. Ever.
Create the Bodice
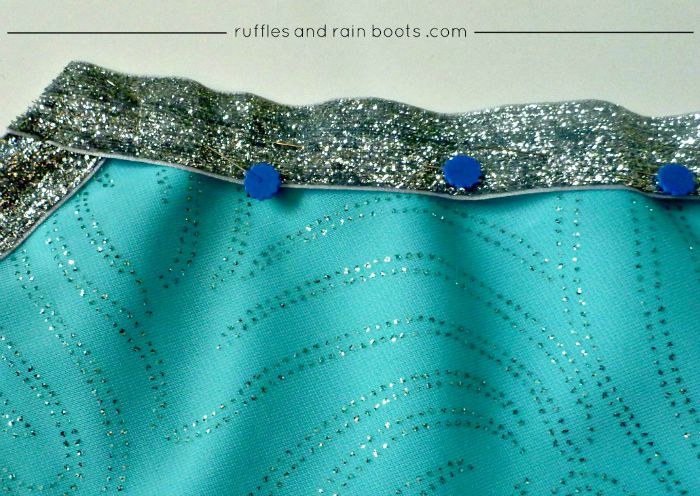
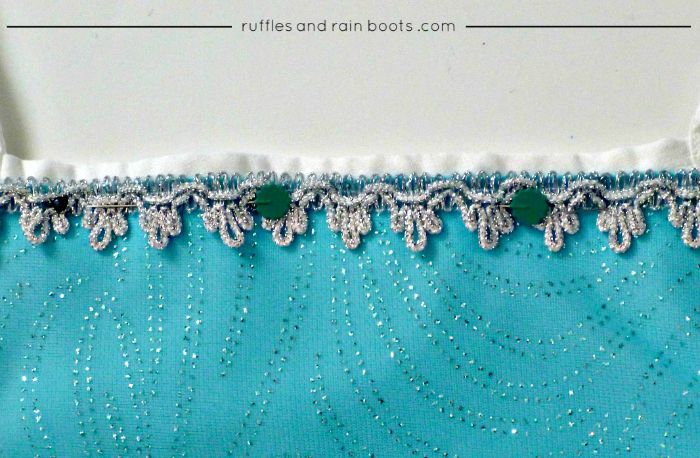
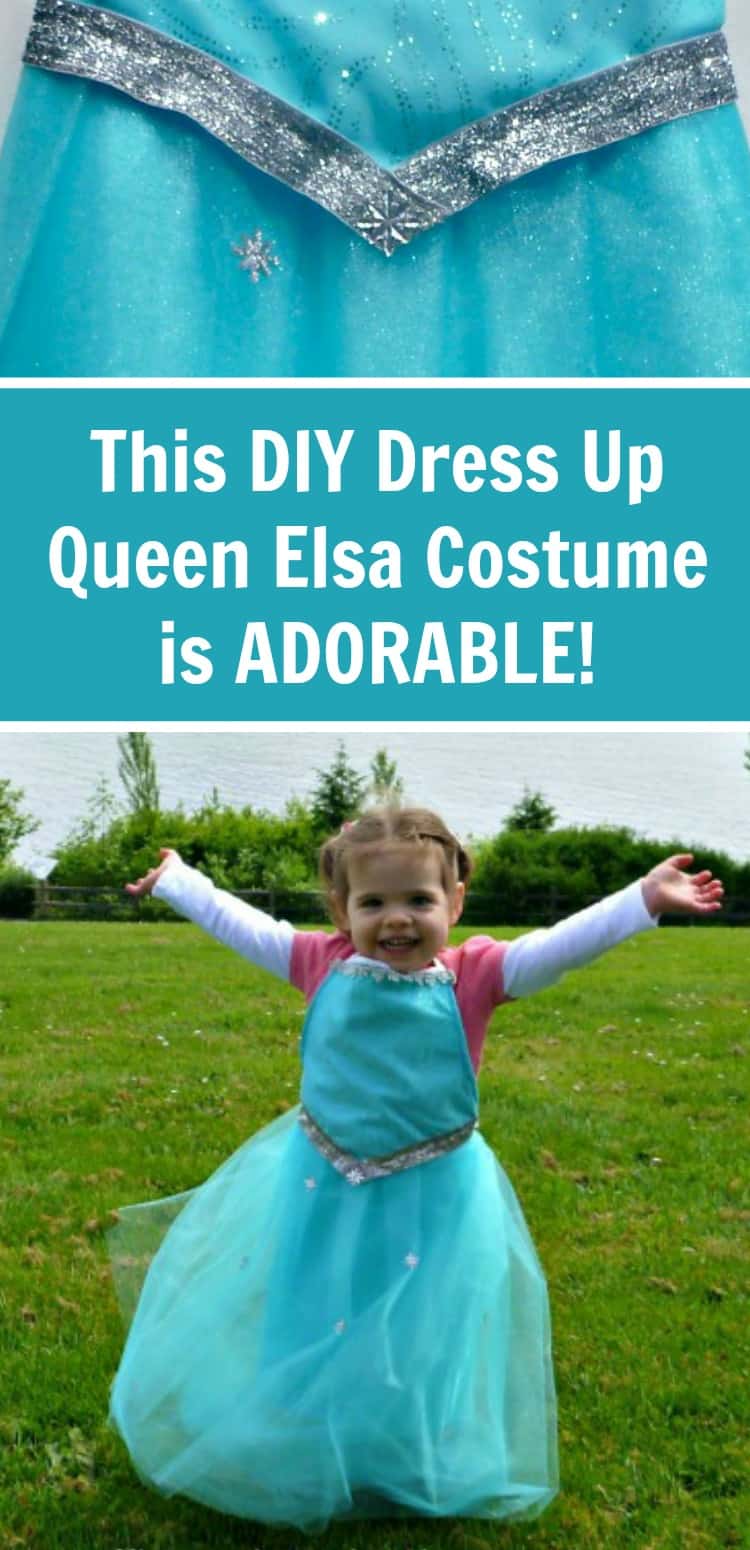
Now, we come back to the bodice. You’ve already sewn the two pieces (satin and glitter overlay) together, so now we’re going to jazz it up a bit. I used a VERY sparkly 1-inch ribbon and just lined the very edge with it.
I did one side, cut, pinned (taking care to fold the ends of the ribbon under to prevent fraying) and sewed it to the bodice. I then cut the other side and overlapped the point of the bodice, to give it a clean edge.
I then lined up the center of the apron with the center of the bodice (the point) and first pinned the points where the ribbon trim at the bottom of the bodice met the apron.
Once the bodice is centered and the bottom points pinned, wrap the edges of the bodice piece around the edges of the apron; just pull it around the edge of the apron and pin it.
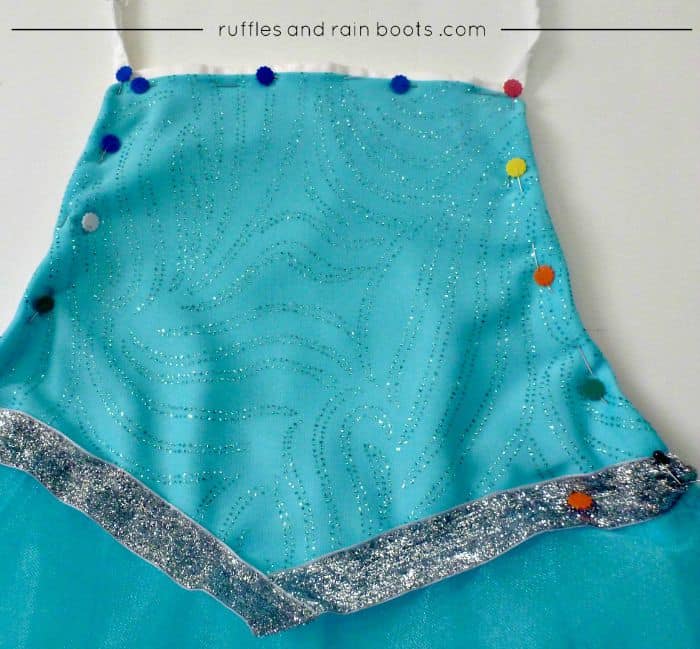
Just a note: While sewing the bodice edges just before where the apron curved, I had to go slow. I had it pinned but also had to tug it a bit so it would lay flat. When I got to the area near the apron strings, I reinforced the stitching quite a few times.
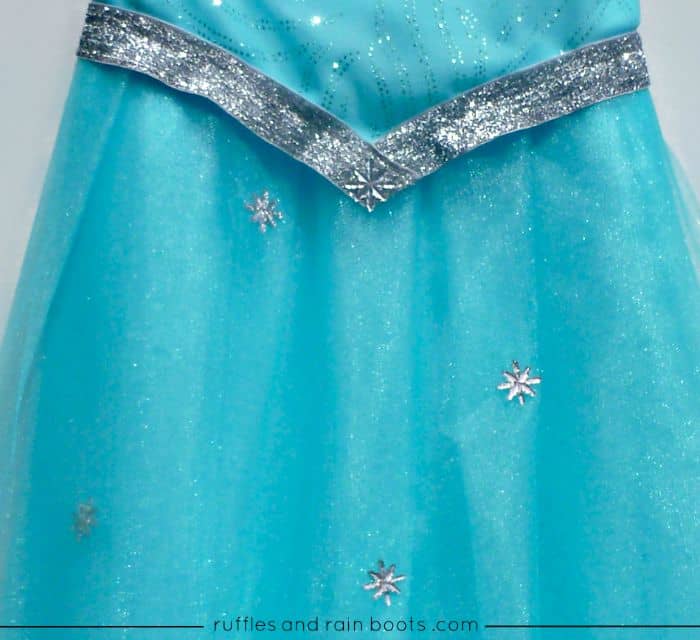
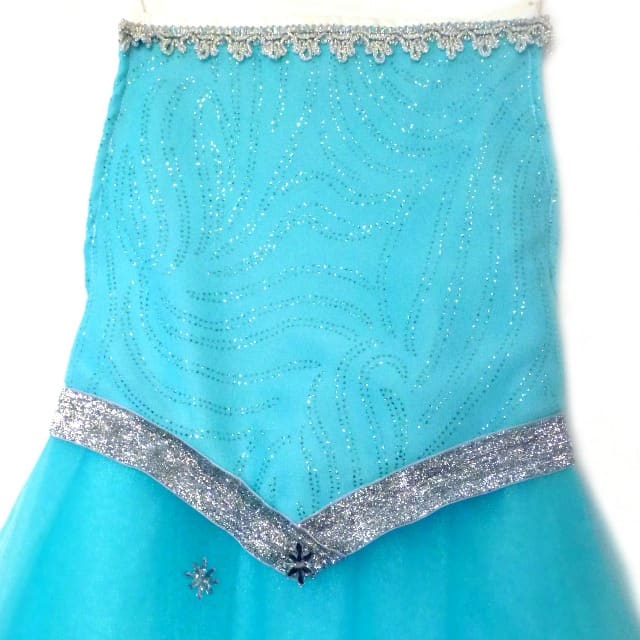
I left the bottom of the bodice (and the bottom point of the “V”) free because I thought it would help to allow freer movement.
Finish
The ribbon trim at the top was pinned and attached and I had a mini celebration.
I took a few snowflake buttons and hand-sewed them to the skirt in various spots (uncer the top layer of tulle so they wouldn’t snag) and to the “V” on the bodice of our Elsa costume.
This FROZEN Queen Elsa Costume will please any fan! For more Disney dress up and costume ideas, visit Ruffles and Rain Boots.FROZEN-Inspired Princess Elsa Dress Up Apron Tutorial
Materials
Instructions
Notes

Melissa, the folding over (double layering) of the tulle is really going to only apply to the kid-sized version. If you want to fold over yards of uncut tulle, I’d have to say that you might get a bit frustrated, as it can get unruly when you are working with a lot of tulle.
When I advised on quantity (8-10 yards for an adult sized version), it was taking that into account.
Sorry I had to reply to you with another thread, but the commenting system is only set up for 5 layers deep. :)
Sarah, I have a few questions. Sorry for the squeaky, high pitch of my voice… I get that way when I’m stressing.
– I’m working on the skirt part and a little confused. Is the tulle measurements 25″ long or 25″ wide.
– The first step of pinning the tulle, is the tulle and satin pleated?
– Or is the tulle pleated and then attached to the satin that way; if that’s the case, won’t there be a lack of fabric to wrap around the waist.
I hope these questions make sense.
Thanks in advance for your help. 16 days and counting. I’m freaking out!
Jennifer, No worries – you sound like me when I’m stressed! :)
One note that I’d like to mention (that others have mentioned on the Anna dress) is that the pattern might not print out exactly as needed for the bodice. Please make sure it fits to wrap around the edges of your apron.
Now to answer your questions:
The width is 25 for the satin, 25 for the tulle (the satin gets hemmed to close the fraying edges, making it 23 inches wide). The satin (on my version) is 16 inches long, but will depend on the height of your child, keeping in mind that it will be hemmed as well. The tulle ended up being 18 on mine because I wanted it to go to the floor for my child, but some people are not taking it to the floor. If you measure from your daughters’ waists (where the apron ties are) to the floor, you will get your length of tulle.
The satin and the tulle do NOT have to be the same length, just close-ish.
Note: you can cut the tulle 23 inches for the bottom layers and just cut the top 2 layers (4 sheets of tulle) longer to allow for the pleats, but I am too lazy to cut each piece of tulle by hand, so everything got cut at 25 inches and trimmed later.
The first step of pinning the tulle: The satin is not pleated but it has already been hemmed at this point. I only pleated the top two layers (4 sheets of tulle), but you can pleat all of them. The problem with pleating all of them was that I was too lazy to figure out where ALL of the pleats needed to be, but feel free to do that.
The cuts of tulle are 25 inches wide and with the pleats, it brings them down to 23 inches to match the width of the satin. Make sense? I started by finding the center of the tulle I would be using to pleat. I worked out from the center making sure that each side mirrored the other with the pleating.
For the ones that weren’t pleated, I just cut them off before sewing the tulle to the satin (it wasn’t exactly removing an inch on each side, because tulle isn’t an “exact” type of fabric, but it’s easy to think of it that way). Again, you could always see the note above and cut the bottom layers of tulle at 23 inches wide and the top few layers at 25 inches.
Let me know if that helps! And don’t freak out, Jennifer. I’m sure they will just LOVE them!
Tone of voice not so high-pitched anymore.
No need to worry about the bodice. The top of my aprons are really tiny. I have almost an inch overlap on each side. Maybe it’s because I skipped the double hemming part and placed both good sides together – double stitched on all three sides and them flipped it right side out?! Regardless… it worked and saved me some time.
I think I understand now. Taking a break to participate in Thanksgiving festivities but if I have any questions, I’ll make sure to give you a shout.
Thanks so much for your prompt response. You’re such a sweetheart.
I mentioned this fabulous tutorial and linked to it in my upcoming Body, Mind, Soul (and Everything Else) post which will be published on Monday :)
Have a great weekend! Hopefully this is the last you hear from me!
xoxo
Have a wonderful Thanksgiving, Canuck! :)
You sewed the bodice piece the “right way” – I just was really intimidated when I first started sewing and thought I’d make it easier on myself! haha
Thank you so much for your mention in your upcoming post, Jennifer. I’ll be sure to share it all over social media.
Enjoy the holiday,
Sarah
I work at a children’s store and these would be perfect for our Halloween dress up. I am 5ft 2 I am going to give these a shot. I am a very very beginner sewer. I love how elaborate these look but they seem like it could be done. Thank you
Good luck, Melissa! If you have any questions, please let me know.
I see your instructions below to help up size the pattern my question is I take my waist to floor and just waist measures for the tulle and times by 5. 5 sheets this measure? Also is that for elsa and Anna? Thanks you in advance
Melissa,
Just because there are different sizes of tulle on bolts, to be clear: I use tulle that is 54 inches wide, so for a single yard of tulle, the measurements are 54 x 36 inches.
Because you and I are both vertically challenged (ie short), we could use the width (54 inches) for the waist and the length per yard (36 inches) for the dress length. For those who are taller, this wouldn’t work so much. So, for me I would probably get 8-10 yards of tulle for the Elsa (remember, you are doubling it over).
As for the tulle amounts for both FROZEN dresses, I used twice the amount of tulle for Anna because she has a much fuller skirt than Elsa, so I would double the amount of tulle.
Oh, I can’t wait to see what yours looks like!!!
Yay thank you so much. Now for another dumb question by double over is that folding it on top of itself. Layers of the tulle?
Love this! I want one for me :) Pinned for my niece or a future baby girl someday!
I’m in love with this apron, but have no concept of how to transfer from measurements to supplies needed. My daughter is 10, and like 5’4. I’m much older than 10, but 5’8″. Can you help me out in sizing up this apron to fit a grown up? Please and thank you.
Kimberly – How wonderful! It sounds like you’re going to have a great time dressing up together.
After now making so many dress up aprons, the best thing I can tell you is this:
1. Buy an apron that fits you and one that fits your daughter.
2. TULLE: Measure from the waist down to the floor and determine your length of tulle and measure your waist to determine the width. Remember, you want the tulle to go around your waist so that it gives the illusion of a dress, so measure to the point that the apron ties. Go to the craft store to see how much tulle that would be (for a single layer) and then multiply that amount times 5.
3. BODICE and SATIN: For the satin and the “special fabric,” you will want to make an outline of the apron bodice (the top down to the waist) on a piece of craft paper or a couple of pieces of copier paper. Check out my other tutorials (mermaid, in particular) to see how I make a “pattern.” Basically, you just trace the outline of the bodice and add an inch or two. Then, take that pattern to the craft store and lay it out on the fabric you like. For the waist piece of satin, your measurement will be the waist (until the ties) by the drop length (from waist to however long you want the dress to be).
I hope that helps, Kimberly. I know that if you go to JoAnn’s, they are really helpful when you have questions about fabric. They will lay it out on the big counter so that you will be able to lay a pattern piece out or eyeball it. Good luck making them and send me pictures! :)
I found aprons! They’re a little on the short side but I figure it should work because it’s just a base for the costume. So I’m going to attempt to make 2 of these for Halloween for my girls (they both adore Elsa… which is unfortunate because it would have been so cute if my youngest dressed up as Anna). Plus my oldest daughter has a Frozen themed birthday party to attend at the end of the month… so I thought she could wear it there too.
Did you ever make the cape tutorial or is that something you just winged?
Wish me good luck! I’m going out to find the fabrics today. I hope I can find what I need… boy would that ever be a disappointment if I didn’t.
Thanks again.
xoxo
Jennifer – Yay!!!! Send me the pics when you complete them and let me know if you think I can make the tutorial any clearer.
As for the Elsa cape, I haven’t made it yet. She gets such a kick out of just the apron that I think I might make the cape a separate piece. It’s cold here during most of the year (and cold by Halloween) and I thought it would make more sense to make it like a cape she could use as a coat instead of a decorative one attached to the apron. Maybe I should add the supplies to my craft store list today. :)
I already have some supplies to make a short Anna cape, so maybe I’ll bang both of those out for Halloween this year. So many sewing projects, so little time. :)